7
\$\begingroup\$

I see a lot of questions about low light, and one of them which stood out to me was How can I improve my exposure in low-light situations?

All my flash pictures tend to turn out great, but my shots in low light without flash are always terrible

  • blurry
  • bad colors
  • under exposed

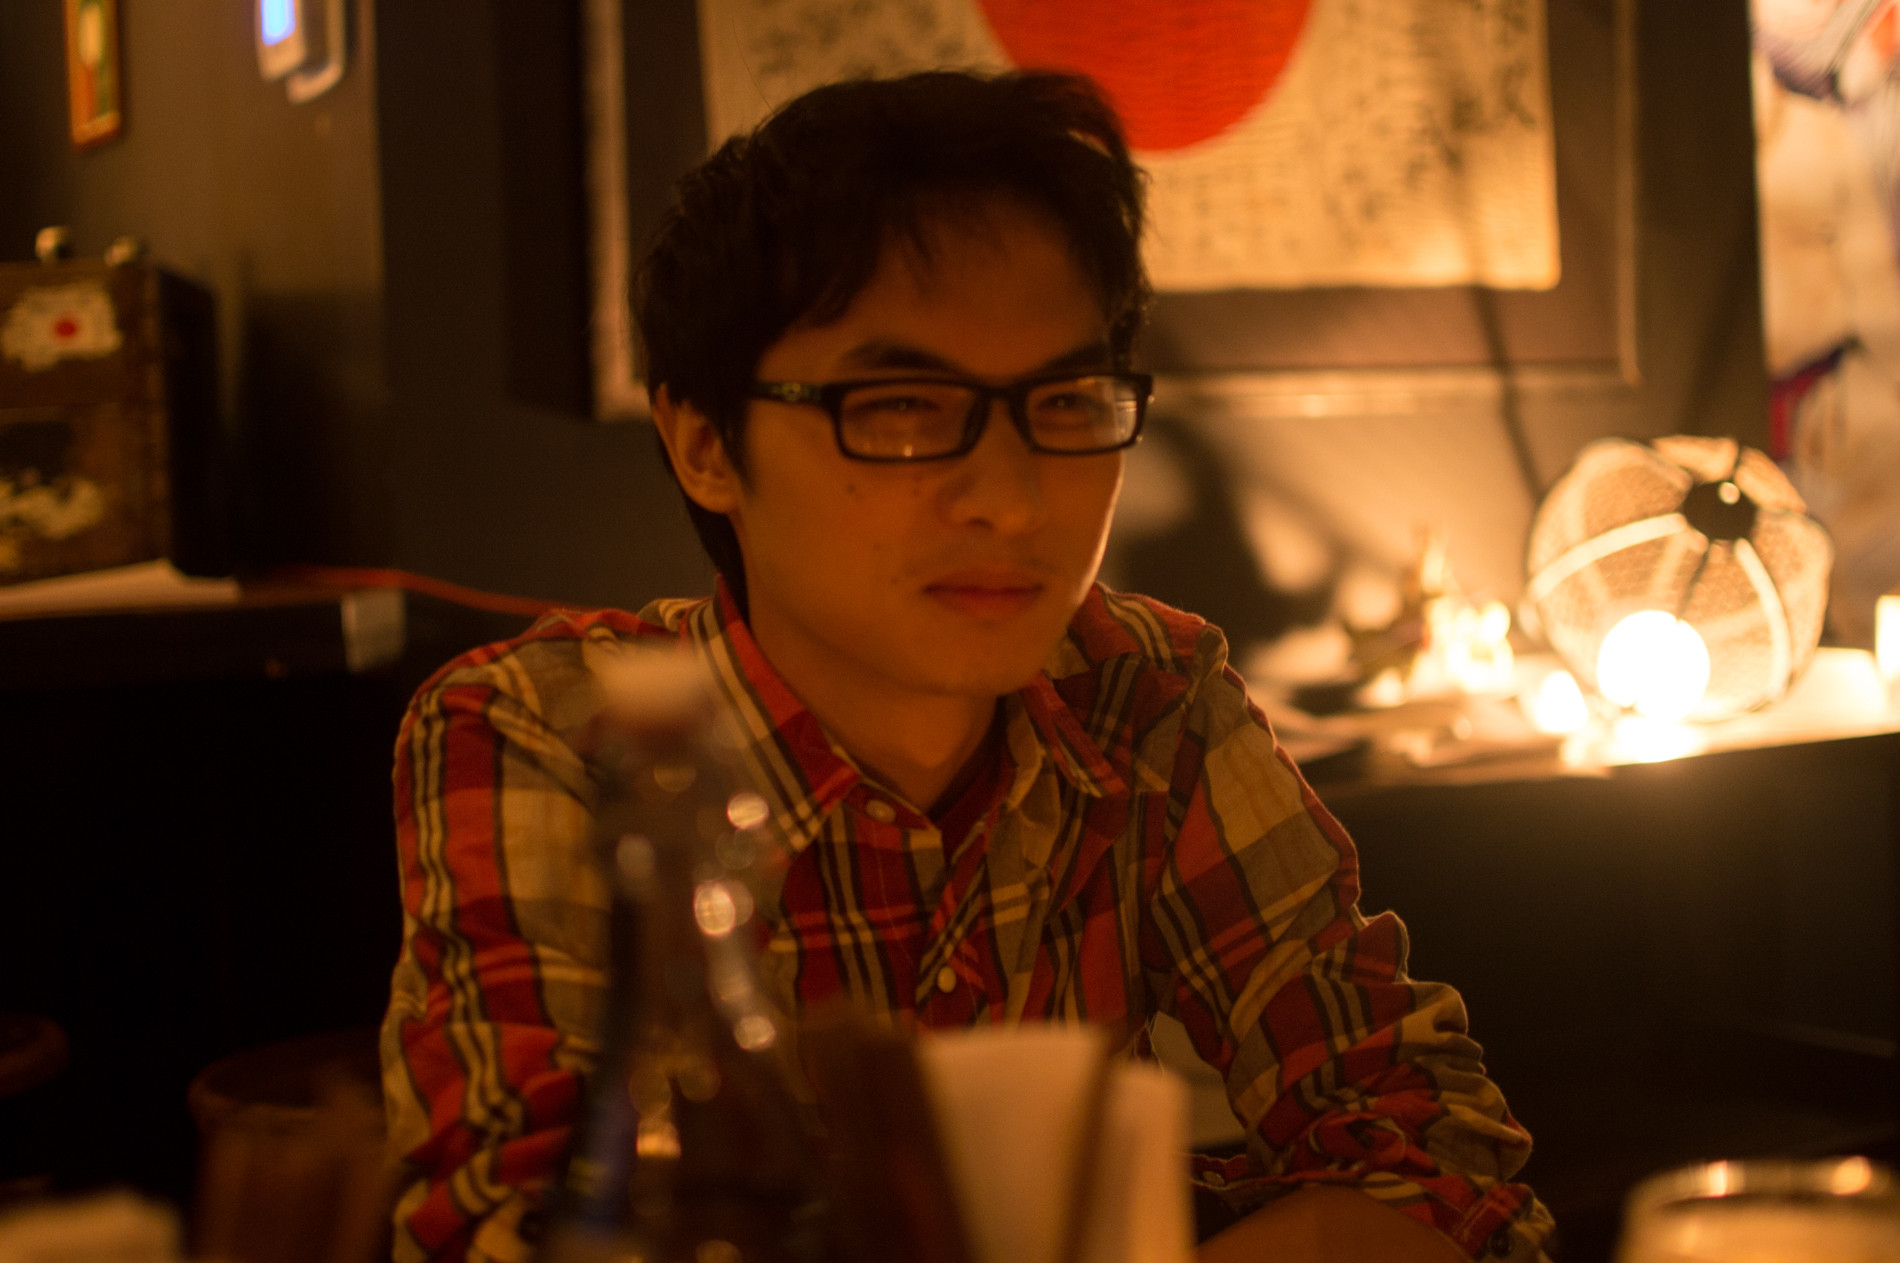
My setup is: Nikon D3200 with a 35mm f/1.8 prime. After reading the above question, it seemed that I should have gotten a good photo, but below is what I got in RAW. Settings: ISO 800, 35mm, f/1.8 1/15sec.

enter image description here

Can someone give me a suggestion of what my settings should have been, perhaps? (Remember that I don't want to use the flash, so I can capture the ambient). It's typically situations or candid portraits like this I would be taking. Also any advice on what quick adjustments I could make if I get a dim result like below? I don't want to ask for the subject to stand still until I get a great shot, so if I get a poor result on my first trial, what settings should I immediately switch to in order to hopefully get my second shot closer to a likeable shot?

Note: getting another body or lens would be a last resort if I run out of options.

\$\endgroup\$
0

9 Answers 9

5
\$\begingroup\$

The contrast in this photo is very high - the light in the background is obviously very bright, but the face is pretty much in shadow.

To get the face lighter by only changing settings in the camera can be done 3 ways:

  1. Bigger aperture (smaller 'f' number): you were already at the biggest your lens can do at f/1.8 and from what I've seen, that's generally considered quite a big aperture, so I wouldn't be rushing out to spend vast sums of money on something even bigger. I wouldn't worry about this one.

  2. Slower shutter speed: you say this was taken at 1/15 sec. You didn't say if it was hand-held or on a tripod. Personally, I would struggle to hold the camera still enough to use anything slower than that hand-held, and even if it was on a tripod, will the subject stay still enough anyway? This might be contributing to why you say these pictures come out a bit blurry. I might even consider going slightly faster, just to reduce the risk of motion blur (either from me moving or the subject).

  3. Increase ISO: yes, higher numbers introduce more noise, but modern cameras are pretty good at controlling it. To be honest, I'd rather have a bit of noise rather than blur and under-exposure. I think given the lighting in this photo, this is the way to go.

If it was me taking that picture, the only thing I'd have done different in the few seconds available, would be to use a higher ISO to brighten everything up a bit. It would over-expose the light in the background, but the face would be better. The other thing you could try is to rearrange things to get a bit more light onto the subject - but I know this isn't always possible on the spur of the moment.

In post-processing, you could try playing with the controls to increase the brightness of the dark areas. I use Photoshop Elements 11 - in their RAW converter (Camera RAW 7.4), the sliders I'd be looking at are Blacks and Shadows, as well as the overall Exposure and Contrast (also worth playing with Whites and Highlights to try to control the light in the background). This is one advantage of shooting RAW - there's more data available to play with afterwards!

One final thought - the flash built into the camera is obviously quite harsh as you know, but it is possible to reduce the power (lookup "Flash Compensation" on page 65 of the manual). This requires a bit of trial and error, but can be useful sometimes. If you have an external flash, they can be either angled at the ceiling for bouncing light onto the subject or can be fitted with a diffuser - both of which will soften the harshness of the flash. And of course, if you're shooting RAW, you can change the white balance back in post-processing to give a warmer feel.
\$\endgroup\$
3
  • \$\begingroup\$ Thanks for your great explanation and its actually this type of explanation that I was looking for. To answer:#2) it was on handheld. I use Lightroom to post-process. Also for shutter speed: would you have suggested (just like the others) after raising the ISO I should have shot at 1/30 or 1/60? \$\endgroup\$
    – azngunit81
    Commented Nov 12, 2014 at 0:34
  • \$\begingroup\$ @azngunit81 There really aren't any fixed rules about it and you don't always have time to analyse and play with settings! Personally, I don't like going much below 1/30, but then my hands aren't the steadiest! I've just been having a closer look at the picture - it seems to me that the sharpest part is the person's left cuff. Because the aperture is so wide, the depth of focus is really shallow which makes picking the focus point important. It's worth setting the focus mode to "Single-point AF" (page 38 of the manual) and focusing on the subject's eyes \$\endgroup\$ Commented Dec 8, 2014 at 1:21
  • \$\begingroup\$ I wasnt looking for "set you must use these settings" but rather: ok this is where i am at...what do i turn up or down to get something respectable. \$\endgroup\$
    – azngunit81
    Commented Dec 8, 2014 at 4:53
5
\$\begingroup\$

Improving the lighting would be the first thing to do. On your shot, the face of the person is practically unlit, as well as the background, resulting in too much contrast with blown whites on the right. The fact that the brightest light is facing the camera creates lens ghosts, which is probably not what you want.

If you're unable to change lighting, then you can still:

  1. Change white balance to make the image less yellowish. Although setting white balance manually would result in the best result, you may use one of the presets of your camera if you need to be quick.

  2. If the image is dark, change the exposure compensation by +0.7/+1.0. Note that in the current case, this will make the image probably worse, because of the whites at the right. Adjusting the blacks and the whites separately in Lightroom or any similar software is another way to improve the image when the lighting is poor.

  3. Increase the ISO up to 1600 or more. While higher ISO will result in more noise, Nikon D3200 is able to produce photos without much noise even with 1600-3200 ISO. Unless you're looking at the photos at 1:1 scale, noise should't be a problem, especially if you use noise reduction afterwards (for example in Lightroom).

\$\endgroup\$
4
\$\begingroup\$

Ignoring the white balance issue which is easily fixed in post, there's a couple of technical things you could look at to improve sharpness:

  • Shutter speed. The general rule of thumb is that you want your shutter speed to be 1/effective focal length. In your case, that would be 35mm * 1.5 ~ 50 and therefore you'd want a shutter speed of 1/50s - but you've used 1/15s, a couple of stops too slow. Do whatever you need to do (increase ISO) to get the shutter speed up.
  • Aperture. While wide apertures are great, they do mean you get very small depth of field. For example, at a focal length of 35mm and a subject distance of 1m, you've got a depth of field of around 5 cm. This means that you need to be very accurate with your focusing - even doing something like focus and recompose can mean you lose your critical focus. This one's a trade-off: if you stop down, you need to either increase ISO or slow your shutter to compensate. Your lens may also be sharper when stopped down a bit from it's maximum aperture.

One thing you don't make clear in your question, but is definitely something you should be thinking about: why did you choose 1/15s, f/1.8 and ISO 800?

\$\endgroup\$
3
  • \$\begingroup\$ It was always said that if I lower my aperture to something lower and raise the ISO I can shoot in low light without flash. So i went straight for my lense f/1.8 and I made the ISO 800..With Flash - I typically shoot at f/5.6 - 1/60 or 1/80 and ISO 400. \$\endgroup\$
    – azngunit81
    Commented Nov 6, 2014 at 11:51
  • \$\begingroup\$ True if you raise the ISO enough. Why did you pick ISO 800? \$\endgroup\$
    – Philip Kendall
    Commented Nov 6, 2014 at 11:52
  • \$\begingroup\$ Random Pick of choice. I could have picked a higher one if I wanted to but noise was a concern so I decided one up than normal shoot and see. Just a reminder as I mentioned, this was during an event so I have to pick and choose my settings ASAP and try not to tell the subject "oh that one wasnt good, let me try these settings." I want to be able to take 3 shots of a standard scene and then adjust my shots base on that then I can move towards the main attraction like the subjects mingling and etc. \$\endgroup\$
    – azngunit81
    Commented Nov 6, 2014 at 11:56
4
\$\begingroup\$
  • Set the shallowest acceptable DOF (this will depend on your distance from subject as @Philip mentions)
  • Set the slowest acceptable shutter speed. Resting the camera, leaning against a wall, or using a monopod or tripod can help lower this speed. The movement of the subject also has an impact of course, but for a portrait type of shot in your example it can be taken at a pretty low shutter speed.
  • Set the ISO to whatever is required to get the proper exposure for those settings. Ignore the noise and deal with it as best you can in post. Noise is a fact of life when shooting in low light. You have to accept it an move on.
\$\endgroup\$
2
  • \$\begingroup\$ I have given my settings for the photo, what you are recommending I dont know what numbers am I suppose to setting it to. Please elaborate using the information I have given. \$\endgroup\$
    – azngunit81
    Commented Nov 6, 2014 at 18:49
  • \$\begingroup\$ Well, I don't know the actual distance you are from your subject, but I will guess that you can probably get the whole head in focus at around f2.8. If you rest both elbows on the table for example, you may be able to keep it steady for your 1/15s, if not 1/30s should be doable. If you are holding freehand, I would be shooting at 1/60th as a min, but this is very dependent on how steady your hands are. As for ISO, set it to auto, or simply use your camera's metering to determine when it is high enough. \$\endgroup\$
    – Robin
    Commented Nov 7, 2014 at 20:29
1
\$\begingroup\$

You might want to try and use the spot meter setting instead of the average. In the picture you posted there is a bright object on the right side that is throwing off the rest of the picture.

\$\endgroup\$
1
\$\begingroup\$

A few things I would consider are:

How close to the original exposure is the photo and what determined the 3 main factors: shutter speed, aperture and iso? If you shoot in manual mode you will have chosen these settings yourself (if you set these yourself I would suggest increasing the iso to at least 3200 and your shutter speed to about 1/30th (tell the subject not to move much or shoot at iso 6400 and put shutter speed to 1/60th if subject isn't quite still). I'm assuming you didn't shoot in manual and you have shot in either aperture priority, shutter priority or program mode or indeed another automatic mode. At which point the camera tries to do it's best based and set these settings according to the cameras metering mode you have chosen.

My guess is that you have not spot metered on the subjects face and the bright light in the background has caused the metering system (either centre-weighted or matrix metering) to underexpose the rest of the photo.

Solution: either apply exposure compensation, probably between +1 or +2 stops or change the metering mode to spot metering and when the focus point focuses and meters the subject it should force the camera to shoot at the correct exposure. I would also check to make sure your exposure compensation isn't set below 0. Also make sure your iso isn't fixed at 800 otherwise the metering system will not be able to gain a correct exposure without lowering the shutter speed to a level that's not suitable for handheld portraiture. Sorry I've just typed this up quickly, if anything doesn't make sense my main advice would be learn about the metering system on your camera and double check if your camera has an auto-iso feature as this would help your cameras metering system in these lower light situations. thanks

\$\endgroup\$
3
  • \$\begingroup\$ I was shooting in manual, and I picked those settings on the fly under certain things that I read in the lines for low light no flash settings: lower the f (i normally shoot at f/5.6 for flash) and raise the ISO (i shoot at 400 for flash) WB is on auto. The Metering is on Matrix. \$\endgroup\$
    – azngunit81
    Commented Nov 6, 2014 at 14:55
  • 1
    \$\begingroup\$ With matrix metering the camera is just trying to find the best balance between lights and darks for the whole photo. There is a really bright light in this photo and the camera thinks the light is as important as the person and adjusts the exposure indicator accordingly. If I shoot a scene in matrix metering mode and there are darker or lighter areas than the subject, I know through experience that this will affect the subjects exposure and will adjust the exposure compensation accordingly. Alternatively, you can shoot in spot metering and the subject will be closer to the correct exposure. \$\endgroup\$
    – Warren
    Commented Nov 6, 2014 at 15:51
  • \$\begingroup\$ I agree with brighening the face in post, while otherwise adjusting the lookmof the room. But you have noise there, and maybe the exposure is lower than it could be because of the bright lamp. If you expose for the main subject and overexpose the lamp, the you can fix the lamp from a low-bracketed shot. Or crop, and avoid doing that going forward. \$\endgroup\$
    – JDługosz
    Commented Nov 7, 2014 at 8:22
0
\$\begingroup\$

With RAW, you don't worry about the white balance when shooting. The ISO is misunderstood and overused with RAW: if the image is too dark, turning up the ISO is no different than fixing it in Lightroom (but explainaions I've read don't consider quantization of the A-to-D step). However, the extended range or whatever that brand calls it can help if the hostogram shows that it's being cut off on the left.

Youn can shoot bursts to get a "lucky shot" among them re camera shake and subject blinking. If you do get the histogram cut off one end or the other and it varies by shot, use auto exposure braketing along with the burst. If not needed, that is the entire histgram is present in different positions on each version, that's harmless and you can still use them to choose among blur and pose.

The go-to control to know is "program shift". Given the chosen exposure value, choose to change the shutter speed / f-stop combination keeping the product the same. Experimentbto see ifbthat affects the auto-ISO setting, too. If so, you can request faster shot with the aperture already maxed out means increase the gain at the expense of noise.

Experiment by yourself in the same lighting to get a good feel for the controls and abilities. Then you can ask very specific questions on details you discover. :)

\$\endgroup\$
5
  • 1
    \$\begingroup\$ "turning up the ISO is no different than fixing it in Lightroom". While this is partially true, it's definitely an oversimplification and depends a lot on the sensor. See this answer for more details. \$\endgroup\$
    – Philip Kendall
    Commented Nov 6, 2014 at 8:39
  • \$\begingroup\$ Yea, I have an A posted on that Q that goes into more detail on that point. \$\endgroup\$
    – JDługosz
    Commented Nov 6, 2014 at 8:44
  • \$\begingroup\$ "The ISO is misunderstood and overused with RAW: if the image is too dark, turning up the ISO is no different than fixing it in Lightroom " ... absolutely false, otherwise ETTR would not be a thing. \$\endgroup\$
    – Jim Bolla
    Commented Nov 6, 2014 at 21:54
  • \$\begingroup\$ @JimBolla "ETTR is irrelevant in the sensor limited high ISO region in Figure 2. In that high ISO region, one is "light limited" and ETTR is irrelevant." at clarkvision.com/articles/iso/index.html As I wrote elsewhere, he doesn't consider quantization of the A/D but that might not be an issue since the photon count is a small number not an analog measurement. \$\endgroup\$
    – JDługosz
    Commented Nov 7, 2014 at 8:13
  • \$\begingroup\$ The ISO at which the noise generated by the sensor overpowers the noise-reduction gained by ETTR is camera-dependent. One would have to set up a series of controlled shots at various ISOs and exposure levels (keeping subject, aperture, and exposure time constant) and then compare the results. \$\endgroup\$
    – Jim Bolla
    Commented Nov 7, 2014 at 15:55
0
\$\begingroup\$

Raising the ISO, opening the diaphragm, and increasing the shutter speed are the only ways to go, as said above. But be careful with the aperture and the shutter speed: your bright objects will be burnt.

Typically, for the picture above, I would have shot it that way, and then post-processing it.

On the pictures you take, you should have a look quickly at the curves (you can probably do it on your SLR): it shouldn't have any pic on the left nor on the right sides (no burnt and not black spots). Then, you know you can post-process it.

\$\endgroup\$
3
  • \$\begingroup\$ Hi few questions: what is diaphragm? (first time someone mentioned this)2) where would I find this curve? I dont use the lcd, I actually shoot with the viewfinder. Do you recommend me to turn on the LCD and look more into what is being shown? \$\endgroup\$
    – azngunit81
    Commented Nov 6, 2014 at 15:27
  • \$\begingroup\$ Old skool term for the aperture. In low light I don't recommend using the LCD. It is so bright that it stops down your eyes and then you can't understand your preview. NEVER use the LCD at night. Sometimes use it inside. The "curves" he's talking about are the in-camera histogram. \$\endgroup\$
    – Jasmine
    Commented Nov 6, 2014 at 17:55
  • \$\begingroup\$ Yep. Don't use the LCD for shooting. You check your pics after shooting . and there you display the curves, yes, the histograms \$\endgroup\$
    – Lucile
    Commented Nov 7, 2014 at 15:25
0
\$\begingroup\$

Lets assume in the next scenario you are shooting wide open at the slowest feasible shutter speed. Take home message don't be afraid to use a high ISO in this situation.

Prepare a couple more things before composing the photo.

  1. Set up a spot meter rather than average meter. This will mean that any intense lights or extreme darks don't skew the EV reading. You can accurately set up your ISO this way (or use auto ISO to allocate more time for composition if you have a NEED FOR SPEED).

  2. Make sure your ISO is programmed to an easily reachable button or wheel and allow your camera to go right up to the upper ISO limit which is often not permitted by default. If you take a shot that is under exposed you need to be able to quickly alter your ISO since you can't open the aperture more and you can't risk motion blur. Modern DSLRs are able to push up comfortably to very high ISO and grain can be compensated for with noise reducing post processing.

  3. Last resort before a new lens. Lets face it, f1.8 is a quick lens; ideal for low light. You need to accept that a highly diffused flash is now the only portable way to get more light onto your sensor whilst keeping an ambient feel to the photo.

\$\endgroup\$

Your Answer

By clicking “Post Your Answer”, you agree to our terms of service and acknowledge you have read our privacy policy.

Not the answer you're looking for? Browse other questions tagged or ask your own question.