29
\$\begingroup\$

I have got an old lens (f1.4) that I have to use only with manual focus on a DSLR. Well, it is difficult for me to get the subject on focus. Although on focus according to the viewfinder, the actual picture is blurred or the focus is slightly elsewhere. I usually reduce the aperture to avoid this. Do you have any suggestions?

Added: I'm using a Pentax K10D.

\$\endgroup\$
3
  • 1
    \$\begingroup\$ Definitely, the focus indicators help, however when DOF is narrow and objects are small, such suggestions are not very precise. \$\endgroup\$
    – emit
    Commented Aug 11, 2010 at 3:21
  • 2
    \$\begingroup\$ As mentioned in above link, try adjusting dioptric adjustment knob. And in Canon rebel t3 focus indicator will glow constantly, if this is blinking its not in focus, if you have any such indicators it will also come in handy. \$\endgroup\$
    – GoodSp33d
    Commented Aug 31, 2012 at 15:17
  • \$\begingroup\$ +1 for dioptric adjustment. I was about to return my first manual only lens and I figured after reading your post that dioptric adjustment in my camera was off by one notch. And that made so much difference in my ability to focus properly that I decided to keep the lens. \$\endgroup\$
    – Regmi
    Commented Feb 16, 2013 at 5:46

13 Answers 13

19
\$\begingroup\$

Check if your viewfinder has a dioptric adjustment knob - this is a little adjustment on the viewfinder that allows you to adjust for your eyes. It might be set for someone short sighted.

If it is there then make sure the in-viewfinder display is visible, and adjust so that the display is sharp. Then try focusing on other things.

You could also see if there are alternative focusing screens available for your camera. I replaced the focusing screen in my Canon 40D and it made a big difference in manual focusing. The higher end cameras generally have official alternative focusing screens available, but you could also go to http://www.focusingscreen.com/ or http://www.katzeyeoptics.com/ and see what they have to offer.

You should also be aware that some alternative focusing screens are intended for fast lenses - say f/2.8 or faster.

\$\endgroup\$
2
  • 2
    \$\begingroup\$ +1 for mentioning the dioptric adjustment. I'd been wondering why I was having trouble focusing manually, and now I feel like an idiot... :-) \$\endgroup\$ Commented Aug 13, 2010 at 15:52
  • \$\begingroup\$ An improperly adjusted dioptric knob can never make the image in the viewfinder look more focused than the image projected on the viewscreen, only more blurry. If the view in the viewfinder is sharper than the image captured by the sensor (as is stated in the question), it is due to the optical image path (via the mirror) being slightly longer or shorter from the lens to the viewscreen (when the mirror is down during focusing) than the optical image path from the lens to the sensor (when the mirror is up during image capture). \$\endgroup\$
    – Michael C
    Commented Mar 3, 2016 at 10:54
16
\$\begingroup\$

You'll have a hard time focussing a wide aperture lens wide open without a live preview with magnifying option. Here's why:

  • Your viewfinder has a fixed depth of field that you perceive when viewing through it. It's the matte screen that poses a limit. In general, it's close to F/2.8 in terms of the depth-of-field that you see here, so if you use a wider aperture with a more limited depth-of-field, there's simply no way of seeing wether it's in focus, no matter how good your eyes are. You can get a special matte screens for some camera's, but they tend to darken the image in the viewfinder.
  • Your AF sensor can only check for focus to a limited degree. This is also a technical limitation not by the AF sensor itself but by the aperture that forms between the mirror and the the AF sensor. You can use a wider aperture for lens, but the AF sensor won't see this larger aperture and can therefore only focus to what it can see. Usually the center AF point in most camera's is more sensitive than the others, because it lies at the center of the aperture and has less light fall-off, but even in professional camera's it doesn't do much better than F/2.8, so even if your AF system confirms your focus, it's only confirmed to what it can focus to.

Without live-view-with-magnification, your best best is to take a shot, check it, take one again, check it, or live with the limitations of your system that even though you might need the light (for low-light photography) the focus may not be as accurate.

\$\endgroup\$
3
  • \$\begingroup\$ I think this is the best explanation to what happens with my gear. Do camera specs provide the value of the fixed depth-of-field? I haven't found on the specs of Pentax K10D. \$\endgroup\$
    – emit
    Commented Aug 13, 2010 at 2:46
  • 1
    \$\begingroup\$ Canon does. They specify for their AF sensors whether they are cross-type or not, and at what aperature the cross effectively becomes used. They also state the maximum aperture value that a lens wide open can be used. The SIGMA 50-500 "BIGMA", for example, has a maximum aperture of F/6.3 at the long end, but it has to lie to Canon camera's that it's effectively F/5.6 so that the camera won't refuse to autofocus as all but the 1D series cameras can autofocus up to F/5.6 with the center focus point. \$\endgroup\$ Commented Aug 13, 2010 at 7:35
  • \$\begingroup\$ This discussion, though technical, gives a rather good insight in how phase-detection autofocus works: photography-on-the.net/forum/showthread.php?t=829772 \$\endgroup\$ Commented Aug 13, 2010 at 7:44
10
\$\begingroup\$

I propose some tricks that can be used with lenses that have mechanical coupling with the focus ring (Anything in this answer does not apply to focus by wire lenses like Zuiko Digital lenses that require power from camera body to focus):

Rock the Focus

  • Step 1: I Just try to focus quickly as best as possible, then, re locate fingers on the focusing ring trying to adopt a "neutral feeling"
  • Step 2: Intentionally move the ring out of focus until I clearly see that I am out of focus, noting how much I've moved my fingers but without loosing my point of contact with the ring (this is very important, do not release the focus ring).
  • Step 3: repeat step 2 but in the other direction, always without releasing the ring at any moment. Note how much you move your fingers. Also try to achieve the same amount of "out of focus" that you observed in step 2.
  • Step 4: The true focused point will be aproximately the "average" of the two out of focus points you calculated in steps 2 and 3. Move the focus ring back and forth a shorter distance every time, trying to math the "defocus amount" at each extreme until you find the average (think of a marble ball in a concave surface, rolling free until finding rest right in the middle or lower point).

All this should be done without releasing the focusing ring at any moment, the keystone of the "method" is that you have to be aware of the amount of displacement of the focusing ring at all times, and learn to feel it with your fingers. (This assumes you are holding the camera by resting its weight on the palm of the hand, so you are not moving the hand relative to the camera, only the fingers). You don't need to iterate too many times, four to six movements should be enough.

Zoom Scales

Another alternative is to use focusing scales. This is a feature that almost all old (manual) lenses had. It was markings on the lens barrel that allowed to know what distance the lens was focusing. You can create a focusing scale for your lens in an easy DIY way:

First note if the focus ring moves against a fixed part of the lens barrel. Place a small sticker and draw a line on it it along the lens axis. Now measure how much the mark "travels" around the barrel. Now adhere to the barrel a stiker that covers the full travel of the mark (Im thinking of those long and narrow labeling stickers to apply in CD case spines, but any nice, suitable autoadhesive paper cut to fit will do). Now affix the camera to a tripod, aim it horizontally (not tilted up nor down) and select an object you can place in front of camera at various distances. A chair, another tripod, a tall lamp, etc. Now place the object at various measured distances: 1, 2, 3, 5, 10 meters or 3, 6, 9, 15, 18 feet. For every distance Use autofocus so the lens focuses on its central focusing point, and mark the barrel sticker at the point that it coincides with the marking on focusing ring, label the focusing distance. Now you have a lens with focusing scale.

Next time you have to focus on a difficult situation, like a low contrast scene/object, low light, though glass, etc. given that you can measure or estimate the distance, you can pre select it using your lens' scale. If you practice, you'll get good a guessing distances...

This method (of creating your own focusing scale) works best on fixed focal length lenses, but some zoom lenses are suitable for the operation, however, some zoom lenses focus at a different ring position at different focal length at the same distance, making the scaling a lot more complicated (but not impossible).

Focus Bracketing(sort of)

This works best with static scenes and with camera on a tripod.

  • Step 1: Compose and quickly focus as best as possible, then move the focus ring in one direction until slightly out of focus.
  • Step 2: Take a shot, and move the ring a little in the oposite direction you did in step 1.
  • Step 3: Repeat until you notice you have it out of focus again.
  • Step 4: Review (posibly later, on a computer) your shots at 100% zoom to select the correctly focused one.

An alternative to this, while shooting static subjetcs but without a tripod is: As usual, quickly focus, as best as posible, lean back, shot, "un-lean" a little, shot, repeat until you are in fact leaned forward. All of these without changing focal length nor moving the focus ring. Review and select the one with the correct focus. (This last one is the only one that may work on focus by wire lenses, assuming you can turn off autofocus)

\$\endgroup\$
2
  • \$\begingroup\$ Nice ideas here.. \$\endgroup\$ Commented Aug 31, 2012 at 16:49
  • 1
    \$\begingroup\$ It should be noted that if the lens is an AF lens and has a Manual Focus mode but Full-Time Manual focus in AF mode, setting it to manual focus makes rocking easier to do, as it releases the AF motor allowing the focus ring to move more freely and smoothly. \$\endgroup\$
    – jrista
    Commented Aug 31, 2012 at 18:00
7
\$\begingroup\$

this sounds very old-fashioned, but the only way I know of to get good at manual focus is practice. Lots of it. It takes time and work.

You can use your AF to help you understand what your camera thinks is focus for "easy" images and then learn to match that using manual focus. Keep doing it until you're comfortable doing it and you understand your gear and how to quickly get the focus you're looking for.

There aren't many shortcuts here. you have to put in the time to learn the skill. AF can help you get there, but ultimately, you need to put in the hours.

\$\endgroup\$
6
\$\begingroup\$

For example my Canon EOS 450D has such function for manual focus: when you press the trigger button like you do when using auto-focus(a very lite touch) and start to adjust your lenses to find the right focus - the body beeps when processor thinks that the subject is in focus. So by that "beep" sound i can definitely say that i have found at least almost right focus.

\$\endgroup\$
1
  • \$\begingroup\$ Sure, but the problem persists with small objects. \$\endgroup\$
    – emit
    Commented Aug 13, 2010 at 2:42
6
\$\begingroup\$

While I realise not all DSLRs have it (the K10D unfortunately being one of these), I've found magnified Live View to be very useful for manual focus when the other assists fail or aren't suitable. In fact, I've found this to be the main reason I use Live View on my camera.

\$\endgroup\$
1
  • \$\begingroup\$ This is especially helpful for macro shots where the DOF is so narrow and thus getting the focus right is critical. \$\endgroup\$ Commented Aug 10, 2010 at 22:43
6
\$\begingroup\$

Newer Autofocus (D)SLRs have poor focusing screens which show everything in focus at once, instead of showing nothing in focus when it's out of focus. These old focusing screens made focusing manually not only possible, but easy. The advantage of the newer, but less useful screens is that the image is brighter edge-to-edge and there wasn't an obstruction blocking the field of view. This is OK, because AF is the primary focusing method.

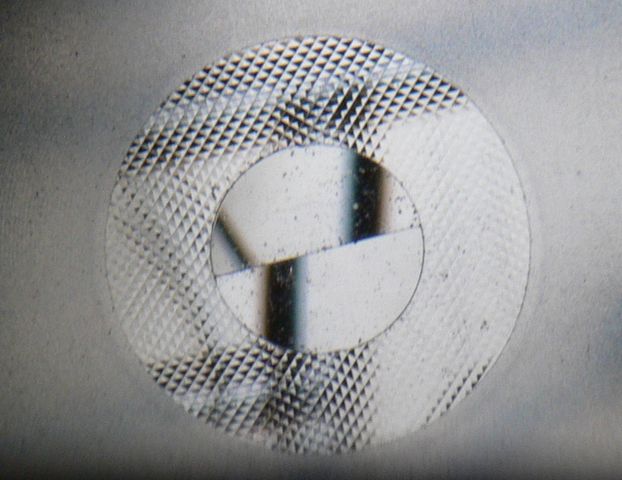
Depending on your camera, you can replace the focusing screen with a screen that has a split-prism. Katz-eye offers better focusing screens for many DSLRs.

Here is an example of a split-prism screen (sourced from this article at EpicEdits -please read it, it's a good article): enter image description here

\$\endgroup\$
3
\$\begingroup\$

The problem is that new lenses and cameras are not really designed for this purpose. In the pre-autofocus era, what photographer was able to see in viewfinder was somehow helpful for the focus. For example this:

enter image description here

In case of accurate focus, those two vertical lines would meet at horizontal line. But these days, you can almost never see something like this in a viewfinder!

What I personally do for manual focus (if not using the live-view), is to pay attention to the lines and global contrast. A good example is focusing on a light source. If you are out of focus, you will have a glow around that light source. Change your focus until you minimize the glow. Lines also could be useful but something better is a surface with a preferably small pattern/texture. If there is a tiny pattern you should be able to see this pattern only on focus. An example in street photography would be trying to focus on the asphalt. Consider that many cameras use the contrast detection method and what I suggested above, is more or less, the same as how your camera autofocus.

\$\endgroup\$
1
\$\begingroup\$

If you are using higher end Nikon bodies, you can use the built in electronic rangefinder for focusing assist. This function is only available in 'A' (aperture priority) mode.

\$\endgroup\$
2
  • \$\begingroup\$ I'm using a Pentax K10D. I've just noticed that the focus indicator is going to help :-) \$\endgroup\$
    – emit
    Commented Aug 10, 2010 at 8:03
  • 1
    \$\begingroup\$ Note that the K10D also has focus-trap mode: if you set the body to auto-focus with a manual lens, the shutter won't trigger until something in the center circle is in focus. \$\endgroup\$ Commented Aug 10, 2010 at 21:34
1
\$\begingroup\$

The camera will confirm focus, even with a manual lens, I use manual lenses on my K20 all the time. One trick, you might want to experiment with, is the 'catch in focus' feature on your camera, it's basically a way for Pentax to do autofocus with a manual lens. To do this, on the K10:

  1. Set the autofocus level on the camera to AF-S
  2. Focus slightly behind or in front of the subject, keeping it blurry
  3. Press the shutter release fully
  4. Manually adjust focus until the subject becomes clear, the camera will trip the shutter when focus is acquired (you'll see the focus hex and hear the beep).

The K20 has a menu option to turn this on or off, but I don't think the K10 has that. Anyways, it only works with manual focus lenses.

\$\endgroup\$
1
\$\begingroup\$

I think the dioptric adjustment that Hamish mentions should be your first step. If this gets improperly set, you'll have lots of issues.

However, one technique that I've used, particularly for macro lenses is to get the focus close on the lens, and then move the entire camera closer or further from the subject to do the fine tuning rather than trying to get the focus ring perfect. Pull the camera back a until you just notice it going out of focus, then move closer until you see it going out of focus on the other end of the range, and your target should be somewhere in the middle.

If you notice that the lens is out of focus with the dioptric adjustment at it's limit, you can use this technique to move the camera slightly closer or further depending on which direction you tend to be out of focus with much more control than trying to manually adjust the focus ring and remember which direction and how far to adjust.

\$\endgroup\$
0
\$\begingroup\$

This thread on another forum might be of interest to you. One poster suggests a particular method of training oneself to quickly obtain sharp manual focus. Though I haven't tried it, it does sound interesting.

\$\endgroup\$
1
  • 2
    \$\begingroup\$ Can you summarize the thread? Photo.net is pretty stable, but forum links are notoriously fragile. \$\endgroup\$
    – mattdm
    Commented Mar 18, 2011 at 15:58
0
\$\begingroup\$

If your having trouble focusing, and you are sure your gear is properly calibrated, you might try using a focusing screen. Here is an example of how they work, and a comparison of a variety of focusing screens:

http://www.focusingscreen.com/privacy.php

I recently learned about these, and have ordered one for myself, as I also have trouble focusing with the tiny view screen of my DSLR.

\$\endgroup\$
4
  • \$\begingroup\$ After looking at those for about 5 minutes, I don't know what I am looking at. :/ could you explain a bit? \$\endgroup\$
    – BBischof
    Commented Aug 13, 2010 at 14:53
  • \$\begingroup\$ I was also trying to find out what focusing screens are and how they can be helpful in my case. Do they fit into the viewfinder? Do you need live view? Do they just make things easier or improve somehow the limit of the viewfinder (having a fixed DOF)? \$\endgroup\$
    – emit
    Commented Aug 13, 2010 at 15:24
  • \$\begingroup\$ A focusing screen is used through the optical viewfinder. They are designed to take advantage of the refractive properties of glass to make it easier to see where you've focused. Usually, the center of the focusing screen is a small prismatic grid or a split screen that makes it very clear when something is out of focus. If you click the link I posted, and scroll down, there are lots of visual examples. \$\endgroup\$
    – jrista
    Commented Aug 13, 2010 at 21:55
  • 1
    \$\begingroup\$ Keep in mind that all dSLRs have a focusing screen already. This answer is talking about a specific kind of focusing screen designed for manual focus. Higher-end SLRs will directly support swapable screens, and can generally be done as a DIY project even for SLRs which don't. \$\endgroup\$
    – mattdm
    Commented Mar 18, 2011 at 15:57

Your Answer

By clicking “Post Your Answer”, you agree to our terms of service and acknowledge you have read our privacy policy.

Not the answer you're looking for? Browse other questions tagged or ask your own question.