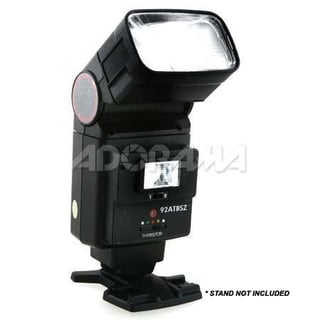
Sure. Strap yourself in for a moment; this may take a while (and you may have to read it through a couple of times before you get it).
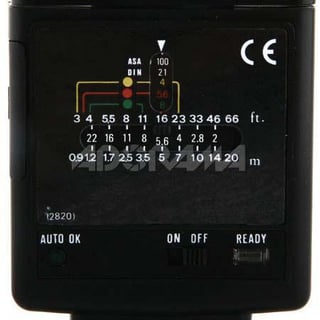
Apart from the On/Off switch and the lights, the stuff on the back of the flash doesn't actually do anything. It's just a sort of calculator to help you decide how to set your camera and where to put the "slider" on the front of the flash. You change the film speed setting, and the coloured numbers in the window change to tell you what f-stops the three auto settings will correspond to (and the coloured lines pointing to the range scale will tell you how far your subject can be from the flash). The f-stop numbers in the middle row of the range scale will also change, telling you what f-stop corresponds to what distance when the flash is used "manually".
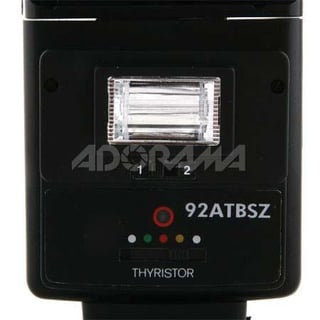
This flash actually works only in "auto" mode. The little sensor above the "slider" on the front of the flash reads the light reflected back from the subject (it's a center-weighted reading) and shuts off the flash (using a thyristor, which is essentially a high-voltage electrically-controlled switch) when enough light has been received. The "slider" is actually a five-position thing. There are three positions with holes for the light to get through to the sensor (the green, red, and amber settings), and two without holes (the light grey/white settings).
Since no light hits the sensor when the switch is set to the white/light grey dot at either end of the scale, the flash will be at full-power "manual mode". The only way to affect the power output is to use gels or light modifiers on the flash; there is no way to set the flash to a lower power output. You usually won't get an "OK" signal on the flash when you use it in manual mode, because it works by defeating the auto sensor system.
The other three settings allow light to hit the sensor, so the flash can control its own power output—provided that the sensor is pointed at your subject. The amber/yellow setting should be a large hole. The red and green setting will either use smaller holes or a bit of (cheap) neutral density filter (different auto flashes use different methods to do the same thing). Either way, they restrict the amount of light hitting the sensor, which simulates the effect of using a smaller aperture on the camera. The red setting lets in half the amount of light that the yellow does, and the green lets in half the amount of light that the red lets in.
So... to use the flash in auto mode, select your film speed or camera ISO setting. You will be given three apertures that you can use, and can see on the scale how far the flash will reach at each of those apertures. (The scale tells you the distance when the flash is used directly, so if you plan to bounce it or use a diffuser, you'll have to keep in mind that the maximum distance will be quite a bit less than what's shown on the calculator.) Remember that the distance is from the flash to the subject, not from the camera to the subject. Set your camera to the corresponding aperture, and make sure that the shutter is set to its x-sync speed or slower (there's no high-speed sync with these things). Make sure that the flash sensor is pointing at the thing you want to light. Shoot, then make sure that the Auto OK light comes on (or flashes, depending on how this flash works). You can adjust the exposure you get by adjusting the aperture on your camera.
Manual mode is a matter of setting the slider to one of the white settings, then letting the flash do what it do. You can adjust exposure by changing the aperture on your lens, or by modifying the light coming from the flash (by bouncing it, using gels, firing through diffusers, etc.).
There is just one more thing with this flash, and that's the little fill flash head below the main head. It's an on/off thing, and it diverts a small amount of the power from the main head to the little flash. That's used mainly for fill light when you're using the flash on-camera and bouncing the main light from a wall or ceiling (which can otherwise cause deep shadows). It also adds a small catchlight to the subjects' eyes.


