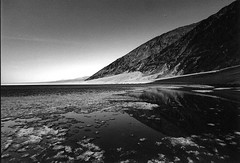
Your printer appears to have done quite a bit of burning in of the sky area (and of the closer of the two rock faces, as well as some general vignetting). It's a pretty good job, but you can see some lightness close to the hill that wouldn't be there if the darkness was the film's response to the sky.
Panchromatic black-and-white film is generally more sensitive to blue than to other colours (although by how much varies with the emulsion, some being more sensitive to greens and others to reds than others). In order to get a substantial sky, you normally need to use some sort of colour filtration, normally in the light yellow to deep red range. Without filtration, a blue sky will normally be very light in tone, without much distinction between the sky and clouds.
When shooting black and white, you should consider a K2 yellow filter and a #25 "light red" (it won't look very light to you when you see it) to be standard parts of your kit. The K2 will render the sky more or less "normally"—that is, there will be a distinct tonality to the sky, lighter at the horizon and getting darker as you move up, with visible clouds. The #25 will give you a much darker sky and more dramatically contrasting clouds (assuming white clouds, of course). There are filters covering the range between the K2 and the #25, but they're sort of "neither here nor there"—they're not strong enough to really be dramatic, but are obviously filtered. To get the Ansel Adams-style black skies, you might want to use a #29 dark red filter.
You can approximate the look of filters when converting your colour digital images to black and white, but with a great deal more control over contrast than you can get with an ordinary optical filters.


