There were several old tricks to get this kind of shot with film:
- Stretch a section of nylon stockings/hose over the front of the lens.
- Spread a thin layer of vaseline or other type of petroleum jelly around the edges of the lens (or on a skylight or UV filter on the front of the lens).
- Stretch a piece of Saran wrap or other type of polyethylene food wrap across the front of the lens and hold it there using a rubber band around the front of the lens barrel. Combine with the petroleum jelly mentioned above, spread around the edges of the Saran wrap, if desired.
- Use a soft focus/diffusion filter. Lower quality "soft focus" filters are basically diffusion filters that also reduce contrast and result in softening the overall image. Higher end 'soft focus' filters, such as the Zeiss Softar line, let center light through undiffused and only diffuse the light entering the edges of the lens.
- Use a soft focus lens (see below).
Note that soft focus lenses are not simply lenses that are intentionally soft or intentionally misfocused slightly. Rather they combine a sharp image gained from the light passing through the center of the lens with blurred light that passes through the edges of the lens.
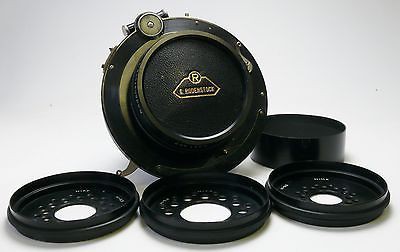
The classic soft focus lens was the Rodenstock Imagon made to fit in the lens board of a Large Format view camera. It had a set of different "sink strainer" aperture diaphragms, a/k/a apodization filters, that included a main opening in the middle that produced the relatively sharp image. Each "sink strainer" also had smaller holes of varying sizes and patterns around the edges of the various diaphragms that could "dial in" the amount of soft focus that was blended with the sharp image projected through the center hole in the diaphragm.

Combined with uncorrected spherical aberration/field curvature that made the focus distance at the edges closer to the camera than the focus distance at the center of the lens' optical axis, this allowed the proportions of 'in focus' versus 'soft focus' light to be controlled.
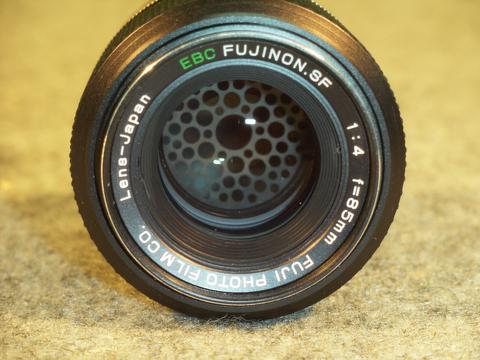
Fuji also produced such a lens for 135 format (35mm) cameras way back when, although the pattern was fixed and inside the lens, rather than on the front of a Large Format/Medium Format lens such as the Rodenstock.

This thread at a DPReview forum (with interesting images - some of the lens and some taken using the lens) shows how one photographer adapted a Dyotar 180mm f/4.7 Soft Focus Lens (for LF or MF) to his Nikon DSLR. The Dyotar had a screen at the rear of the lens that did a similar thing to the "stocking" trick mentioned above.
This discussion at MFlenses shows several different DIY screens made to be placed in front of normal lenses and the results such modifications rendered. If one goes the DIY route, a lens with uncorrected SA/FC will lead to more pronounced results. Of course such screens will reduce the amount of light entering your lens significantly, so only through-the-lens metering should be used to determine exposure.
Other soft focus lenses, such as the discontinued Canon EF 135mm f/2.8 Soft Focus (with Softfocus mechanism) used different mechanics to do the same thing: combine in-focus light coming through the center of a lens that had uncorrected/undercorrected spherical aberration/field curvature with softer light entering through the edges of the lens in a way which could be more variably controlled than by a traditional lens design with a single opening in the aperture diaphragm.
All of the methods mentioned above work the same with digital cameras as they did with film, although the pattern with the nylon stockings could interact with the grid pattern of the camera's sensor and produce a moire effect. Film negatives or prints digitally scanned could also result in the same type of moire.
In addition, one can simulate the look digitally by placing layers with varying levels of simulated spherical aberration applied to them in various amounts of transparency/opacity on top of the in-focus base image.


