21
\$\begingroup\$

I have a Nikon D5300, and a host of hawks flying around near where I live. I have two lenses: an AF-S Nikkor 18-55mm VR (1:3.5-5.6GII), and an AF Nikkor 70-300mm (1:4-5.6G). The latter is excellent for zooming in, but it can't autofocus with the D5300. I'm new to photography with a DSLR.

I like taking pictures of the hawks, but I find it hard to shoot pictures of them in the sky without the birds being a mostly dark blob. I stick to auto settings most of the time.

To compare:

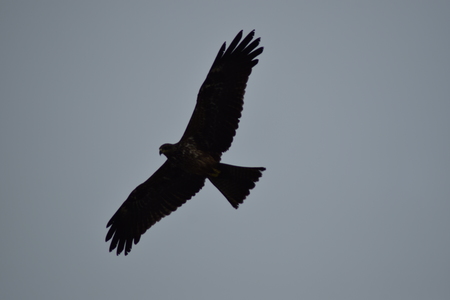
  • The camera JPEG, shot on auto:

    enter image description here

    Settings:

    • f/6.3
    • 1/1000s
    • 300mm
    • ISO: 200
    • Metering: Pattern
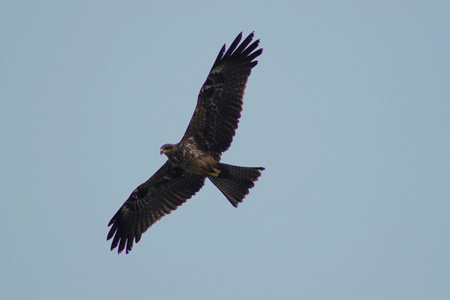
  • After some tweaking on Rawtherapee:

    enter image description here

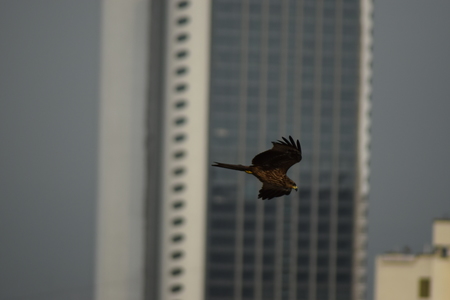
  • Contrast with a shot not against the sky:

    enter image description here

The bird's colours are much better in the shot without the sky in the background.

I imagine I could, with a lot more effort and understanding of the technicalities involved, modify #1 to have colours like #3.

However, I'd like to shoot so that I can get faithful colours without having to tweak the RAWs (too much). What settings should I keep an eye on to achieve this?

And aside from buying a new lens or camera, are there any accessories that might be helpful?

\$\endgroup\$
6
  • 1
    \$\begingroup\$ I get lucky now and then in the late afternoon and catch a hawk wheeling so the underside is well-lit. \$\endgroup\$ Commented Jun 21, 2016 at 11:22
  • \$\begingroup\$ @CarlWitthoft I usually go early morning or late afternoon myself, and even then my luckiest shot required some editing to bring out the colour (i.sstatic.net/7m9Zn.png, goo.gl/photos/ybbN5wweK3Cf46yr8 - I think I increased the saturation too high on that, too). \$\endgroup\$
    – muru
    Commented Jun 21, 2016 at 14:41
  • \$\begingroup\$ All the stuff about exposure is only half of the problem. The colour fidelity is "THE" OP's issue. It's related but… \$\endgroup\$
    – Stan
    Commented Jun 21, 2016 at 16:01
  • \$\begingroup\$ You need to turn up exposure compensation. From my experience, I'd suggest starting with +1.3 to +2.0 and adjusting from there. If your camera allows it, use manual mode and enable auto ISO with these exposure adjustments. (On Pentax, we have what's called TAv, which provides auto ISO but manually-controlled shutter speed and aperture settings.) \$\endgroup\$
    – bwDraco
    Commented Jun 21, 2016 at 17:50
  • \$\begingroup\$ @JDługosz if it makes any difference, the second pic was from processing the RAW. I set the camera to save RAW+JPEG. \$\endgroup\$
    – muru
    Commented Jun 21, 2016 at 21:37

4 Answers 4

21
\$\begingroup\$

Well, in order to get good results, you'll have to make the plunge into non-auto settings. I'd recommend Manual mode.

The problem you're running into here is that you are pointing your camera at a bird in the sky, which is bright. Camera meters are set up to try and make every exposure a uniform grey in terms of brightness. So if you point your camera at something white, it will underexpose the shot, and if you point it at something black, it will overexpose it.

A day time sky is to all intents and purposes nearly white in terms of brightness, as far as the camera's meter is concerned. So, when you point your camera at the sky, it's going to underexpose the shot. That means anything darker than the sky, like a bird, is going to likewise be underexposed, as you've seen. This is why the shot of the bird with the buildings in the background is exposed better - the background is about as bright as the bird, so the meter didn't get confused.

What's the solution? Stop the camera making the decision, or at least fool it in to making the correct one. It's easy. The first thing to do is set your camera in Manual (M) mode. Now, point it at the right thing - not the bird (or the sky, as far as the camera is concerned), but the ground. Why the ground? Because the light falling on the ground is the same light that's falling on the bird. So the ground and the bird will both need approximately the same exposure settings to be properly exposed.

So, point your camera at the ground and keep doing that while you adjust your settings. You have three to adjust: Aperture, Shutter Speed, and ISO. Let's go through them. As you adjust each setting, note the exposure meter at the bottom of your viewfinder. We want the meter to be at 0, in the middle, not to either the + or - side:

  • Aperture: on your kit lenses, you will get better image quality if you close the aperture a little from its maximum. f/8 is a good starting point, so dial that in.

  • Shutter Speed: you'll want to freeze any motion the bird makes like turning its head or flapping its wings. Bird motion tends to be quite fast, so you'll want a shutter of speed of at least 1/500. Dial that in.

  • ISO: here's where we nail the exposure. Because we have set our other two variables, aperture and shutter speed, we now adjust our ISO to get the meter in the viewfinder to 0. If the meter is showing overexposure (+), reduce your ISO. If it's showing underexposure (-) increase your ISO.

When the meter is at 0, you're ready to shoot - fire away at the birds! You'll probably see that the sky looks very bright: that's fine, because you should also see that the bird is correctly exposed too. Of course, the light might change, or the bird might be moving very fast, so you can always adjust your settings a little from the base exposure you took from the ground before.

As a final point, I would absolutely recommend using RAW, not JPEG. It will give you much more leeway to edit your shots to perfection afterwards. Also, to head the pedants off at Nitpick Pass, yes, I know about spot metering, but manual exposure for the ground (whatever meter mode you choose) is a heck of a lot easier than trying to spot meter a moving bird. Also, yes, the light isn't exactly the same, especially when you're directly below, but the high dynamic range on sensors these days means it's as near as damn it.

\$\endgroup\$
13
  • \$\begingroup\$ Thanks. I set the camera to save RAW+JPEG. When using the 70-300mm lens, I notice the camera usually defaults to 1/4000 or 1/2000, the fastest my camera allows (for the image above, I'd manually set it to 1/1000 to see if that would help). I guess the ≤ 1/500 recommendation is for the kit lens? Also, most of my concentration goes to focusing on the bird, what with unsteady hands and less-than-perfect vision, so trying to spot meter on top of that would indeed be harder. Settings I can apply before I start aiming for the bird, like you suggest, are much better. \$\endgroup\$
    – muru
    Commented Jun 21, 2016 at 8:53
  • \$\begingroup\$ The light falls on the ground from above, and you're shooting the brid from below. So it's not the same light, it's just that in many cases it's close enough (bright clouds, maybe even blue sky if the ground isn't in direct sunlight or hard shadow). And you're right about spot metering. \$\endgroup\$
    – Chris H
    Commented Jun 21, 2016 at 9:38
  • \$\begingroup\$ @muru the 1/500 shutter speed recommendation is regardless of the lens. It's just a good minimum speed to aim for to freeze motion. If you can get faster shutter speeds without excessively high ISO (which can produce noisy images), then by all means go for it. \$\endgroup\$ Commented Jun 21, 2016 at 9:44
  • \$\begingroup\$ @ths I'm confused - going from 1/4000 to 1/1000, am I not over-exposing? I'd have thought the picture would come out brighter. \$\endgroup\$
    – muru
    Commented Jun 21, 2016 at 9:52
  • \$\begingroup\$ @muru yes, it would, ignore him :) \$\endgroup\$ Commented Jun 21, 2016 at 9:53
8
\$\begingroup\$

Easiest fix

Only shoot the bird when the sun is at your back, not behind the bird. Given how redtails circle where I am, I sometimes just wait as I draw a bead and follow them around the circle, to where the light is falling on them nicely.

However. This will be rarer than backlit opportunities, because a hunting hawk doesn't like to fly into the light and be blinded. The bird, too, wants to have the sun at his/her back, to be able to better see its prey. Like bird-butt shots of them flying away, we all get tons of backlit shots, too. But after deleting a few thousand of them, you simply learn not to click in those situations, but to simply enjoy having seen your feathered friend.

Spot Metering

If you're a good shot, and can aim your metering exactly where you want, this is a great case for using spot metering mode. Spot metering basically tells the camera only to meter at the designated spot. If you can get that spot onto the bird with accuracy, then the surrounding scene is mostly ignored by the metering, and your exposure settings will be good for the bird. However, you will overexpose the background, if you're shooting a backlit bird, it can be hard to hit the target every time (I'm lousy at it, so I go with center-weighted most of the time), and you might overexpose even more if the bird is very dark (e.g., ravens--I run into this all the time and have to compensate) or underexpose if they're very light (e.g., great egrets).

Use a higher ISO setting

Bird photography almost inevitably requires a fast shutter speed—either from the speed the bird is zipping past, or to mitigate for camera shake blur in combination with very long, slow lenses. So your ISO is the only factor left to avoid underexposure. I shoot with Canon's EF 400mm f/5.6L USM on a 50D. Being unstabilized and on crop, by the 1/focal_length rule, that means I need shutter speeds or 1/640s or higher (I most typically aim for 1/1000s or faster). But it's also an f/5.6 lens, and I'll stop to f/8 for a little extra performance. At 1/1000s and f/8, on a bright sunny day, requires an iso setting of at least ISO 250 (think: Sunny 16 rule). On a less than bright sunny day, or in the morning/evening hours when birds are most active, that can easily require ISO 400 to 1600. I generally start out at iso 800, even on sunny days. Fear not the higher ISO settings, it's why you got the big camera with the big sensor.

You can use M mode if you know exactly what settings will work, but I tend to use aperture priority to get the fastest possible shutter speed every time, and then adjust with exposure compensation as best I can. Because a circling hawk going in and out being lit/backlit can change conditions very quickly, I find that M defeats the purpose. But I live in Southern California and have a particular spot on a canyon ridge, where young birds are unwary and curious enough to simply circle around me to try and figure out what I'm doing with that big metal pointy thing.
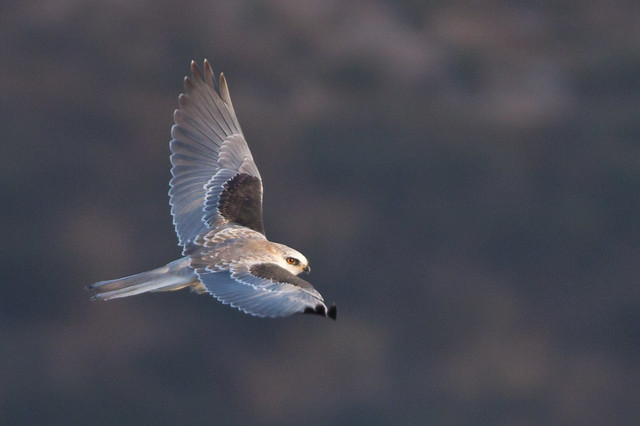
wtk

Juvenile White-Tailed Kite (Elanus leucurus).
Canon 50D, EF 400mm f/5.6L USM, iso 800, f/5.6, 1/640s. December, 7:20am.

Your situation may be very different.

\$\endgroup\$
4
  • \$\begingroup\$ Beautiful pic! Yes, in this case I was rather constrained by the location (the roof of a building), so I was facing the sun nearly all the time. There are a couple of other locations I visit which aren't as constrained, or maybe the same location early morning would work too (instead of late afternoon). I'm curious: can you identify the bird in the question? It's just my guess that it's a hawk. \$\endgroup\$
    – muru
    Commented Jun 21, 2016 at 17:55
  • 2
    \$\begingroup\$ @muru. I'm not that good, which is why I joined Flickr's Bird Identification Help group. Lots of very experienced, bored birders dying to do some ID. They're great. My guess would be dark-morph juvenile Red-Tailed Hawk, but that's only because where I live, a) 90% of the time it's a RTH. :) Wing shape and no distinct belly band, though, makes me dubious. If you do post it on the Flickr group, be sure to give them geographic location and time of year. \$\endgroup\$
    – inkista
    Commented Jun 21, 2016 at 18:06
  • 1
    \$\begingroup\$ That looks like a great resource. Can you please post that as an answer to photo.stackexchange.com/q/3281/46912? It's where I looked first \$\endgroup\$
    – muru
    Commented Jun 21, 2016 at 18:08
  • \$\begingroup\$ @muru; I've posted an answer on that question. Also added a paragraph to this answer about ISO settings. \$\endgroup\$
    – inkista
    Commented Jun 22, 2016 at 3:58
3
\$\begingroup\$

It's NOT (only) the exposure.

This situation calls for more than the correct exposure which you will discover if you are able to bracket your exposures to select the one with the subject optimally exposed. No matter which one you choose from among the series, it will not show the plumage correctly.

Why?

The bird you illustrate against a clear blue sky has warm colours in the browns and beige.

The reason is referred to as the "adjacency effect." The blue of the sky has flooded your camera with blue light. Blue is the complement of the bird's plumage. Look at the photo with a warm background and you will see that the plumage looks more like what you'd expect. You have a strong colour "cast." The strong blue light which "filters" your subject must be neutralized. The correct colour is there but it's being overwhelmed by the background.

The fix can take you in two different directions.

The first is to neutralize the background with a complementary colour (yellowish) filter. Your success might be acceptable until you actually compare your images with actual plumage. (Photography is not a good way to capture colour fidelity—it's an approximation at best. We tend to forget this because sometimes it's pretty good; but, we rarely compare the reproduction with the original critically.)

The second way will be with a grey card in your kit. You'll shoot it before and after every bird image and use it to set your white point in post-capture processing with software. Perhaps using BOTH techniques will give you something acceptable.

Number 3 of the two solutions is most obvious. You can try to avoid the whole problem by shooting against a cloudy or overcast (neutral) background so the subject is relatively unaffected by the strongly coloured background. Even then, realize that the subject will be back-lit meaning you will be shooting the shadow against the source of illumination so flare will be the "bad boy" to tame.

As a work-around with software, you might also drop-out the background from an otherwise great shot and put the subject into a blue background for display if that's your desire. Even then, the background will affect the viewer's perception of the subject coloration due to contrast and other factors as it does even when you look at your monitor under non-neutral conditions.

\$\endgroup\$
2
\$\begingroup\$

Warning: I have not tried this and don't know if it'll really help much.

Either going full manual, or setting an Auto mode to overexpose by a stop may help. Then, consider adding both a polarizing filter and a yellow filter to darken the sky background as much as possible without significantly mucking with the spectrum from the bird.

\$\endgroup\$

Your Answer

By clicking “Post Your Answer”, you agree to our terms of service and acknowledge you have read our privacy policy.

Not the answer you're looking for? Browse other questions tagged or ask your own question.