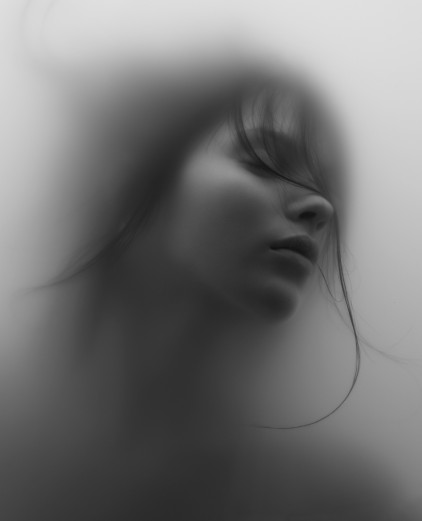
I came across this photo by Jacob Sutton and wanted to know if someone knew how to get this effect in photoshop?

(source: jacobsutton.com)
I came across this photo by Jacob Sutton and wanted to know if someone knew how to get this effect in photoshop?

(source: jacobsutton.com)
First, I can't emphasize enough that the look you are trying to achieve was not a Photoshop effect; it's the result of shooting a model in a tank (or pool or tub or what have you) of water to which something was added to make the water cloudy. Reproducing the look in post-processing is going to be a little on the tedious side, but this should get you more-or-less where you want to go.
Finish the image so that it looks pretty much the way that you want the clearest parts of the image to look. That would include all of the major retouching you want to do. You might want to leave it with slightly higher contrast than the final image; you can easily adjust that at the end. If you're working non-destructively, create a stamp layer of your work so far.
If you want to emulate the way the hair is moving underwater, you will have to paint in a few strands at this point. Don't worry too much about getting it very realistic, since that's going to be blurred away anyway. Just make sure it's about the right shade of grey to match the existing hair. (You can do that on a separate layer before creating the stamp.)
Make a copy of that layer. Run a Gaussian blur filter on the copy, just enough to blur the fine details. Then use either a curves or levels adjustment to reduce the contrast of the new layer, while keeping the background brightness at the same level as the original. (With a Curves layer or direct adjustment, you'd drag the black point up and the white point down; you shouldn't have to play with the centre of the curve.)
Make a copy of that layer, add a little more blur to it, and reduce the contrast again. One more, repeating that procedure should get you to the lowest-contrast, blurriest part of the look.
At this point you will probably find it easiest to invert the order of those four layers, so that the blurriest, lowest-contrast layer is on the bottom of the stack. Add a black layer mask to the other three layers, then slowly paint in the higher-contrast, more detailed parts of the image one layer at a time. Pay attention to how far things are away from the camera; the stuff that's deeper in the water will be blurrier and less contrasty.
Once that is done, you may have to burn in some shadow areas, since your dry-land picture will probably not have the semi-backlit effect that the cloudy water produces automatically. Make sure that your added shadows are no deeper than the real shadows in the clear part of the image.
Now it's just a matter of adjusting the overall contrast to taste. To get an overall hazy look, you may want to add a Soft Light layer above the image, filled with 50% grey, and with a small amount of noise added, then given about a 1-pixel Gaussian blur. You can adjust the opacity of the layer to control the amount of grain, and use a curves or levels adjustment to control the brightness or darkness bias you're adding to the image. Once you've got what you want, you're going to want to tone the image to get the warm-tone effect of the original. If you're using CS6 or higher, you can simply use a gradient map with one of the photographic toning gradients. (You may have to load the gradient set if you haven't done that already. It is supplied with Photoshop, but it's not loaded by default.)
There are many ways to create any effect in Photoshop so there is no way of knowing what he did exactly but if you want to create a similar effect without the use of plugins, you can first use the smudge tool to soften it a bit. Then add a touch of "noise" so it doesn't look 'too photoshoped', then duplicate the layer and add a vignette shaped mask to it but draw it so you have more control when the edges are, or better yet, just add the mask layer and brush out the center with a large, soft edge brush... then play with blurs like Gaussian and such, on the masked layer. Finish with some B&W but don't just use the default B&W adjustment but choose one of the color channels
This is almost certainly manually masked/brushed. I would suggest a tablet such as Wacom as you maybe spending hours doing this; make a copy of the image blur it then bring back the wanted detail by carefully masking the blurred layer adjusting the brush transparency as needed.
To create this affect, two operations need to be performed.
First, the blurred background -- blur the image, masking out the front of the head.
Secondly, the skin needs to be smoothed -- blur the low spatial frequencies. This article explains how to do this in GIMP.