There is a UV-filter screwed on my Canon 16-35mm. For some reason, I'm not able to get it off the lens. Does anyone has a simple but safe trick?
-
2\$\begingroup\$ You can try this guys: vimeo.com/24834472 ;) but you need to go to Montenegro - Friend of mine dropped lens with UV filter on it... filter went to hell - lens survived :) \$\endgroup\$– user1681Commented Jun 30, 2011 at 18:21
-
2\$\begingroup\$ Use graphite from a pencil to lube the filter if you want to reuse it and fear getting it stuck again. \$\endgroup\$– LeonidasCommented Jun 30, 2011 at 21:21
-
3\$\begingroup\$ Hello, newcomers to Stack Exchange! If you have a suggestion for this problem that is novel and helpful, please share. If one of the existing answers covers the same thing already, please vote that one up instead. Thanks! \$\endgroup\$– mattdmCommented May 5, 2012 at 22:32
-
1\$\begingroup\$ Use a hacksaw and hammer. No seriously, look here. fstoppers.com/… \$\endgroup\$– Evan PakCommented May 16, 2013 at 1:57
-
\$\begingroup\$ Buy one of these in the appropriate size rover.ebay.com/rover/0/0/… \$\endgroup\$– user8654Commented Dec 29, 2017 at 23:15
17 Answers
I carry a jar lid gripper around in my kit which has always done the trick for me when I need a little extra, well, grip.
The other 'trick' that I have learned over the years is that most people's default reaction to a stuck filter is to get a really good grip on the filter and just try to torque it off. The problem with this approach is that the filter glass is rarely a snug fit inside the metal filter rim. Because of this, gripping the filter firmly often results in the metal filter rim flexing ever-so slightly... Which binds it to the lens even more tightly. With such tiny threads a flexed filter might as well have lock-tite in there!
So it seems paradoxical, but often I've found that by loosening my grip and very gently turning the filter mostly using pressure on the top of the filter, rather than on the sides (which can cause it to flex) I can get it to turn.
-
\$\begingroup\$ How does the lid gripper work for CPL? \$\endgroup\$– ysapCommented Jun 30, 2011 at 19:06
-
\$\begingroup\$ @ysap: Not as well, obviously. :-) \$\endgroup\$ Commented Jun 30, 2011 at 20:23
If you're out and about and this happens then carry a couple of elastic bands! These allow you to get a proper grip on the slim sides of the filter so you can remove it. Often they are stuck not because they are jammed on but because you cannot get enough of a grip to apply enough pressure to start turning them.
A very simply, cheap, and more importantly small, solution that works quite well :)
-
\$\begingroup\$ I use an elastic band too. Also make sure you apply pressure evenly around the rim of the filter and not just on two sides else the filter distorts and jams. If future remember that you don't need a filter to screw on tight. I always leave them just a little loose on the thread. \$\endgroup\$ Commented Jul 1, 2011 at 6:32
-
\$\begingroup\$ Hours after posting this answer I found the following jar opener free on a magazine ... trudeaucorp.com/us/products/kitchen-tools-gadgets/… ... small enough to easily carry and should provide even pressure around the filter. \$\endgroup\$ Commented Jul 1, 2011 at 20:15
-
\$\begingroup\$ I had a polarizing filter stuck - this solution worked for me! \$\endgroup\$ Commented Mar 19, 2012 at 19:00
You can buy lens filter wrenches -- if you don't think they'd be something you'd use all the time (and thus, buy), you might find that your local camera shop has one you could use.
-
\$\begingroup\$ This is what I did. Rubber bands didn't work for me, and I really needed a specific, narrow grip on the filter that didn't catch the normal rotating portion of the CPL. \$\endgroup\$ Commented Aug 15, 2012 at 18:57
When separating a stuck filters that are correctly screwed together the key is to be gentle and persistent. The filters got stuck because of the repetitive motion of turning the polarizer, they will get unstuck the same way.
What happens is that when you use force you bend the ring so the filters jam together more.
To get more grip, take a pair of thick rubber bands and put one arround each filter, that will help grip the very thin part of the polarizer that has the knurling. Gently twist the filters, grabbing at different parts of the ring to even out the distortion. A little push in and out (not rotation) can help wear down / dislodge any grit.
Illustration of undesired action:

-
1\$\begingroup\$ Many times my polarizer gets stuck on my lenses for PRECISELY the reason you give. The filter isn't stuck in reality, it's just hard to remove because the force of gripping the filter causes it to tighten. I've found that using the lightest of light touches allows the filter to be removed with ease. As soon as the gorilla grip comes out, the filter acts like its welded to the lens. \$\endgroup\$ Commented Aug 20, 2012 at 20:07
You can get filter wrenches for exactly this sort of situation - just as you can for stuck tops on jam jars.
They can come in incredibly useful if you have a stubborn stuck filter. They are usually quite cheap and come in a range of sizes to suit the filter thread size you need...
-
\$\begingroup\$ Not quite sure what this answer adds over the one posted earlier by @D.Lambert \$\endgroup\$– osullicCommented Jun 19, 2022 at 17:03
One thing that has always worked for me in the field is to screw another filter on top of the stuck one. Screw it in pretty hard. This provides an extension of the outer surface of the stuck filter, enabling a much better grip with the fingers (or with a tool, which I have never had to use). Perhaps it also evens out small eccentricities in the stuck filter, helping it turn better within the lens's threads. The two filters together are also a much stronger assembly than a single filter, so there is less risk of cracking or deforming it. Once this pair of filters comes off the lens, it can be a little troublesome to separate the two filters again, but they tend not to be stuck as hard as the original filter was. A little patience always gets them apart. If not, you can work with it in the shop if you like without risking your lens; and your lens is back in service in the meantime.
One solution that I've used is to put a grippy cloth or other surface on a flat counter, set the lens face down on that surface and while applying firm downwards pressure, turn the lens - thus turning the filter without distorting it.
Try putting the lens in the freezer for a few minutes (or more). The filter probably expanded due to heat and should contract more than the lens as it cools down. Then wait that your lens is above freezing temperature before using it.
-
-
2\$\begingroup\$ Wait not until it is above freezing temp, but until it is at room temp and any condensation has evaporated. \$\endgroup\$– ysapCommented Jun 30, 2011 at 18:57
-
\$\begingroup\$ Well, I live in a country where temperatures change a lot, so that worked on the few rare times where I needed to. I also shoot at below freezing with the lens and camera working well (most of mine are weatherproof and freezeproof), so the temperature thing was just a precaution. \$\endgroup\$– ItaiCommented Jun 30, 2011 at 21:14
I use disposable latex gloves. You can buy large packs of them from motorist stores in the 'stuff for mechanics' section. They're also helpful in many other situations.
-
\$\begingroup\$ This worked perfectly for me, thanks! Just be sure that your gloves are dry before holding your lens :) \$\endgroup\$– Adil BCommented May 17, 2014 at 13:15
Take a cable (Like a long USB cable) and loop it around the filter as close to the lens as you can get. Use the cable loop as a grip to get the filter started off.
-
4
Put your lens in the freezer for 6 minutes and then use a rubberband to get a grip around the full circumference of the lens and unscrew it. I've tried this method before and it worked.
-
1\$\begingroup\$ I'd be a bit concerned about putting my lenses in the freezer with regards to condensation. If I were to resort to this type of method, I'd bag the lens in the freezer before removing it, and let it warm up gradually, as mentioned here. \$\endgroup\$– EddCommented Aug 14, 2012 at 8:45
-
\$\begingroup\$ @Edd By the time it has warmed back to room temperature, the advantage of having the outer layer colder than the inner layer (why you only leave it in there for a few minutes) is no longer applicable. \$\endgroup\$ Commented Dec 25, 2017 at 1:12
If you want to use the heat technique, but don't want to risk condensation on your lens, try this:
Park the lens in a sunny window. You want it warm. Doesn't need to be hot.
Take a cup of hot water and dissolve as much salt as you can.
Freeze the salt water in a bowl.
Once frozen solid, remove from freezer, knock the ice out of the bowl and put on the counter flat side up.
Press the filter against the ice for 10 seconds.
Attempt to remove filter.
Repeat with 20 seconds.
etc.
If it hasn't worked by the time you get to a minute, back to the drawing board.
Aluminum conducts heat quite well, but the threads don't conduct heat as well. You are trying to cool the filter faster than you are cooling the threads on the rim.
Having a warm lens increases the temperature differential and so increases the size difference.
Cautions: Salt water is corrosive. Do NOT get this in your lens.
If this makes you nervous, you can partially fill a bag with alcohol. It won't freeze, but it will get to whatever the minimum temp of the freezer is.
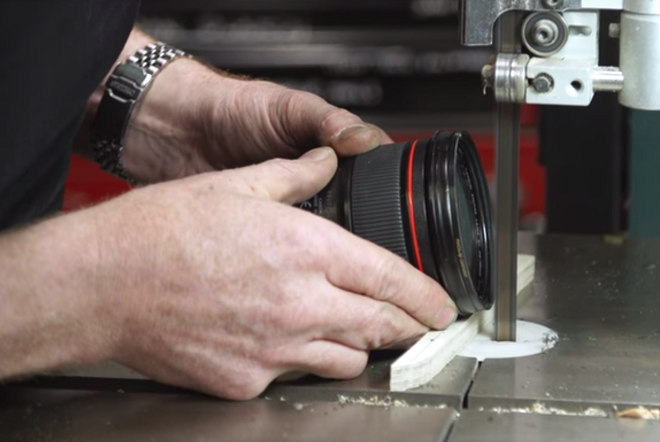
If the rubber band or filter wrench doesn't work, the next step is a precision band saw.
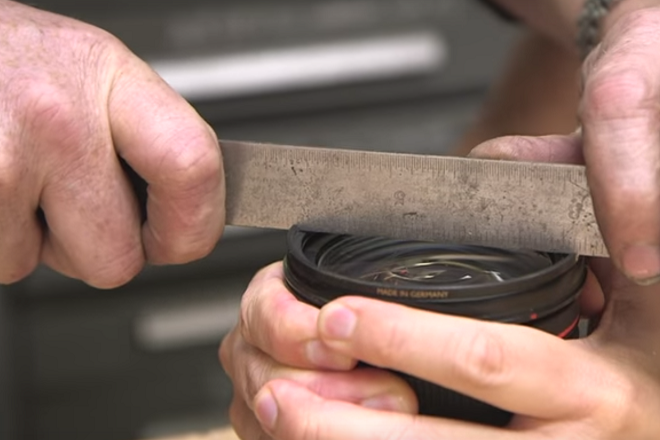
If Adam Savage (the guy in the video) and his band saw is not available, you could also use a needle file or hacksaw to create a couple of notches in the front of the filter ring.
Once you've cut a couple of notches in the filter ring, you can use a steel rule to twist it off.
If the filter ring is too distorted to twist it off with the metal rule, you're going to need to remove as much of the filter glass as you can and then peel it off with a pair of (locking) needle-nose pliers. It may be easier if you cut all the way through the filter ring. Yes, that will nick the lens' filter threads. But if they are already warped they're going to need to be replaced anyhow.
When using a file, hacksaw, needle-nose pliers, etc. on the filter ring, it's not a bad idea to place a soft cloth over the front element of the lens to minimize the risk of scratching it.
If the lens hit something hard enough to warp the filter ring, the front element of the lens and filter threads are the least of your worries. The internal lens alignment needs to be checked.
For more about the overall subject of To filter or not to filter (for lens 'protection'), that is the question, please see this answer to is uv filter a must? here at Photography at Stack Exchange. There are lots of links to a plethora of questions/answers here and resources elsewhere on the subject. While there are times and places (sand/dust storms, at the beach, industrial settings with hot metal particles flying off grinders, etc.) where filters are useful for protecting the front of the lens, in catastrophic incidents such as yours they tend to be liabilities more often than not. A lens hood is normally better impact protection without any of the optical penalties of a flat glass filter.
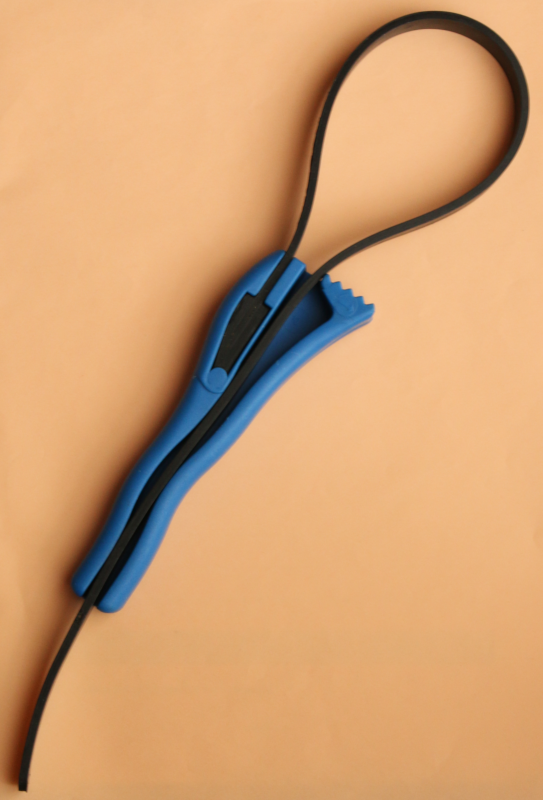
I successfully removed a CPL filter from my lens with mid-size strap wrench:
(scale: the strap loop is left as set for a 72mm filter)
safe for the lens or safe for the filter? Only time I've had a filter that wouldn't come loose with some force I took to breaking the glass on it and destroying the filter in place, then taking a wrench (now that I had enough grip) to force the empty thread off the lens.
Have to take some care of course but it's not that hard (in this case the front element was recessed deeply, making it a lot less dangerous to the lens).
One of the things to try is to lubricate the joint between the lens and the filter. You do NOT want to get liquids into the lens, so for doing all of these, keep the filter below the lens body.
I would go further and put most of the lens in a plastic bag, and masking tape the edge to the barrel behind the filter.
Things to try:
Lens cleaning solution. This, I think is basically distalled water and photo-flo, a wetting agent.
Soapy water. I think the best solution would be glass cleaner -- windex or equivalent.
Ether. You can get canned ether at auto stores for starting reluctant engines.
WD-40. This basically fish oil and ether. The ether acts as a carrier so that it can penetrate.
Penetrating oil. This is usually a mix of what amounts to light machine oil in a carrier of hexane
Ether and hexane potentially are solvents for whatever lubricants are in the lens. As solvents they can move the lube to different places. Ether is explosively flamable. Do not do this in a confined space, or near a source of ignition.
If you are willing to sacrifice the filter, you can cut a notch across the middle of the filter. (A thin piece of cardboard protects the filter if you want to try to keep it.)
If you use a hacksaw, the resulting notch will be about 1/16" wide and between 1/16 and 1/8 inch deep. 1/16 is enough.
Now out to the garage. You need to pieces of wood, 1x2 is fine. You also need a hacksaw blade. Old one is fine. You will need a couple of #4 or smaller screws. Several 1.5" #8 screws.
- Cut one piece so that it is about 3 inches longer than the hack saw blade.
- Lay the hacksaw blade on this chunk so that the back edge (no teeth) over hangs the edge of the board by a bit less than the depth of the cuts in your filter rim.
- Screw the blade to the board.
- Cut the other board so that it's shorter than the blade, and doesn't hit the screws.
- Screw the board to cover the blade from the other side, leaving the same amount of blade showing.
- Now you have a tool that fits the slots. Put the body cap on the lens, and have a helper hold the lens firmly on a table.
- Fit the protuding edge into the notches and twist off.
If you are alone, and have a vice, you can put the tool in the vice and twist the lens.
A comment points out that using a steel machinists rule would make more sense than my used saw blade tool. But: I didn't have one. I didn't think about it. And the blade was the right width for the notch.
-
\$\begingroup\$ Why not just use a steel rule? \$\endgroup\$ Commented Dec 25, 2017 at 1:10
-
\$\begingroup\$ I don’t have a machinists steel ruler I have one that is about 1/32” thick. It bends readily, and is painfully to us as a tool. \$\endgroup\$ Commented Dec 25, 2017 at 17:34
-
\$\begingroup\$ I would think going and buying one would be less trouble, take less time, and possibly have a lower overall cost than making your hacksaw blade contraption. It would also be stronger. \$\endgroup\$ Commented Dec 25, 2017 at 19:22
-
1\$\begingroup\$ Yeah, but it's an hour's drive to town; I don't know where to buy a machinists rule, and I didn't think of it. But I've edited the answer to point out the alternative. Good idea. \$\endgroup\$ Commented Dec 26, 2017 at 19:47
-
\$\begingroup\$ I've since looked up machinists scales. Seems they are about 1/32" thick. I would worry about bending the edge, and getting cut trying to put torque on a thin piece of metal. Now a rule like that in a set square might be effective. \$\endgroup\$ Commented Jan 1, 2018 at 8:24


