5
\$\begingroup\$

First of all let me tell you that I'm a real newbie in photography, I know basically nothing.

I'm trying to digitize our family slides. Just to be sure we're all talking about the same thing, I'm talking about Reversal films producing a positive image, not a negative one. It seems the term slide in photography is used for both...

I use an old slide projector with a Nikon D5000 I borrowed to my dad. The lens is a Nikkor 55-200mm that I use with a reverse ring to take macro photos.

Because the original light bulb on the projector was generating too much heat, I had issues with films popping if they were exposed more than 10 seconds in front of the light. So to avoid any more damage I replaced the original light by a cheap cool white LED.

Now here is the problem: I have blue spots appearing on the photos and I can even see with my own eyes some blue dots coming out of the LED (yes I know now this blue light is harmful for eyes, I'll be careful from now on)

Blue spots on photo

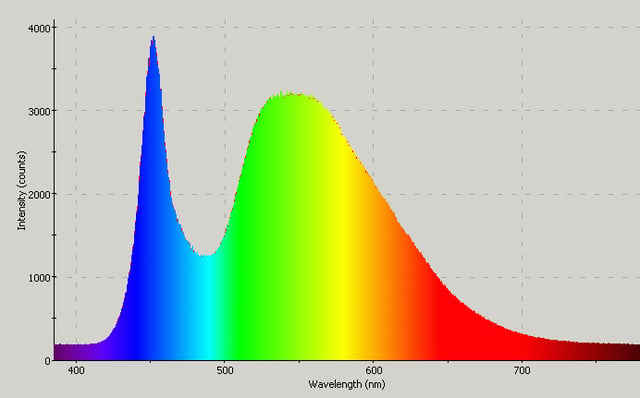
I researched about this blue light and found out LEDs actually have a strong blue lighting, here is the spectrum of a classic LED

LED Spectrum

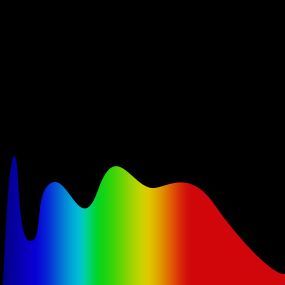
I'm aware there's a brand producing high CRI LEDs with a much better spectrum but those LEDs are much more expensive than this cheap one I bought. Here is the spectrum of this high CRI LED

Hight CRI LED

So my question is: how can I avoid having these blue spots on my photos? Can I add a physical filter reducing the amount of blue light arriving to the camera but keeping other colors fine?

Or can I correct this effect with a setting from the camera? I'm looking for a solution that doesn't require manual editing on the computer as I've thousands of slides to digitize. So I'd need a solution that just works for all the pictures.

I really would like to avoid buying one of those high CRI LEDs as they're very expensive (almost $100)...

The aperture of my camera is at the smallest because of the strong direct light the camera receives and I set the White Balance of the camera to Fluorescent

Please don't forget I'm a real newbie in photography so I'm not familiar with all different kinds of settings (ISO, shutter speed, compensation...etc).

Thanks a lot for your answers

EDIT for more information:

I played a bit with the settings and randomly found something that was working:

  • ISO: 800
  • Shutter Speed: 1/2500
  • Exposure Compensation: 0.0

I'm using DigiCamControl to control the camera.

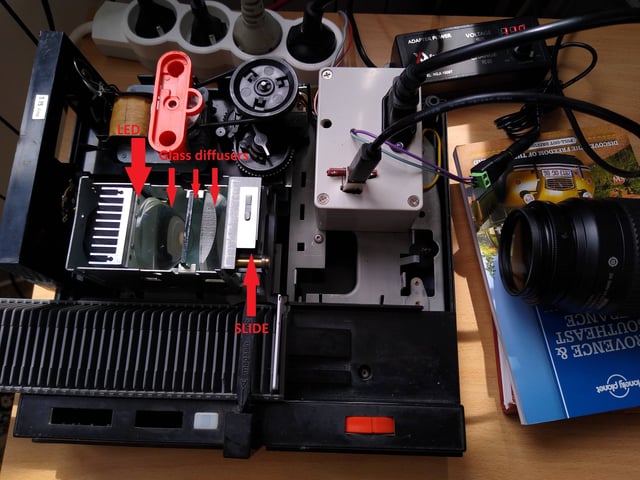
Here is a photo of my setting (the books under the camera are just temporary, didn't have time to build a proper mount yet)

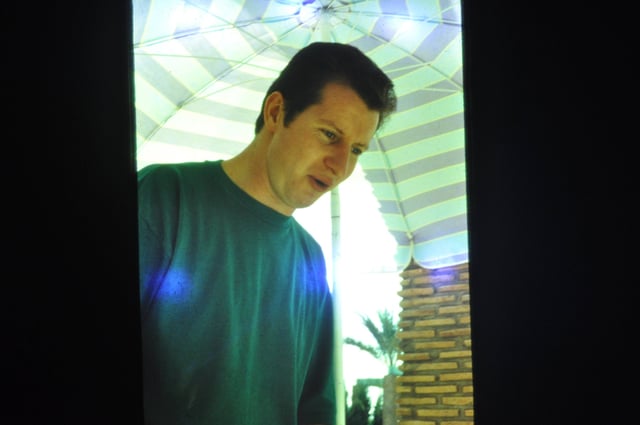
Setting

\$\endgroup\$
2
  • 1
    \$\begingroup\$ Re, "The aperture of my camera is at the smallest." Many lenses produce their sharpest images somewhere near the middle of the range of apertures. If you stop the lens down too much, the sharpness is limited by diffraction, and if you open it too wide, the sharpness is limited by abberations (i.e., compromises in the design of the lens that make it affordable and manufacturable.) \$\endgroup\$ Commented May 5, 2020 at 12:28
  • \$\begingroup\$ Thanks for this information, another user pointed me this detail too. I should be able to find the perfect setting now with all your answers \$\endgroup\$ Commented May 5, 2020 at 13:00

1 Answer 1

3
\$\begingroup\$

You appear to have actually two [& a half] separate issues caused by the same thing.

Firstly the blue spots - which, btw, won't do you any harm so long as you don't stare directly into the light a lot. The bulb appears to have several distinct LEDs inside it - not uncommon at all, & you would probably never notice in normal use, but for this particular purpose, rather a nuisance.

As the lamp runs cool, there's the possibility of an almost free method to do three tasks in one.

Tissue paper. The stuff they used to wrap fresh bread in when you bought it directly from the baker's. It's thin, it's light, it's cheap.

If you add layers of tissue between the lamp & your slide, each layer will diffuse the light more. It will also, incidentally, remove some of the blue cast overall, as it will be slightly off-white.

This brings us to your exposure & white balance.
I assume you have the camera set to the lowest ISO it can - usually 100. If not, do that first. This kind of repetitive task with known input is also one you should have the camera set to fully Manual, so you don't need to keep re-focussing [assuming you're on a fixed tripod, which you should be for this type of task] or resetting exposure etc.

We've already reduced the amount of light coming through by using the tissue paper, & also hopefully reduced the blue cast & bright spots.
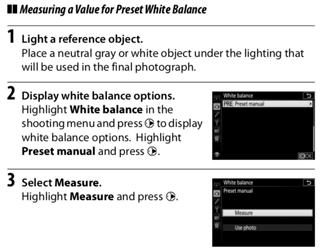
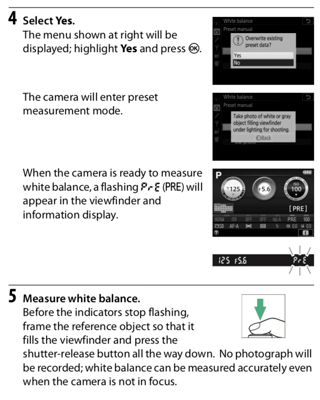
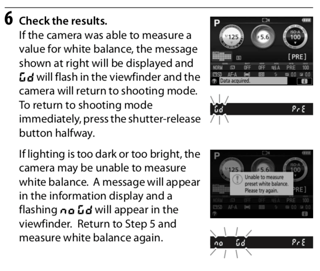
All we need to do now is setup up a correct white balance. Do this manually using the tissue-covered lighting you just made.

Check the reference manual for that particular model. Instructions for the D5500 below [click to see larger]

enter image description here

enter image description here

enter image description here

\$\endgroup\$
9
  • \$\begingroup\$ Thanks a lot for your answer. I quickly tried with a cooking parchment paper and it works well removing the blue spots however it creates noises on the photo because the paper isn't uniform. I'll have to find a better paper. I edited my question to include more information about my settings.I randomly selected an ISO of 800. What is the reason you advise setting the ISO to the lowest 100? What is this setting responsible for with my particular use case? \$\endgroup\$ Commented May 5, 2020 at 11:42
  • 1
    \$\begingroup\$ You can buy optically-perfect diffuser 'gel' in sheets; look at eBay etc. Lower ISO is generally 'better' because it is lower-noise. In your case specifically because you said you were having to close up the aperture fully, which will itself generate image distortion. \$\endgroup\$
    – Tetsujin
    Commented May 5, 2020 at 11:45
  • 2
    \$\begingroup\$ Once you've captured the data deep down in the Menus structure, you set your white balance to PRE in the regular settings, using the i button on the right, same way you had set it to Fluorescent before. You shouldn't need to modify it, it's as flat as you can measure in the camera. \$\endgroup\$
    – Tetsujin
    Commented May 5, 2020 at 11:54
  • 1
    \$\begingroup\$ Ok thanks a lot, I didn't know about image distorsion when the aperture is closed at the maximum. With the paper diffuser I'm now able to open up fully the aperture with the shutter speed set to 1/1000 and the ISO at 100. This settings looks better now \$\endgroup\$ Commented May 5, 2020 at 12:08
  • 2
    \$\begingroup\$ Without going into detail [have a search on this site for more] a lens is generally at its sharpest a couple of stops down from 'wide open' [that's about 6 button presses;) each f-stop setting will be ⅓ stop], so broadly-speaking at maybe 5.6-8 or thereabouts. If you can do that & still leave your diffuser beyond the depth of field, that may be your sweet spot. Closing a lens right down brings in diffraction distortion [again search on here for details]. \$\endgroup\$
    – Tetsujin
    Commented May 5, 2020 at 12:15

Your Answer

By clicking “Post Your Answer”, you agree to our terms of service and acknowledge you have read our privacy policy.

Not the answer you're looking for? Browse other questions tagged or ask your own question.