2
\$\begingroup\$

I have a scanned image of a damaged photo I am repairing in Elements.

What I want to do is to segment the photo into different areas, and clean up each area separately. Each segment will be in its own layer, with an associated mask.

The reason I want to do this is I'll need to do very different things to each segment. One area I'd tweak the colors, another I'd use a healing brush, etc.

The problem is, I'm not understanding how to segment an image such that the union of all of the segments is the original image.

For example, I make a selection in the background layer. I make a new layer and mask from the smoothed & feathered selection (layer2&mask2). Then I copy the new layer and mask, and I invert the mask (layer3&mask3.) I'd then expect layer2 and layer3 (in normal mode) to add up to the original image.

Instead, I see a transparent border between the two selections, as in this sample from Elements. (Note: I've disabled the background image here.)
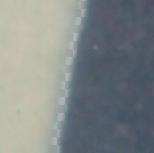
I'm clearly not understanding something.

Additionally, I'd also want to make a selection in layer3 and have that selection subtract (somehow) from mask3.

In other words, I want to end up with a series of layers and masks such that all of the masks together cover the original image completely and exactly (i.e., if you added up the values of the mask data, you'd end up with 1.0 for each pixel.) I'd also expect that the resulting image not show any transparent border.

Is there a simple workflow to do that?

\$\endgroup\$

1 Answer 1

1
\$\begingroup\$

Unfortunately, masks are not additive in the way you expected, when you have feathered them.

If you have only black or white pixels in your mask, you can duplicate and invert one, and know that every pixel in one mask or the other will be white, and show the corresponding pixel from its layer 100%. So every pixel in your resulting image will have a 100% contribution from a layer, guaranteed.

However, if you feather your mask, you end up with shades of gray. Let's say at the midpoint of the feathering, the RGB value of a pixel in the mask is mid-gray (128). If you invert that mask, that same pixel will also be 128.

But what happens when you apply two masks which are 50% gray? You unfortunately don't end up with the equivalent of a white mask, you end up with something more like 25% grey.

  • Start with a white background layer.
  • Add a blank layer, select a box shape and fill with black.
  • Add a mask, and fill the mask with 50% grey. The "black" box will look 50% grey
  • Duplicate the layer. The black box will get darker, but still not black
  • Duplicate again. Still not quite black.

Here is a succession of 5 black squares, each with a 50% gray mask, with each layer shifted. As you can see it each layer progressively gets closer to black.

grey masks

This is a simple demonstration of what you're doing when you invert feathered selections.

So inverting isn't going to work unless you have only fully black or white pixels in your masks. You'll either have to have sharp edges, or use some sort of dissolve technique that you can safely invert.

What I would do instead?

For each area I want to work on, just select a rough selection around that area and duplicate it to a new layer (saves space from duplicating the entire layer). Make your adjustments and create a mask to tidy up the selection. This mask can be feathered as you won't invert it.

Next area, do the same. Select (from the background layer), duplicate, adjust, mask.

\$\endgroup\$

Your Answer

By clicking “Post Your Answer”, you agree to our terms of service and acknowledge you have read our privacy policy.

Not the answer you're looking for? Browse other questions tagged or ask your own question.