16
\$\begingroup\$

I spent an evening walking around and shooting with my relatively new Nikon D7000 and I ended up not liking most any of the photos I took..

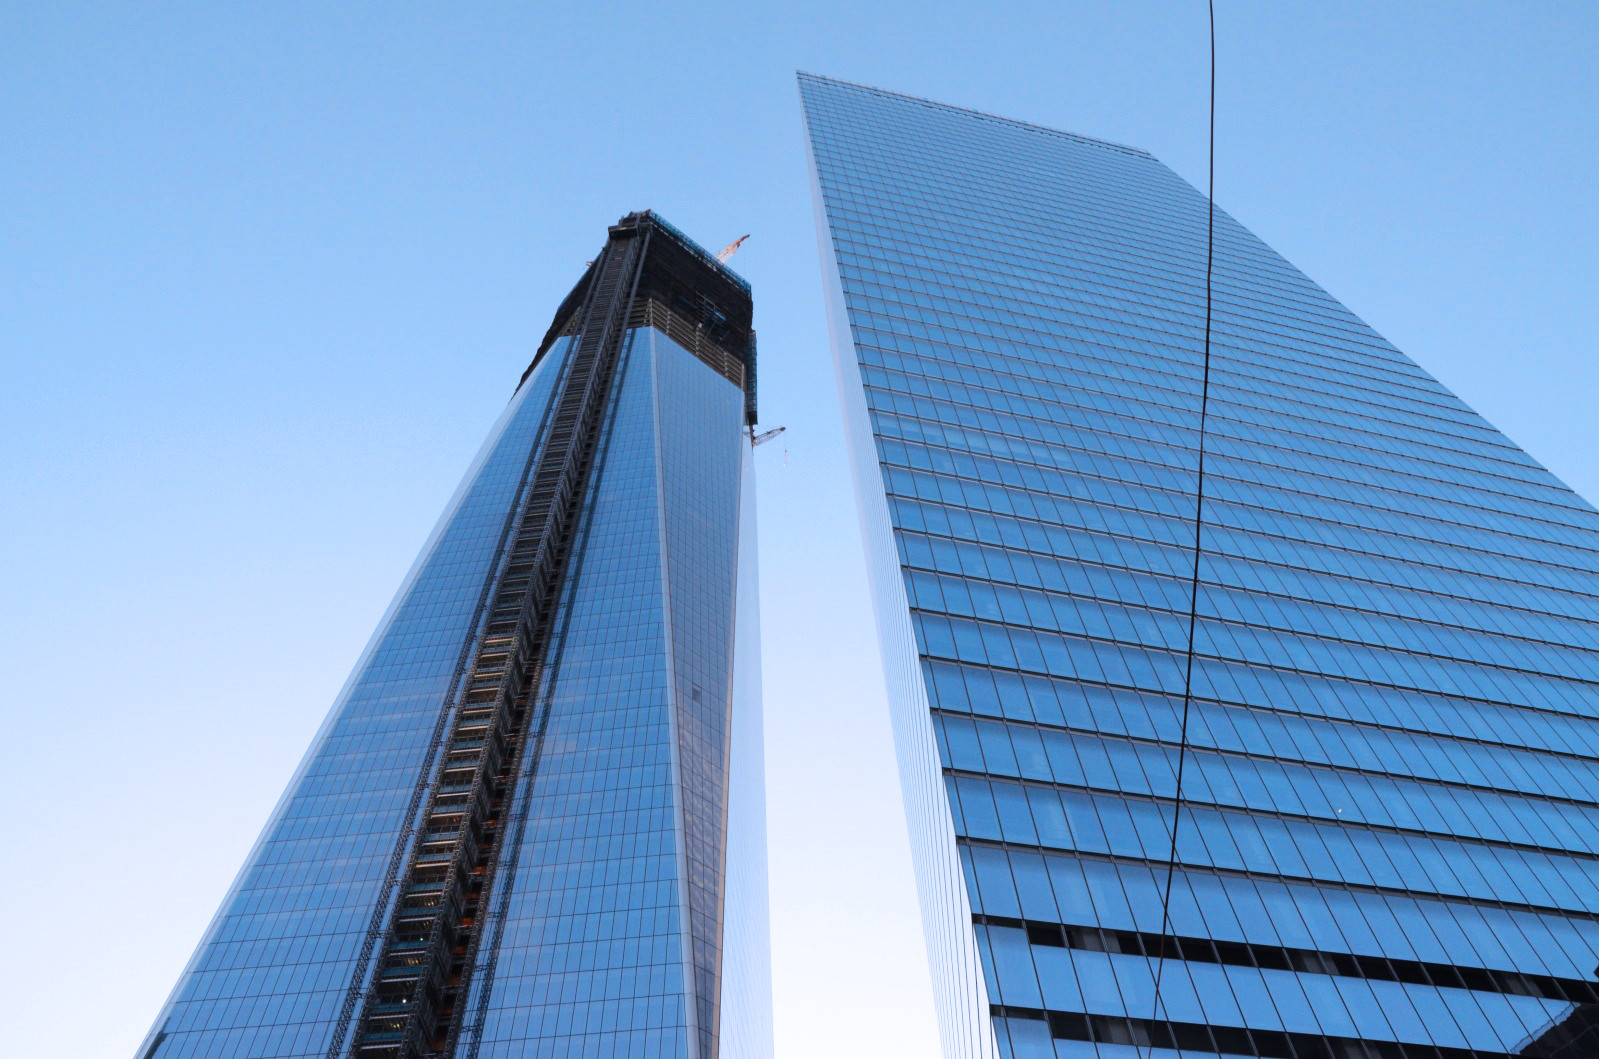
Let's take this one for example: skyscraper with dull sky
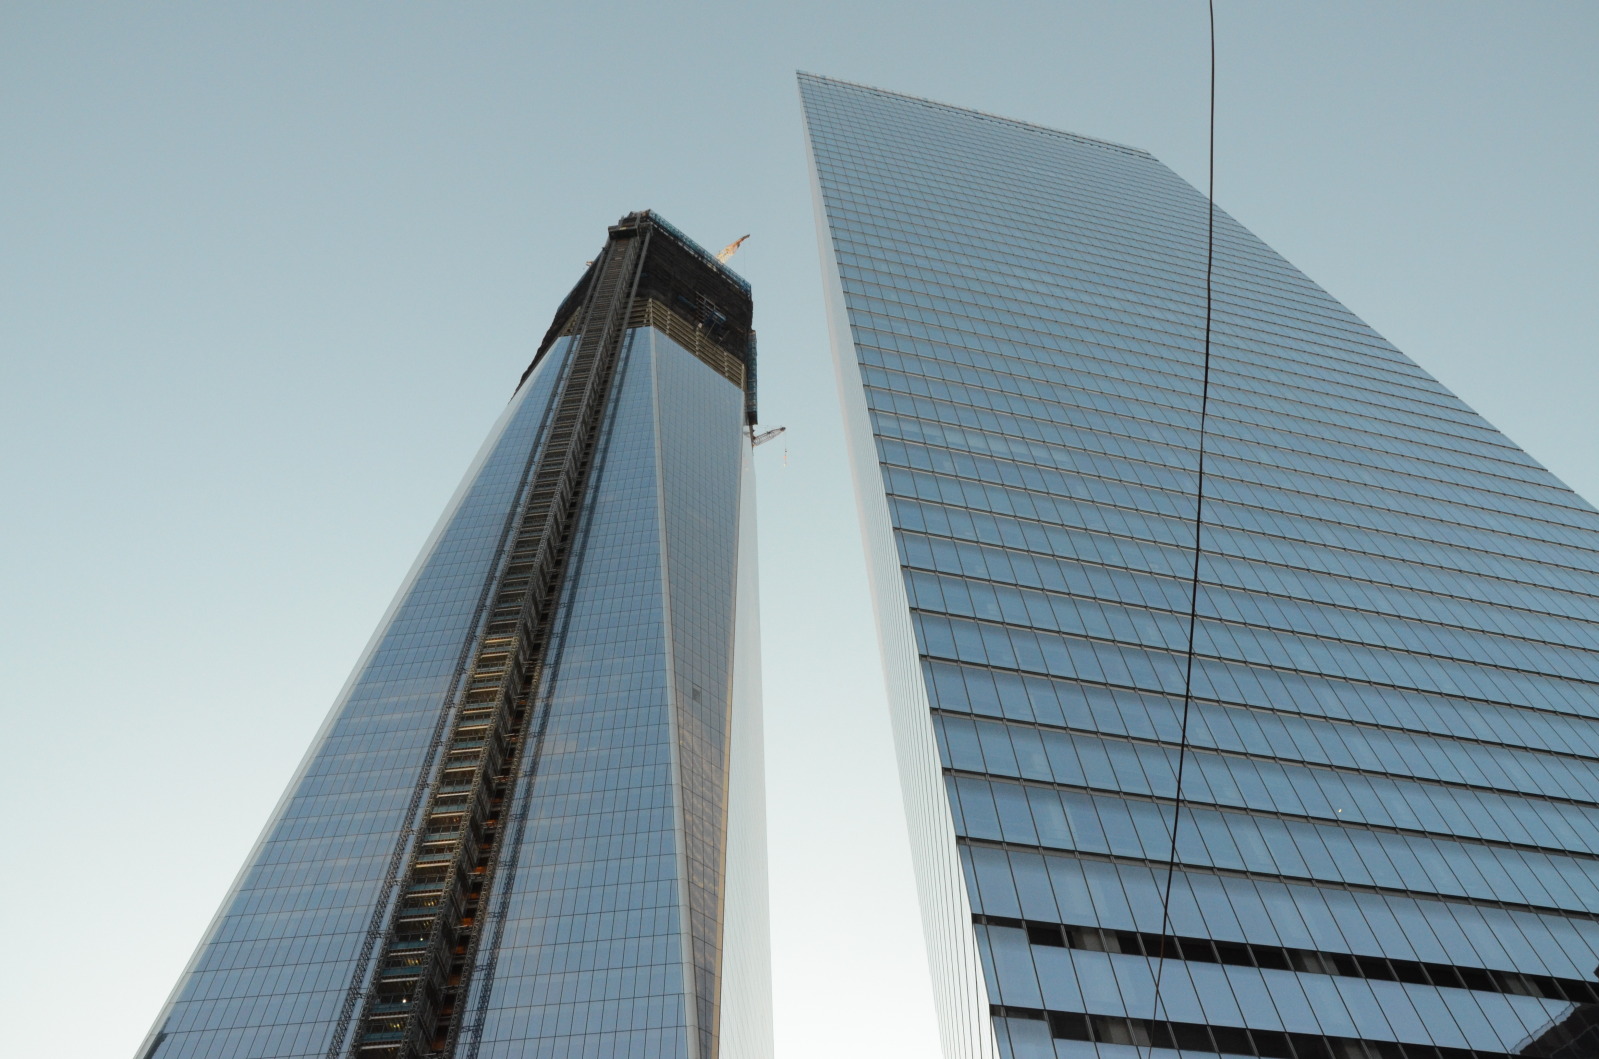
The sky was blue and vibrant when I took this shot. Why did it come out so dull?

I was shooting with aperture priority and ISO 1000 and 1600 that evening. What are some things I could have done to make this photo more vibrant?

\$\endgroup\$
3
  • \$\begingroup\$ thanks for editing Matt, but i wasn't asking about just the sky :) \$\endgroup\$
    – Sonic Soul
    Commented May 23, 2012 at 21:28
  • 1
    \$\begingroup\$ Please re-edit to make it fit what you meant better. I'm on a minor mission to make these kind of questions a) get better results and b) be more useful to everyone in the future. Having more specific descriptive text is a big start. (Because the answer to "how to make photo this more vibrant?" is a rather boring "crank up the vibrance!") \$\endgroup\$
    – mattdm
    Commented Jun 4, 2012 at 23:40
  • 2
    \$\begingroup\$ That wire on the right hand side is driving me crazy, go back, cut the cable and re-shoot it! :P \$\endgroup\$
    – NULLZ
    Commented Aug 9, 2013 at 8:37

9 Answers 9

12
\$\begingroup\$

Some post processing is needed for some images, and most images benefit from some post processing.

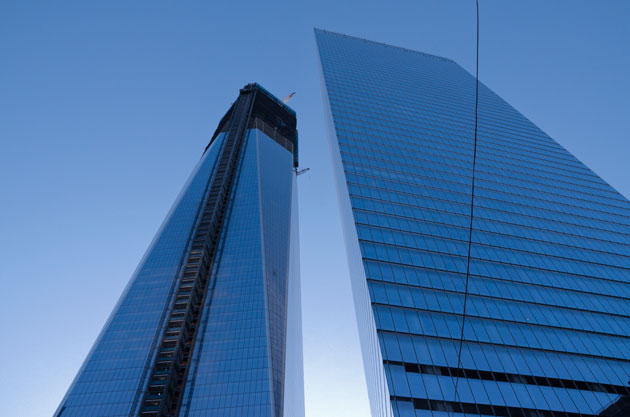
When you take an image like this, where most of it is blue, the automatic white balance will be fooled into thinking that the image should be much less blue. If you had used the "daylight" setting for white balance, it would have been a lot closer to the actual colors.

I wan't there, so I don't know how it should really look, and it's also up to each photographer to create their own experience of the siuation, but here is an example of what you can do with it:

enter image description here Temperature: -31
Tint: +14
Exposure: -1.05
Fill light: 5
Blacks: 2
Brightness: -1
Contrast: -6
Clarity: +10
Vibrance: +10

\$\endgroup\$
11
  • \$\begingroup\$ nice, that is definitely much closer to what it looked like. so if im going to do so much post processing, what's the point of getting a camera like D7000 which is supposed to have a great image sensor. I could take this photo with a D40, and after all the adjustments it would come out the same? \$\endgroup\$
    – Sonic Soul
    Commented May 22, 2012 at 11:47
  • 4
    \$\begingroup\$ @SonicSoul: You only have to do a lot of post processing if there is something wrong with the exposure, normally it's just small adjustments. Having a more expensive camera means that it will expose better in difficult situations, and you will have a better material even if you have to post process. A less expensive camera might have produced something that wouldn't even be usable for post processing. \$\endgroup\$
    – Guffa
    Commented May 22, 2012 at 11:56
  • 10
    \$\begingroup\$ A bit too blue for me :) especially compared to the original \$\endgroup\$
    – clabacchio
    Commented May 22, 2012 at 13:20
  • \$\begingroup\$ +1 for shooting jpeg but setting an appropriate white balance in camera. \$\endgroup\$ Commented May 23, 2012 at 0:52
  • \$\begingroup\$ @clabacchio: The point of the question is that the original doesn't look right, so you shouldn't use the original as a reference for what's right... \$\endgroup\$
    – Guffa
    Commented May 23, 2012 at 8:21
8
\$\begingroup\$

IT is enough to add a cooling filter (25% Cooling Filter (80) in Photoshop) to the image and increase a little the contrast and saturation (10% or so). Do not overdo it or the result will be unrealistic.enter image description here

You could use a polarizing filter for a darker sky. always shoot in raw to be able to change the white balance later. If unsure of the details you whant to promote in the image try overexposing it a little so you cand choose the right exposure later. Just watch out not to get burned white spots.

Always try to shoot at lower ISO. Only increse iso if the exposure time is to low (higher than 1/(lens focal length * 1.5 crop factor) )

\$\endgroup\$
2
  • \$\begingroup\$ +1 for shooting raw and setting the white balance later. \$\endgroup\$ Commented May 23, 2012 at 0:51
  • \$\begingroup\$ yep.. after much more experimenting , the white balance is absolutely the key factor here. thanks \$\endgroup\$
    – Sonic Soul
    Commented Jun 1, 2012 at 14:02
7
\$\begingroup\$

I'm surprised nobody mentioned a polarizing filter. That can do wonders on a blue sky, depending on the angle from the sun.

Think about what sky light actually is. It's light from the sun getting scattered from small particles in the atmosphere. Those are going to be largely dielectric, so will be polarized over a range of angles. The light from any one spot in the sky is all bouncing from the sun to you at the same angle, so will be largely polarized the same way. However, the whiter components are bouncing off of particles large enough for significant polarization, whereas the blue is bouncing off of particles barely large enough to scatter the light at all since all but the shortest (blue) wavelengths didn't get scattered. This makes the blue of the sky less polarized than the general haze. The haze can then be selectively reduced with a polarizing filter at the right orientation. This doesn't work for sky opposite the sun since that's reflecting at near right angles and therefore not polarized.

\$\endgroup\$
3
  • \$\begingroup\$ I didn't even think about it because I always use a polarizing filter outdoors, even on my glasses. Doesn't everyone? \$\endgroup\$
    – jwernerny
    Commented May 24, 2012 at 20:34
  • 1
    \$\begingroup\$ @jwernerny: I don't always. In overcast situations it does nothing for the sky. If you don't have reflections off of dielectrics, then a polarizing filter is just a waste of brightness. \$\endgroup\$ Commented May 25, 2012 at 23:40
  • 1
    \$\begingroup\$ This is the best description of how a polarizing filter reduces haze I've ever read. \$\endgroup\$ Commented Aug 16, 2012 at 18:45
3
\$\begingroup\$

The easiest first step you could have taken is shoot a neutral target like a gray card or Expo Disc. Your color temperature seems too warm, and the target would have helped you bring all your images into line. Good instructions on setting custom white balance on your camera are in the camera's manual and you may find pointers from Expo Disc as well.

Too high a color temperature makes skies look "muddy" so getting that right in camera will help you later to avoid taking this post-processing.

That said, if you color shift from yellows to blues just a bit, I think you'll find the overall hue range more pleasing. You can then add a bit more pop using contrast and saturation, if appropriate. Be careful not to overdo these, as they can bring up digital noise in high ISO images.

\$\endgroup\$
4
  • \$\begingroup\$ interesting! can you elaborate what you mean by shooting neutral target? do you mean, meter off a neutral target? or put the target somewhere in my main shot to force the camera to see the blues? \$\endgroup\$
    – Sonic Soul
    Commented May 22, 2012 at 11:52
  • \$\begingroup\$ You may be able to meter off a neutral target and then do a white balance lock. More likely, I'm sure you can set a Custom White Balance by shooting the gray card and then using that for all your pictures for that session. Re-balance due to changing light & circumstances as needed. \$\endgroup\$
    – Michael H.
    Commented May 22, 2012 at 15:28
  • \$\begingroup\$ What I mean is shoot a neutral target. Really, take a picture of a gray card or an Expo Disc. If your camera allows you to do a custom white balance from a frame, then do that. If not, you at least can do the white balancing in post knowing what the correct color temperature was. The advantage of the Expo Disc is that you can point the camera right at your target and it will give you a neutral that quite accurately reflects the color temperature up there (in your example). With a gray card or target, it's ideal to get have a model hold it or get it at the same light angle as you're shooting. \$\endgroup\$
    – Steve Ross
    Commented May 22, 2012 at 22:17
  • \$\begingroup\$ One other thing: As was pointed out, the meter in your camera attempts to read a white balance assuming there is no predominant color in the scene. So, you have a predominantly blue scene and the meter thinks you are under very blue lights and shifts the color accordingly, giving you that icky green. This is not unique to your camera. Every digital camera I've had does exactly the same thing. In your case, you knew you were under daylight, so you could have set the WB to daylight or about 5000-5500K just to get a pleasing start point. \$\endgroup\$
    – Steve Ross
    Commented May 22, 2012 at 22:21
2
\$\begingroup\$
  • White Balance seems to be off. Learn how to set it correctly and try to use a custom white-balance
  • You can try making the photo less warm in a photo editing software
  • Experiment with Saturation in post processing
  • Learn how to selectively reduce the saturation/de-colorize some part of the image so that the other parts look more vibrant and pop out.
\$\endgroup\$
2
\$\begingroup\$

Nikon D7000 is a great camera and has plenty of tools.

It still looks pretty sunny out so I would not make ISO any higher then is needed. I'd go 200/400 or AUTO ISO for outside photography. Next Auto WB is OK for outside, set AP a slower speed ~ 250/1. If you can afford that camera you can afford Photomatix HDR software and Adobe Photoshop Elements 9. Then use the breacketing on you camera to blend the three photos in bracking set for -2,-1,+1 on the bracketing exposure. When you process the 3 RAW photos through Photomatix software, you get the perfect photo you are looking for. Or even better then you expected. Photomatix & Photoshop Elelments will be well worth your money if you enjoy digital photography!

Learn the HDR photography techniques, or learn processing techniques (like those offered by Photoshop) so that you can highlight the sky and change the color.

The buildings look OK in color so just fix the sky in Adobe Elements: it should be an easy fix.

\$\endgroup\$
2
\$\begingroup\$

FOr in camera results on D 7000, you may try the following:

1) Set the WB to Auto Warmer ( and set to B1 on the grid, you will get a cooler temp but also get the amber.

2) Under picture control set to VIVID 2 and crank up the Saturation to max and Hue + 1 .

Set the sharpness to 9

3) ISO 100

4) Exp compensation -0.7

5) Click with positive bias ( 2 or 3 ) as you like it on the metering scale. You will get a contrast pic with Vivid blue sky.

Please understand if there is haze then the blue will be duller.

Saturation will help and the B1 on the grid will boost the blue.

These ofcourse are manual settings.

\$\endgroup\$
0
\$\begingroup\$

The photograph looks clear enough. So you've two options:

  • Explore options in your camera. Chances are, you have used standard settings for image colors. Most of the cameras have a Vivid color profile which brings out good colors by default (blue sky and green foliage especially).
  • You can also use photo editing software to increase the color saturation levels and curve settings
\$\endgroup\$
0
\$\begingroup\$

Of course always better use polarizer as others says. But back to this photo. here is too much blue on skyscraper, so using color balance only on whole picture, will be not enough. You must select sky with mask and then try with more blue. Anyway, this photo is overexposure a little my opinion. If this is RAW, try to change it back, also try with color balance. Contrast here is not good too, and color balance. Color balance because too much blue on scene and in camera software can't recognize it good. In photos like this, you should check white ballance on gray card or just on white/gray area (wall etc), not on whole photo.

\$\endgroup\$

Your Answer

By clicking “Post Your Answer”, you agree to our terms of service and acknowledge you have read our privacy policy.

Not the answer you're looking for? Browse other questions tagged or ask your own question.