9
\$\begingroup\$

I plan on taking longer camping road trips with my 4x5 camera. I'd like to be able to develop the negatives while I'm traveling. I will not be staying in any buildings, just sleeping in a tent. I'll have access to my car (an SUV), with a heater and an air conditioner. I expect to be using a tank for development.

I am unable to visualize a simple solution to a few hazards I expect to encounter, namely:

  • controlling chemistry temps: I expect a wide range of ambient temperatures over time, but mostly 40-50F.
  • drying the negatives: I expect wind/sand will be an issue outside the car, and dust/down/other will be an issue inside.

I'd love to know if anyone has a complete solution they'd recommend, or solutions to these two specific problems.

\$\endgroup\$
9
  • \$\begingroup\$ what if you dry them out in the trunk? \$\endgroup\$
    – raven
    Commented Mar 1, 2017 at 1:12
  • 1
    \$\begingroup\$ @raven it's an SUV, no trunk. Good thought, though. I've added that detail to the question. \$\endgroup\$
    – steel
    Commented Mar 1, 2017 at 1:13
  • 2
    \$\begingroup\$ Sorry, this won't solve your problems, but might make them seem less daunting... \$\endgroup\$ Commented Mar 1, 2017 at 1:28
  • \$\begingroup\$ How long is your trip about to be? I tried to develop a negative 20 years after the exposure. It went surprisingly well. Though the result was unaceptable... \$\endgroup\$
    – Crowley
    Commented Mar 1, 2017 at 9:08
  • \$\begingroup\$ @Crowley I take regular trips, 1-2 weeks long. I'd like to be able to 1: reuse my negative holders and 2: not go through security with exposed, undeveloped film for the times these trips are on planes. \$\endgroup\$
    – steel
    Commented Mar 1, 2017 at 15:10

4 Answers 4

9
\$\begingroup\$

I don't have a complete solution, mostly because I don't think you need one. I also don't think your biggest issue is going to be either of the two you've mentioned.

To control chem temps, get a instant read thermometer and large thermos. Fill it most of the way with cold water and then add warm water off your stove until you hit your temps.

Since you're shooting 4x5 frames, they'll be rather small, not the rolls you usually have when developing 120 or 135 film. For drying, get a tiny light tent, cut out the sides and replace them with mesh. Get a glue gun to glue a few clips to the top for holding. That should keep dust and bugs out, and if you go too big with the mesh holes and stuff starts getting through, just toss another piece of mesh on them when drying.

I'd say your biggest issue is probably going to be finding enough warm enough water to wash your sheets. Cold (40-50F) water will not wash your fixer out properly, and making enough 75F water to wash it properly (multiple washings) will probably be difficult. The ground water you often get at camp sites also tends to be extremely hard, consider a washing agent.

\$\endgroup\$
4
\$\begingroup\$

I think there are several issues in the wildlife development process.

  1. Moving the film from cartrige to the tank.

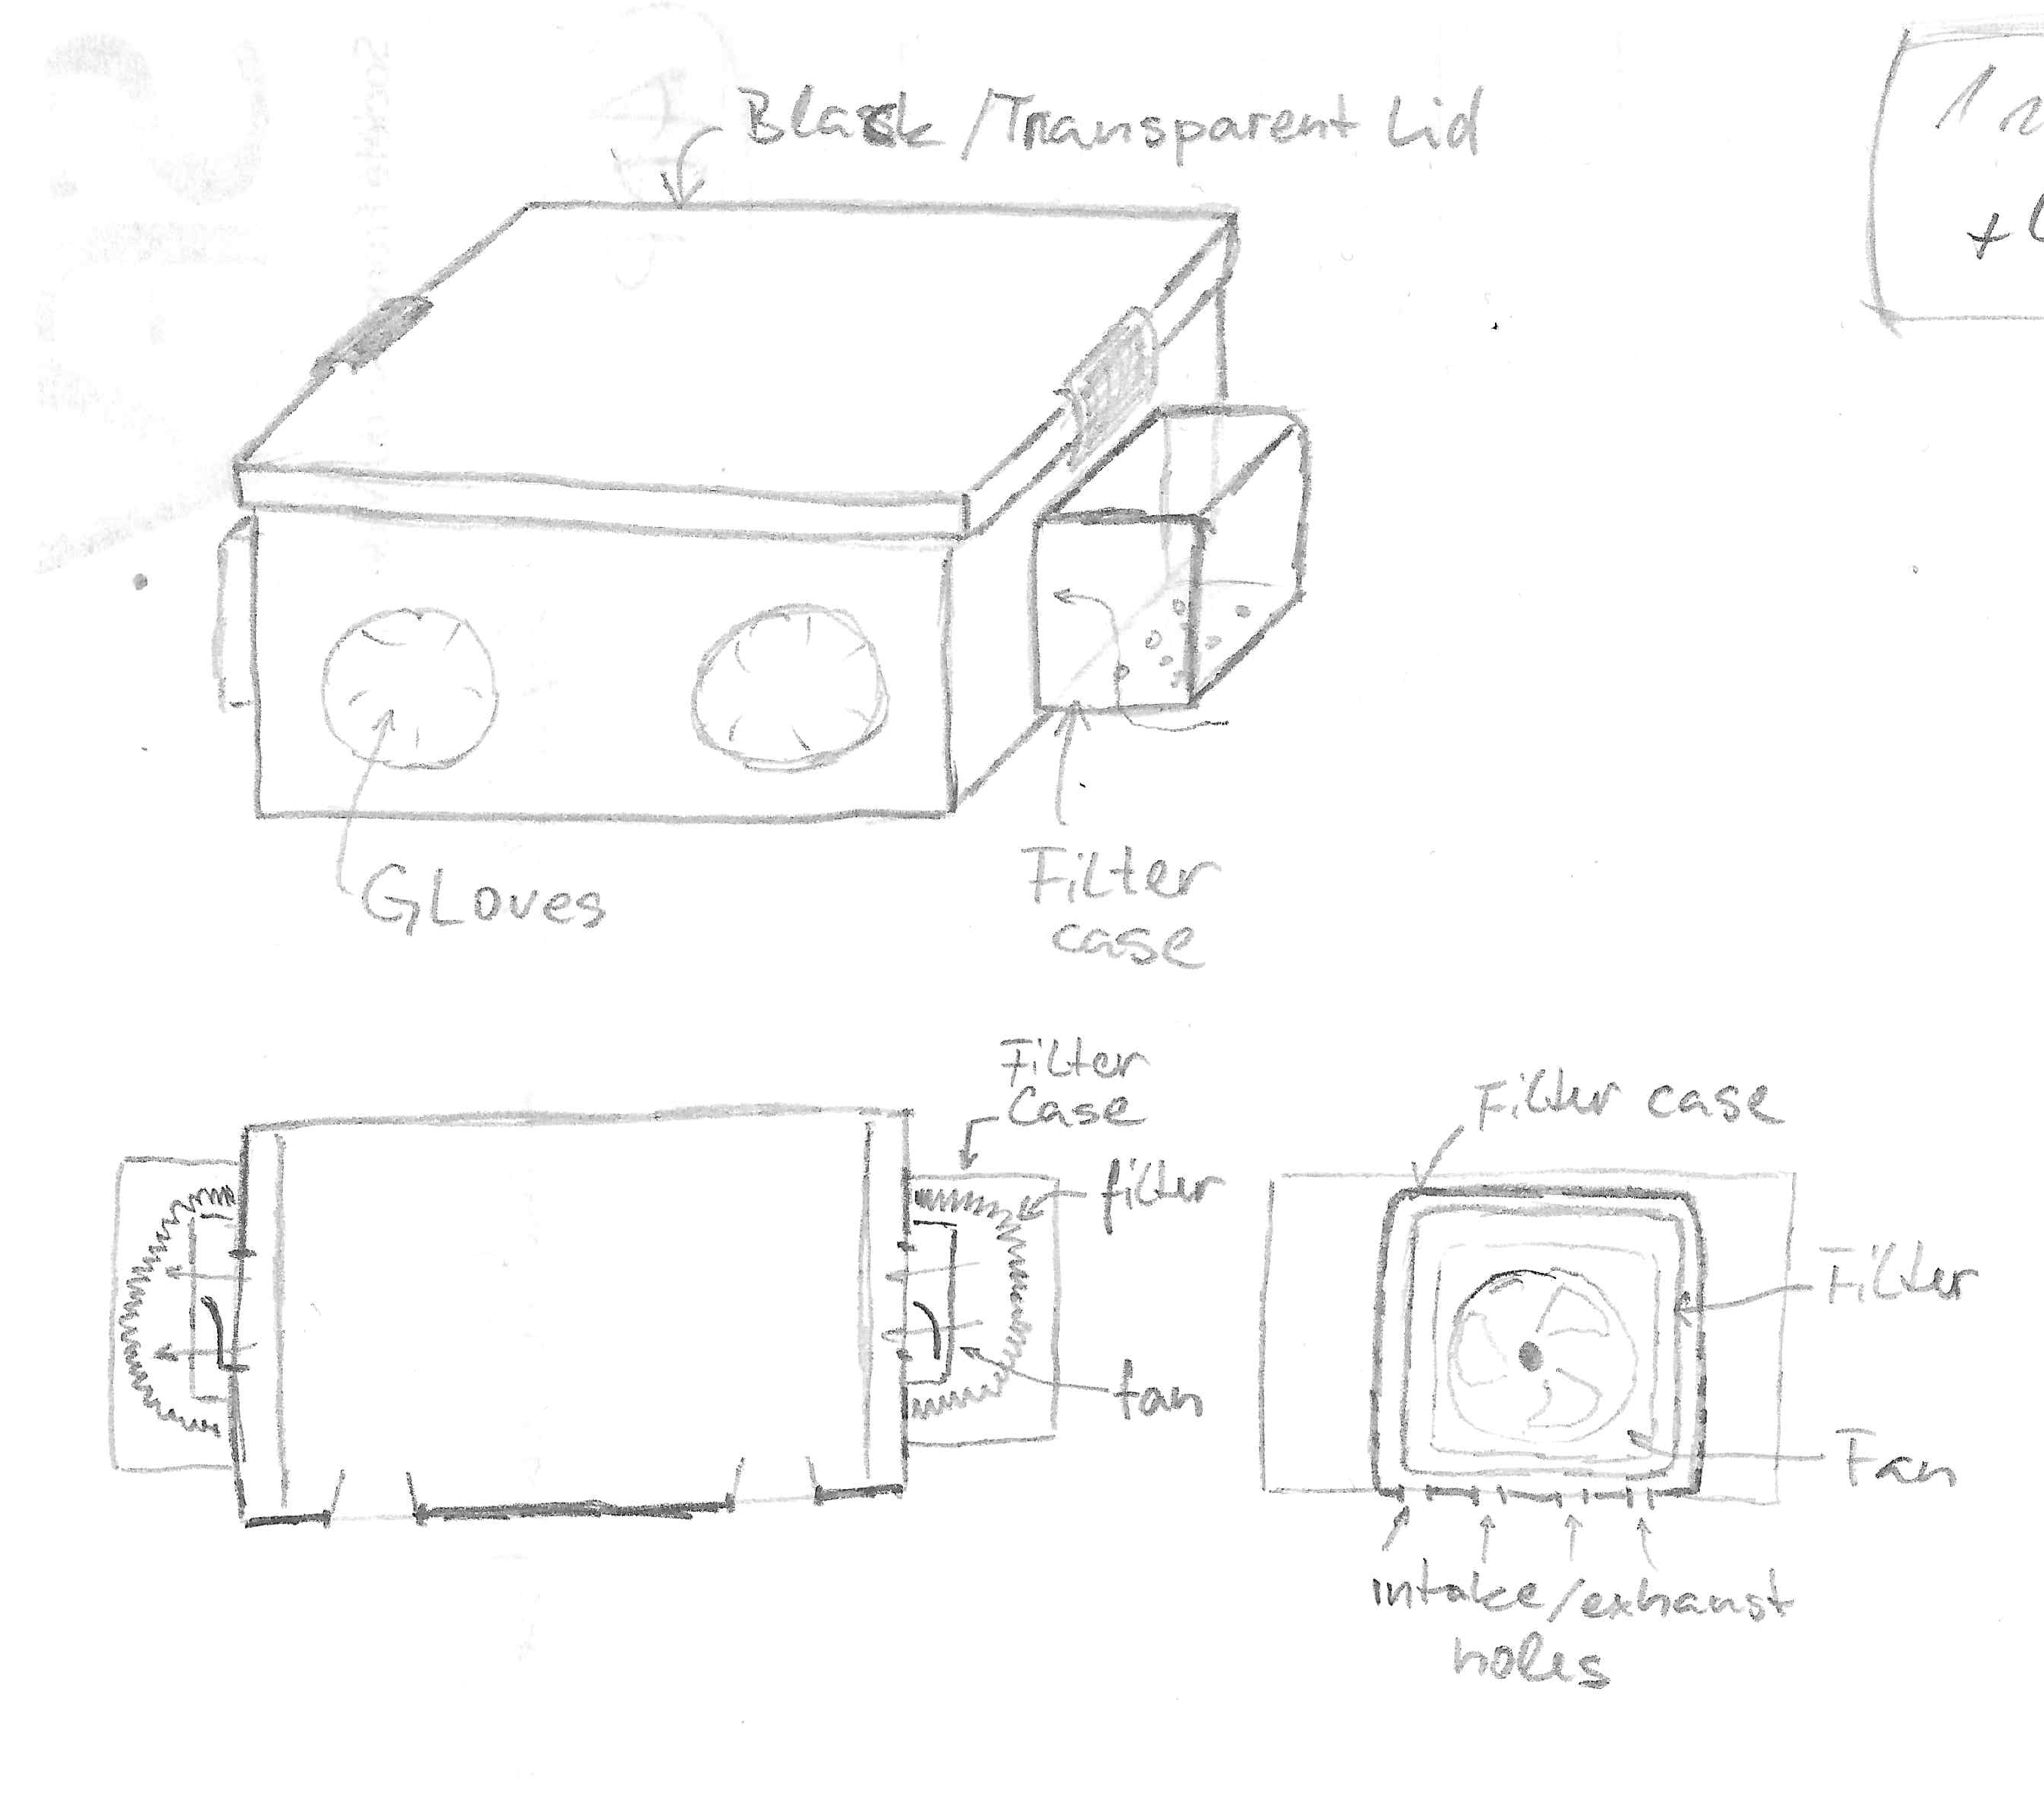
    I think black and tight toolbox with black gloves glued to it will work. Something like this.

  2. Temperature.

    You can use car fridge to keep chemicals cold and during the development you can mixed cold water with hot one to keep the temperature constant. You can go compact by using Peltier cell, but it won't be cheap.

  3. Water source.

    You would need to control the pH and hardness. You can also buy distilled water at petrol stations.

  4. Dust and insects.

    If you attach air filters to the cabinet mentioned above and a 12V fan, you can dry your films in there without problems.

With smart design you can use the cabinet to carry everything needed inside...

Humble sketch

\$\endgroup\$
2
  • \$\begingroup\$ Sketch is out of scale and there is plenty of ways how to improve it :) \$\endgroup\$
    – Crowley
    Commented Mar 1, 2017 at 17:35
  • \$\begingroup\$ You can just buy a film changing bag, no need for building anything. It's a black back, two layers of fabric with zippers on each and elastic gusseted arm holes. More expensive ones have a hoop inside to give you room to work without fabric touching stuff. \$\endgroup\$
    – Davepix
    Commented Mar 7, 2017 at 19:20
1
\$\begingroup\$

I think for developing your best bet is a Yankee Plastic 4x5" Sheet Film Day Light Developing Tank and Photoflex Changing Room, Light Tight Film Changing Tent. You can transfer the sheets from your film backs to the tank in the tent and then do the developing in the light. As stated you can manipulate your water/chemistry temps and you can adjust you dev times to the chemistry temp you have.

As for drying you could possibly use the photoflex tent modified or make a collapsible or modular box out of foam core or similar product with rods and film clips spanning the sides, you could use a 12 volt computer fan powered from the cigarette lighter to pull air thru the box via a meshed port.

All of that said, while it may be gratifying to do, an alternative is to unload your film into a extra 4x5 film box a put it in a lead bag or bags designed to take film through ex-ray machines and fly with it or mail it home.

\$\endgroup\$
3
  • \$\begingroup\$ I ended up going with your bag idea, since I'm early on the learning curve and other solutions were much more complicated. I ended up scratching some of my negatives beyond repair as a result, even with gentle handling. So... I probably won't do that again. Just wanted to circle back and let future folks know. \$\endgroup\$
    – steel
    Commented Jun 16, 2017 at 1:35
  • \$\begingroup\$ can you explain how you scratched them. The bag mentioned in my post was the lead bag and you would put them in a box and then in the bag. \$\endgroup\$
    – Alaska Man
    Commented Jun 17, 2017 at 16:08
  • \$\begingroup\$ I put them into the black bag that they came in, and stored that bag in the box they came in. Best I can tell, the scratches came from adding negatives to the bag once some were already in there, but I can't tell for sure. \$\endgroup\$
    – steel
    Commented Jun 18, 2017 at 16:40
1
\$\begingroup\$

http://amzn.to/2mYrt5S A garment cover bag can also work to dry the film in if you can hang it. Then get get cloths hangers, http://amzn.to/2lUVL8Q, to hold the individual sheets of film or drying rack. If you also have power you can put a small fan in the bottom blowing through a car air or HEPA filter to remove the dust. This also creates an over pressure inside the bag helping to insure dust does not get in. I used to use this setup to dry 120 film because I had to dry in an apartment where I could not control traffic. If I was to do a similar set up today I would use a computer power supply, like http://amzn.to/2mOseBQ to drive a couple of computer fans, like these http://amzn.to/2mOzrls which would also be easy to attatch to the bottom, through a HEPA air filter, http://amzn.to/2mYkNEK but be sure that it fits on the bottom of the bag. Or if you can figure out how to make it air tight on the sides just use an actual air purifier: http://amzn.to/2mOz4Hk. Unfortunately I no longer do film or I would take a picture and include that. You obviously do not have to have any type of air circulation but if you are in an area that has high humidity it could take longer to dry than you are willing to wait. Oh and in the bottom you will want to use a thin sheet of something stiff to both attach the fans to and to keep the sides of the garment bag from moving and possibly touching your film.

\$\endgroup\$

Your Answer

By clicking “Post Your Answer”, you agree to our terms of service and acknowledge you have read our privacy policy.

Not the answer you're looking for? Browse other questions tagged or ask your own question.