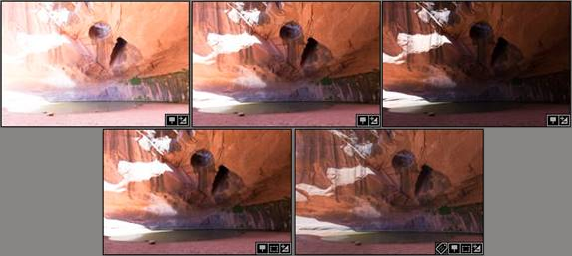
I often take bracketed shots when I see that there is a very high dynamic in my composition, for example a cave in the rock in bright sunlight - the parts of the rock in the sun are very bright, and the deep shadows are very dark.
In the single exposures of the bracket, either part looks fine; the dark part is well lighted in the one end of the bracket, and the bright part is still well structured at the other end - so I would expect this to make a good HDR.
However, when I use the LightRoom function (Photo Merge/HDR), the result has still very bright and very dark areas. It seems LR is not 'compressing' the dynamic range as I would like it.
There is some room in post-processing (Shadows -> +100, White -> -100, etc.) to get about what I wanted, but I'd rather set LR to compress more to start with.
Is there any way to change the default settings, especially for compression?
I am using LR Classic (the version published in Oct 2017), but it worked the same way in the previous LR CC editions. I have also tried 5, 7 and 9-bracket shots, also with very large spreads (so they are going from all-white to all-black), the result is the same.
In the shown image, the top row is the 3-bracket, bottom row left is what I get from LR, bottom right is what I would like to get. Look at the bright spot just above the left center of each shot - my target has the structure from the dark shot, but the LR-generated one is still a bit burned out:


