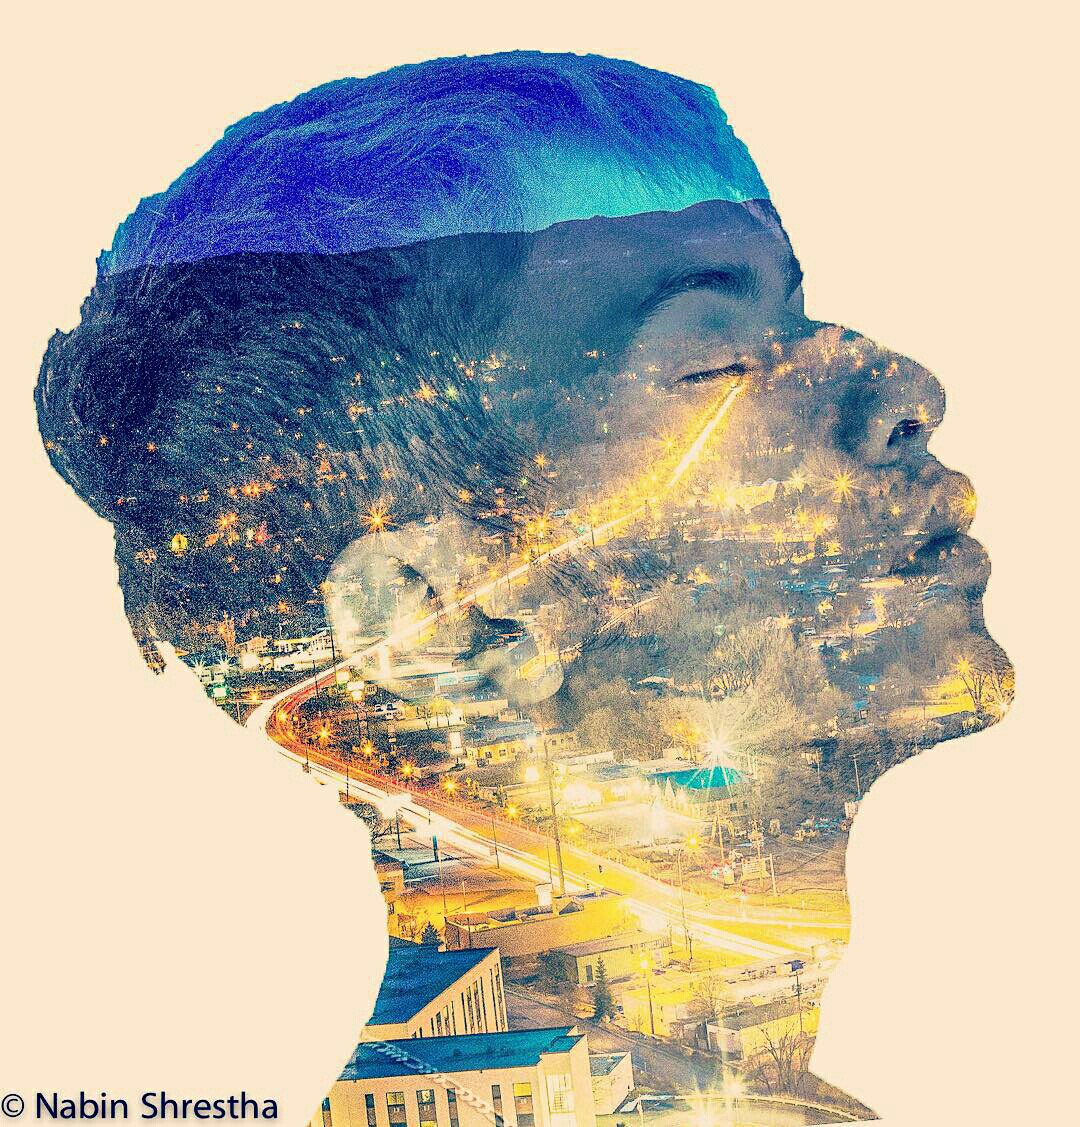
I want to recreate the effect in this picture:

You can see it in some Taylor Swift music videos, too. I'm interested in creating a still image like this, and would like to know what this effect is called. Links to guides will suffice.
I want to recreate the effect in this picture:

You can see it in some Taylor Swift music videos, too. I'm interested in creating a still image like this, and would like to know what this effect is called. Links to guides will suffice.
Find or create the silhouette profile image. You can find tutorials online about this by searching for "silhouette," "profile," etc. I'm being vague about this because there are lots of ways to do it. This is not the appropriate forum for listing all of the possible ways.
I went out and grabbed this image:
Then turned it into a silhouette:
Load both the silhouette image and the landscape into Photoshop as separate images.
What we need to do now is convert the silhouette image to a layer mask. Within the silhouette document, hit ⌘/Ctrl-A to select the whole image, hit ⌘/Ctrl-C to copy it to the clipboard, then click the "Add layer mask..." button at the bottom of the Layers panel. Option/Alt-Click the mask to edit it directly, then hit ⌘/Ctrl-V to paste the silhouette image in as the mask.
Beware: If you leave out the Option/Alt-Click step and just paste the mask image, it will become a new layer in the document rather than replace the initial all-white mask.
If your silhouette image is black-on-white — as in the example above — you need to invert it at this point with ⌘/Ctrl-I to make it white-on-black.
Click back on the image icon within the Layers panel to switch focus from the mask back to the image itself.
Switch to the landscape image, hit ⌘/Ctrl-A then ⌘/Ctrl-C to copy the whole image to the clipboard, switch back to the portrait image, and hit ⌘/Ctrl-V.
The landscape image will appear as a new layer above the profile image. Drag the profile mask up onto this layer, unlink the mask from the layer by clicking the little chain icon between the two, then move and scale the landscape image to fit it into the silhouette as you want:
This is the resulting composite image:
The feathered bits at the top of the mask look a bit strange in that screenshot because I've still got the underlying dog layer enabled. As you will see, this problem will go away later.
Now for the finishing touches.
Add a Solid Color adjustment layer below the landscape image layer to act as a background. This would be the pale orangey-yellow color in the example image.
Recolor the landscape as you like. In the above image, it looks like they've got a strong blue/yellow duotone effect going on. Getting that exact effect is a topic worth a question in its own right.
I chose to mimic the effect with a Gradient Map adjustment layer, but again, there are many ways to approach this problem.
I had you do the initial effect above with a pure B&W silhouette for simplicity, but in the example image above, they've got some of the person's face detail composited in as well. To recreate that, you would apply the silhouette mask to both the portrait and the landscape image, then lay the portrait image over the landscape and use the layer adjustment controls (opacity, blend mode, blending options, etc.) to blend the two images together.
Here's the resulting Layers panel:
And the composite:
Clearly I am not a great artist. :)
As for your question of what this effect is called, I'm not aware that it has any common name. It's a combination of many effects, several of which I've named above. (Silhouette, duotone, gradient mapping, etc.) The overall process of combining two images is called compositing.
I'm not a regular Photoshop user, so I will go in a slightly different direction because I believe it may still answer your question: One way to take this sort of picture "in-camera," even with digital cameras, is through double exposure.
In short, you take a picture of your subject in silhouette and another picture of the scene you want superimposed (I'll call it the "texture"). Many digital cameras will allow you to combine the images (not a true double exposure, but good enough). Because your subject is in silhouette (nearly white background and nearly black shape), the white areas will stay white and the black areas will then carry your texture.
Note that to snap a picture of your subject in silhouette, you need a clean, very bright background (such as the mid-day sky) while your subject is in relative darkness (like in the shade). This is a case where it can be good to "shoot into the sun."
Here is a link from the Popular Photography website explaining the technique: http://www.popphoto.com/how-to/2014/04/how-to-shoot-camera-double-exposure-photo
A search for "double exposure silhouette" or something like that should show you a lot more examples.
I suspect that the Photoshop method would be simpler if that's your cup of tea. In that case you could work with more images that might not initially be right for this technique (I'm thinking especially of increasing contrast or eliminating background confusion to enhance the clean silhouette effect). I will leave a response on Photoshop for the Photoshop experts.