11
\$\begingroup\$

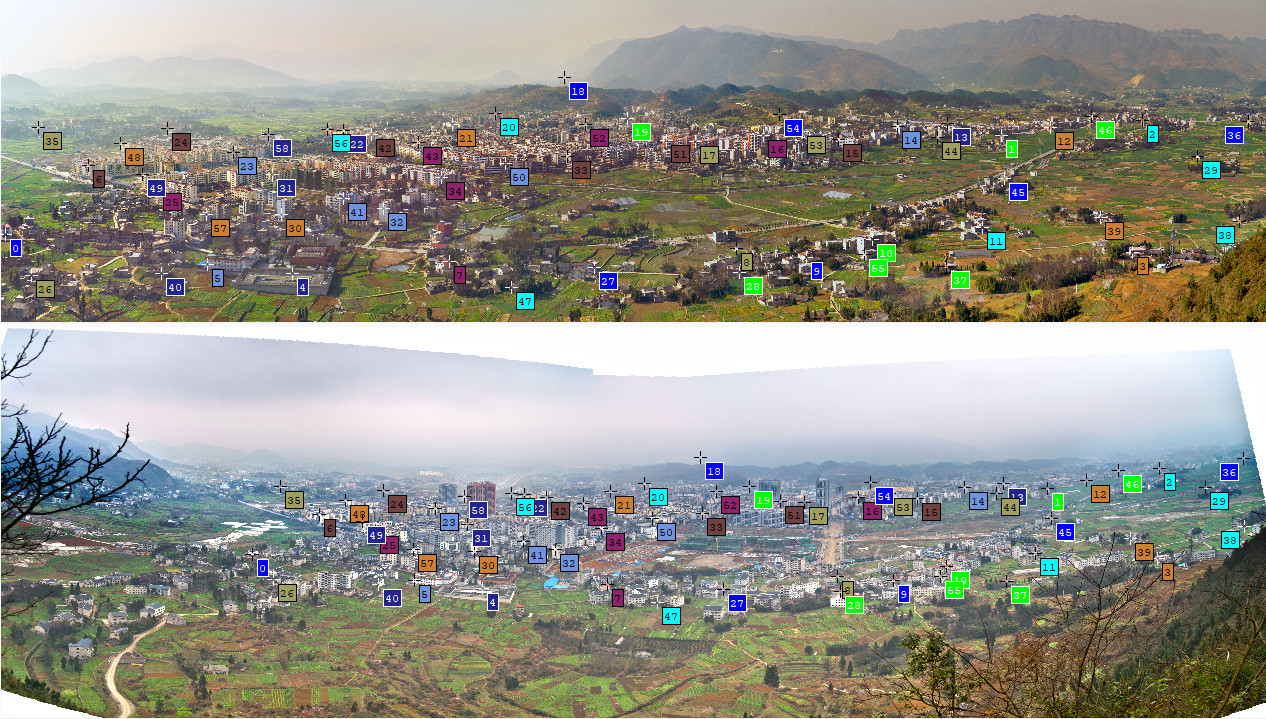
I have two panoramas, which are already stitched. They were taken four years apart, of the same town from the same location. I want to align them and show them side by side, so that the viewer can easily compare them and see the development of the town. I have manually added some control points in hugin.

enter image description here

The problem is that hugin aligns the two images badly. Some matching points are hundreds meters off. I guess problem here is that hugin only reads photos from cameras, but not already-stitched images, which have complex distortions. For a panoramic input image, how to find the type of lens and degree of view? Is hugin the wrong tool?

Edit: Just for the record, I have solved the problem using curve fitting manually. The details can be found here.

\$\endgroup\$
9
  • \$\begingroup\$ Are you using autosift-pano? Or just those manual control points? \$\endgroup\$
    – mattdm
    Commented Mar 3, 2013 at 13:29
  • \$\begingroup\$ Auto control point fails because the two images are quite different. Even manually adding control points is hard, and hugin complains that my manual points have low similarity. \$\endgroup\$ Commented Mar 3, 2013 at 15:15
  • 2
    \$\begingroup\$ Very nice comparison photos, and with a slider function too. Thanks for the update and the explaining part at the end of the page. \$\endgroup\$ Commented Mar 20, 2013 at 7:46
  • 1
    \$\begingroup\$ @user149408, I didn't. Hugin and morph.c doesn't exchange any data. The output of Hugin is a text file containing control points, while the input of morph is the transformation model and the image. From control points to transformation model, I use octave to do regression. \$\endgroup\$ Commented Oct 18, 2016 at 3:57
  • 1
    \$\begingroup\$ @WuYongzheng could you perhaps be so kind as to answer your own question with the solution you found? I think your self developed solution is pretty clever, but it's currenyl only described on the bottom of the webpage you linked to. If that page goes down, the solution becomes unfindable to others. By creating an answer here and writing/summarizing what your method is, it can help more people in the future. Thanks in advance! \$\endgroup\$ Commented Nov 6, 2023 at 15:23

2 Answers 2

3
\$\begingroup\$

I have developed my own solution which worked quite well. The main idea is to use linear regression to find out a 2d transform function. I used 4th order polynomial. I.e:

$x' = a_1 + a_2 * x + a_3 * y + a_4 * x^2 + a_5 * x * y + ... + a_15 * y^4$

$y' = b_1 + b_2 *x + b_3 * y + b_4 * x^2 + b_5 * x * y + ... + b_15 * y^4$

The control points GUI in Hugin looks like this: enter image description here

The text data of the control points can be found in Hugin project file. Like this:

# control points
c n0 N1 x34.0000205966735 y1931.00001347956 X2011 Y1818 t0
c n0 N1 x8268 y1116 X8380 Y1292 t0
c n0 N1 x9431 y991 X9273 Y1132 t0
c n0 N1 x9345 y2083 X9263 Y1851 t0
c n0 N1 x2403 y2254 X3856 Y2090 t0
c n0 N1 x1702 y2180 X3311 Y2026 t0

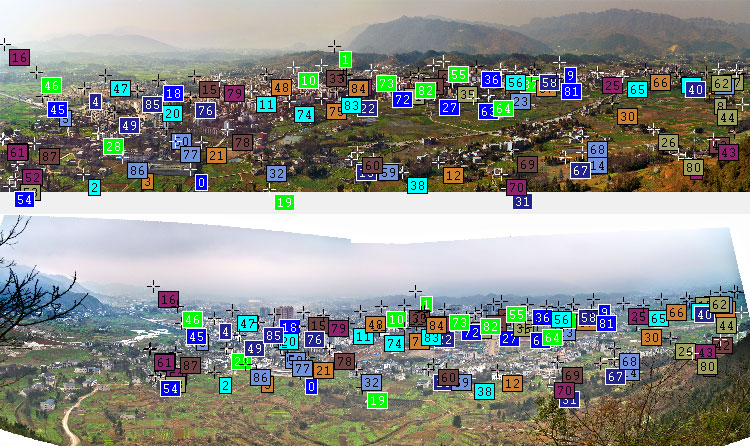
After a little reformat of the text data, my morph program can transorm the top image into the bottom image using the control points. I have added some grid lines to demostrate the trandormation. The max error distance is only 2 pixels. Considering image's dimentation 10456x2664, it's hard for human eye to tell the error.

enter image description here

A more detailed blog can be found in my github.io page.

\$\endgroup\$
1
\$\begingroup\$

How about just cutting the excess material off the new panorama? I don't think any program can nicely align the two panoramas you have, and still keep the both photos the same size. Look at this one, if it is even close to what you wanted? I made it with a simple editing program, mainly a cut-resize-paste job.

\$\endgroup\$
2
  • \$\begingroup\$ Thank you Esa. They look well at a glance, but there are some artifacts. For example, Point 0 and 2 are have almost the same Y coordinate in the upper image, but Point 0 is higher than 2 in lower image. You did gave me a hint. I will try manually transform/wrap them in photoshop. \$\endgroup\$ Commented Mar 3, 2013 at 13:16
  • \$\begingroup\$ The photos are both your own photos. The numbers are in the exact spots that you put them yourself. I did not move anything, only cut and resize, that's all. \$\endgroup\$ Commented Jul 31, 2013 at 19:35

Your Answer

By clicking “Post Your Answer”, you agree to our terms of service and acknowledge you have read our privacy policy.

Not the answer you're looking for? Browse other questions tagged or ask your own question.