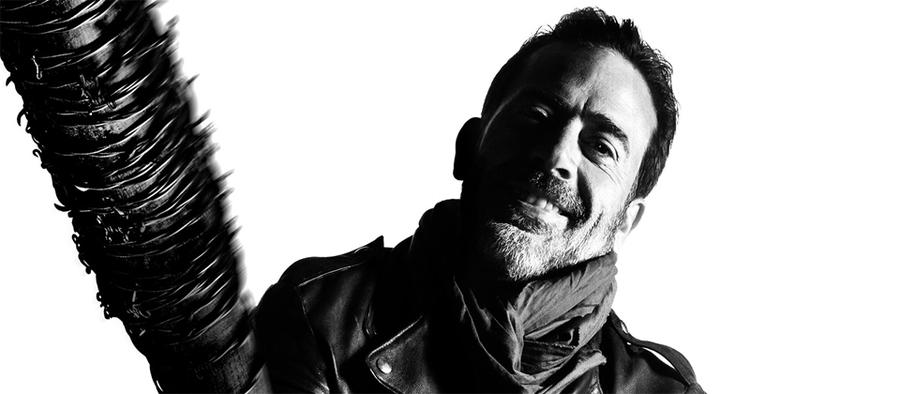
Could you tell me how to get this effect between camera settings and photoshop? I know how to use the flash and backdrop, but I'm curious as to how to get the one side of the face dark.

Could you tell me how to get this effect between camera settings and photoshop? I know how to use the flash and backdrop, but I'm curious as to how to get the one side of the face dark.
Lighting for shots such as this one is not about absolute lighting levels, it is about lighting ratios. The 'dark' parts of the picture don't need to be in absolute darkness. They just need to be less bright than the bright parts of the scene by enough to make them dark by controlling exposure.
As long as the side you want illuminated is lit brightly enough compared to the side you don't want to be bright and exposure is set appropriately you'll get the effect you are looking for.
In both cases when you want the background to be bright or when you want it to be dark the key is to get enough distance between your subject and the background so that light illuminating the parts of the scene you want to be bright does not spill onto the parts you want to be darker. The same is true of walls off to camera left and right: they need to be far enough away and non-reflective enough that light won't bounce off of them and back into the scene.
With a dark background you can also flag your off camera flash to reduce light spilling onto the background. When a bright background is required then the you have fewer options to control the additional light aimed at the background. Distance is the primary way you have of controlling the light coming off the background. Making sure you're only using the minimum power needed on your light illuminating the background in order to blow out the background (instead of, say, twice as much as you need) is another. Tilting the background towards the light source if it is off axis and away from your primary subject may also help.
For how this works out with a dark background, please see: If I want to shoot darker shots, is it better to increase the lighting and then darken in post to retain clarity? Note that the dark areas in the photo can be much brighter than they look in the image, exposure just has to be set to 'kill the ambient' and the parts you want to be bright have to be lit brightly enough to still be bright at that reduced exposure value.
For another question that deals with a lighter background, please see: How to get this particular black and white look?
Some tips on lighting for portraiture:
Years ago, I taught Color Print and Process at the Professional Photographers School for Continuing Education (Winona). The great portrait masters taught there too, and sometimes I would monitor and act as a Grip. Some rubbed off so here goes:
Our media is for the most part 2 dimensional reproductions of 3 dimensional objects. Our lighting should give an illusion of depth. The shadows give this illusion. The shadows must not be too dark; they will be void of detail.
We start with a two-lamp set-up: a “main” and a “fill”. The idea is to preserve an illusion that the subject is being illuminated by just one light that stems from above (simulates afternoon sun). We adjust this lamp, called the “main” or “key”, so the subject is enhanced. We do this by looking at how this lamp casts shadows.
Long nose? – Set main to cast short nose shadow. Short nose? – Set main to cast long nose shadow. Round face – Set main to one side so the other side of the face is in shadow etc. This is an acquired skill.
The crucial point is this: the “main” casts shadows, and if these shadows are not softened by light, these shadows will be rendered dark or even black (void of detail). To temper these shadows we must somehow illuminate them. This is a job for a reflector, or better yet, a fill lamp.
To temper the shadows we can place a second lamp so that it plays on the shadow areas. Because we are tempering the shadows from the camera’s viewpoint, we set a lamp called a called a “fill” at lens height and as close to the camera as is practical.
Now about lighting ratios: 2:1 (Flat Lighting): We place the “main” so it is above the subject, and let’s say it delivers 100 units of light to the frontal area of the face. Now the “fill” lamp is placed beside an imaginary line drawn lens-to-subject. It delivers the same 100 units of light. To accomplish, the “fill” is identical to the “main” and is set at the same distance from the subject as the “main”.
Why 2:1? The “main” delivers 100 units of light on the frontal areas of the face. The “fill” also delivers 100 units. The frontal areas thus receive 200 units (both contribute). However, the shadows only receive light from the “fill”. They get only 100 units. Thus the ratio is 200 units frontal and 100 units in the shadows. This is 2:1 ratio. It is flat, in other words, lacks contrast.
3:1 (Bread and Butter) as this ratio is most flattering and sells best. To achieve this, the “fill” is adjusted so it is subordinate to the “main” by 1 f-stop -- meaning it arrives at 50% power compared to the “main”. To accomplish this, use a studio flash at ½ power or back the “fill” my multiplying the “main” lamp-to-subject distance by 1.4. This establishes the “fill” at ½ power.
Why 3:1: The “main” delivers 100 units of light. The “fill” delivers 50 units. The frontal areas of the face get both = 150 units, the shadows only get 50. The ratio is 150:50 -- this reduces mathematically to 3:1.
5:1 (Contrast or Masculine. “Fill” adjusted to ¼ power. By setting or by backing it up 2X distance “main” to subject. This is theatrical lighting; shadows are dark but retain lots of detail.
Why 5:1? “Main” delivers 100 units to frontal area. “Fill” delivers 25 units. Frontal area gets 125 units, shadows only 25 units. Ratio is 125:25 reduces to 5:1.
Now comes 9:1: Fill is backed up 2.8X the distance “main” to subject or set to 1/8 power. Main delivers 100 units, fill delivers 12 ½ units. Ratio is 112.5: 12.5 = 9:1. A super contrasty lighting; the shadows reproduce very dark with almost no details visible.
If you reduce the power of the “fill” any more, the shadows go black, void of detail. This will be the most contrasty lighting. In other words, no “fill”.