7
\$\begingroup\$

I'm now at the point where I walk around and see light; its direction, strength, softness, casted shadows etc.

Now I'm almost at the point where I also understand it; i.e. the science behind what light is for a camera and what a camera can do with it.

I'm a little confused about low key photography; for example, I read a statement like "make sure that the light of your strobe doesn't reach you background". And I'm like... light travels at 300.000 m/s?

I would like an explanation as to how the general idea of low key photography works; completely blackening the background and lighting an object in the frame. I'm especially interested in the (real world) physical distance en properties of the object and background that's being framed.

\$\endgroup\$
6
  • 3
    \$\begingroup\$ To me the "make sure that the light of your strobe doesn't reach you background" part sounds more like: direct your light-source so that it is not lighting the background, or have it at a certain power and distance from the subject and the background so that the difference in lighting between the subject and the background is important. \$\endgroup\$
    – dannemp
    Commented Aug 16, 2017 at 9:47
  • \$\begingroup\$ Also, even if for practical reasons it's not possible to really make the background "disappear" at shooting time, Photoshop can help; that's what I did here. (Well, I used Gimp actually because I'm cheap.) This suits me better because I don't own or even use any studio equipment, and really don't want to. \$\endgroup\$
    – user29608
    Commented Aug 16, 2017 at 10:16
  • 1
    \$\begingroup\$ @dannemp I reckon you should post that as an answer if you expand it a bit :) \$\endgroup\$ Commented Aug 16, 2017 at 10:28
  • \$\begingroup\$ @fkraiem Having used both, I find that GIMP is a more powerful and easier to extend tool than Photoshop. Apart from the Magic Erase tool - GIMP requires some trickery to achieve a similar effect. (It, however, can be used to create masks that imo achieve a better effect than Magic Erase can.) \$\endgroup\$
    – wizzwizz4
    Commented Aug 16, 2017 at 16:55
  • 1
    \$\begingroup\$ In my opinion, the related question is similar, but not a duplicate. This is about light not hitting the background, the other is about ISO and grain. \$\endgroup\$
    – Rafael
    Commented Aug 27, 2017 at 18:46

5 Answers 5

9
\$\begingroup\$

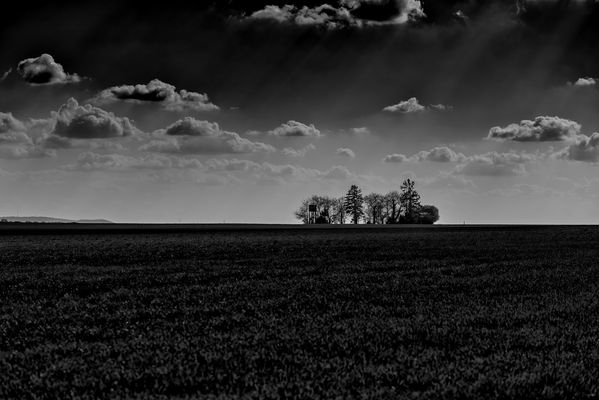
First of all, low key doesn't mean that the background has to be dark. In the photo below, for example, it is the farthest objects that are lighter and the foreground that is dark:

low key photo of Westerberg near Ingelheim in Germany

In fact, in reality there was nothing dark about that landscape at all! What makes this image low key, is that the photographer allowed less light through the lense (or filtered it out in post-processing) than we would normally see in that situation, to bring out the forms of the clouds that would otherwise be lost in the glare.

This image also shows what low key photography is about:

Low key photography focuses the attention of the viewer on the relatively brighter parts of a scene by blackening the others.

If you think of the typical low key portrait of a person or object in front of a black background, it usually emphasizes the shape of the person's features (if lit from the side to a chiaroscuro effect) or the structure and tactility of that person's skin (if lit more from the front).

How you can achieve this effect, has been answered by the other answerers.


Image from Erhard Hess (papabear125) at http://www.fotocommunity.de/photo/westerberg-lowkey-papabaer125/39655266

\$\endgroup\$
5
\$\begingroup\$

Low key photography is about using less light than you would usually do to correctly expose a shot and thus creating a darker image.

Low key photography can be done outside of a studio(and you can achieve interesting results) but based on your question I guess you are more interested in the studio aspects of low key photography.

A low key photo doesn't necessarily mean a dark or badly lit subject, it is more about using light in a very selective way so that the environment is overall dark and there is a darker "feel" to your photo.

In order to achieve this in a studio you should use a black background. You usually want to avoid directly lighting it. You can place your strobes on your subjects sides or you can experiment with the setup so that the light-source is not directed towards the black background. If you however need a en-face light you can place your subject further away from the backdrop and ensure the light is enough for your subject but not too powerful so as not to reach and lighten the background.

You should also mind the fact that it is not enough to have a completely black background in order to achieve a low key look. Your subject should also have less light than in a normal photo. In a low key portrait you can experiment with the shadows on the face, that are sometimes not desirable in a "normal" portrait in order to give it a more low key feel.

An important point is post processing, you can edit a photo to give it a low key look. One suggestion is to edit out any spots that accidentally got lit in the background. Another can be exposing your subject "correctly" then lowering the exposure in post processing.

You can take inspiration from the Baroque style painters who did a lot of low key portraits, or nature morte. For me a good reference would be Rembrandt.

\$\endgroup\$
5
  • \$\begingroup\$ "Another can be exposing your subject "correctly" then lowering the exposure in post processing." What does "correctly" mean here? If you have to lower the subject's exposure in post in order to achieve your desired result, you run the risk of overexposing it in camera and being left with blown highlights. \$\endgroup\$
    – user29608
    Commented Aug 16, 2017 at 11:24
  • \$\begingroup\$ By correctly I mean without any loss of information in the shadows or highlights so that you can adjust for the desired effect. \$\endgroup\$
    – dannemp
    Commented Aug 16, 2017 at 12:12
  • \$\begingroup\$ But as you say yourself, "low key" is not only about exposure; the light needs to be positioned so as to produce interesting shadows, etc. This paragraph makes it sound like you can take just any image and make it "low key" by lowering the exposure in post. \$\endgroup\$
    – user29608
    Commented Aug 16, 2017 at 12:32
  • \$\begingroup\$ Exposing correctly does not mean having a flat lighting on the face in a portrait photo, you can still have all the shadows which are created from the light-source positioning rather than from the exposure. Although if you are a Photoshop magician you sometimes can make "just any image" look as "just any look" to some extent) \$\endgroup\$
    – dannemp
    Commented Aug 16, 2017 at 12:36
  • \$\begingroup\$ You can always create shadows, but it is harder to recover highlights or completely black spots. I am not advocating for heavy editing in order to achieve low key photos, but give it as an option. There is a lot you can do with only dodging and burning for example. \$\endgroup\$
    – dannemp
    Commented Aug 16, 2017 at 12:38
5
\$\begingroup\$

Lighting in photography is about ratios, not intensity. You can pretty much expose anything to make it low key but I understand that what you want is to have a darker background than your subject.

The first and easiest way is simply to move the background further. Light does travel at 300,000m/s and will eventually reach your background but it also falls off with the square of the distance. So, the further the background, the less bright it will be. What you are looking for is to adjust the ratio between the light-to-subject and light-to-background distance. The greater that ratio, the darker the background will be compared to the subject.

Another technique is not to light the background. This is useful when creating silhouettes, outlines of objects and patterns of shadows. You can do this by using a directional light, with blinds, reflectors, snoots, etc and place it between the background and the subject. Make sure light goes towards the subject which will be backlit or sidelit, depending on where exactly you place the light source.

\$\endgroup\$
4
\$\begingroup\$

Make sure that the light of your strobe doesn't reach you background

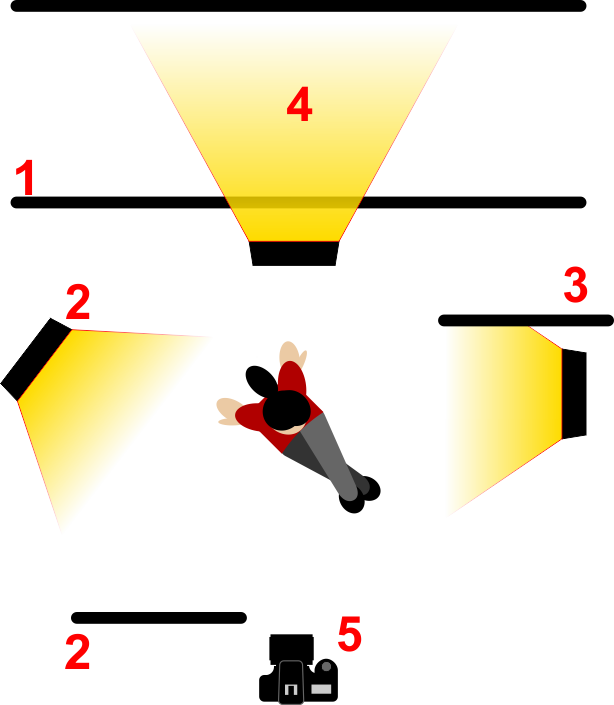
There are several ways to achieve a dark background. When you look at them are pretty obvious. Each light on my diagram is just an example, of course on a low key photo you would not use that many lights.

  1. Use a dark background.

  2. Point your strobe in a way it does not illuminate the background. There is a chance the light points directly to the camera, you probably need to cover that.

  3. Use a dark flag, simply put some obstacle between the background and the light.

  4. Move the background away from your subject or move your subject and the lights away from the background. The light cast on the background will diminish*.

  5. If there is ambient light you need to make some adjustments on the camera.

enter image description here

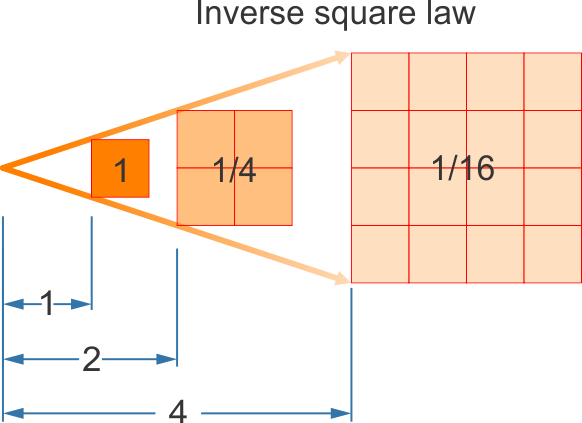
  1. The point 4 is interesting to understand, that responds to an inverse square law, this is, if you double the distance to the background, the light will diminish 4 times, double the distance again and the light will diminish now 16 times.

enter image description here


  1. If you have ambient light the basic principle to diminish this is using a faster shutter speed. The faster you shoot the less light will enter the camera.

If this speed is lower than the max sync speed, you are ok.

But when you reach the max sync speed, you need to use additional tricks:

  • Use a lower ISO
  • Use an ND filter
  • Use a High-Speed Sync Flash
\$\endgroup\$
3
\$\begingroup\$

It was already explained that the intensity of the light arriving on a surface falls off in intensity with distance. This is explained by what is called the “Law of the Inverse Square”. In practical terms if you double the distance from lamp to surface, the light will be reduced by 4X. In other words, if 100 units of light arrives at a surface 1 yard (1 meter) distant from the lamp, backing the lamp away to 2 yards (2 meters) will reduce the intensity of the light to 25 units.

Now a reduction of 2X = 1 f-stop or a 50% reduction. To achieve we measure the distance lamp-to-subject and multiply by 1.4. This calculates a revised lamp-to-subject distance that cuts the light 50% (1 f-stop). Thus if 100 units fall on the background from a lamp 1 yard (1 meter) distant, them moving it back 1 X 1.4 = 1.4 yards (1.4 meters) cuts the light in half. The light at the background will be 50 units (1 f-stop). Multiply by 1.4 again thus 1.4 X 1.4 =2 yard (2 meters) the light fall off is 4X. Now the light level will 25 units = 2-f-stops. Multiply by 1.4 again and the distance is 2.8 yards/meters and the light intensity is 12 ½ units = 3 f-stops. Again and the distance is 4yards/meters and a 4 f-stop reduction. Again and the distance is 5.6 yards/meters and the light reduction is 5 f-stops.

A five f-stop difference between the light intensity on the principal subject and the background will do this deed. You can achieve in a studio environment by just moving the background backwards. Easy to say but not easy if the studio is too small for such action. If can’t make distant changes now you are forced to somehow throw the background into the shadows.

\$\endgroup\$
1
  • \$\begingroup\$ The ability to move backgrounds further from the subject is one of the technical advantages a large photographic studio offers over a small one. Another is not having to shove lights quite so close to the subject...e.g. someone's face. \$\endgroup\$
    – user50888
    Commented Aug 16, 2017 at 16:19

Not the answer you're looking for? Browse other questions tagged or ask your own question.