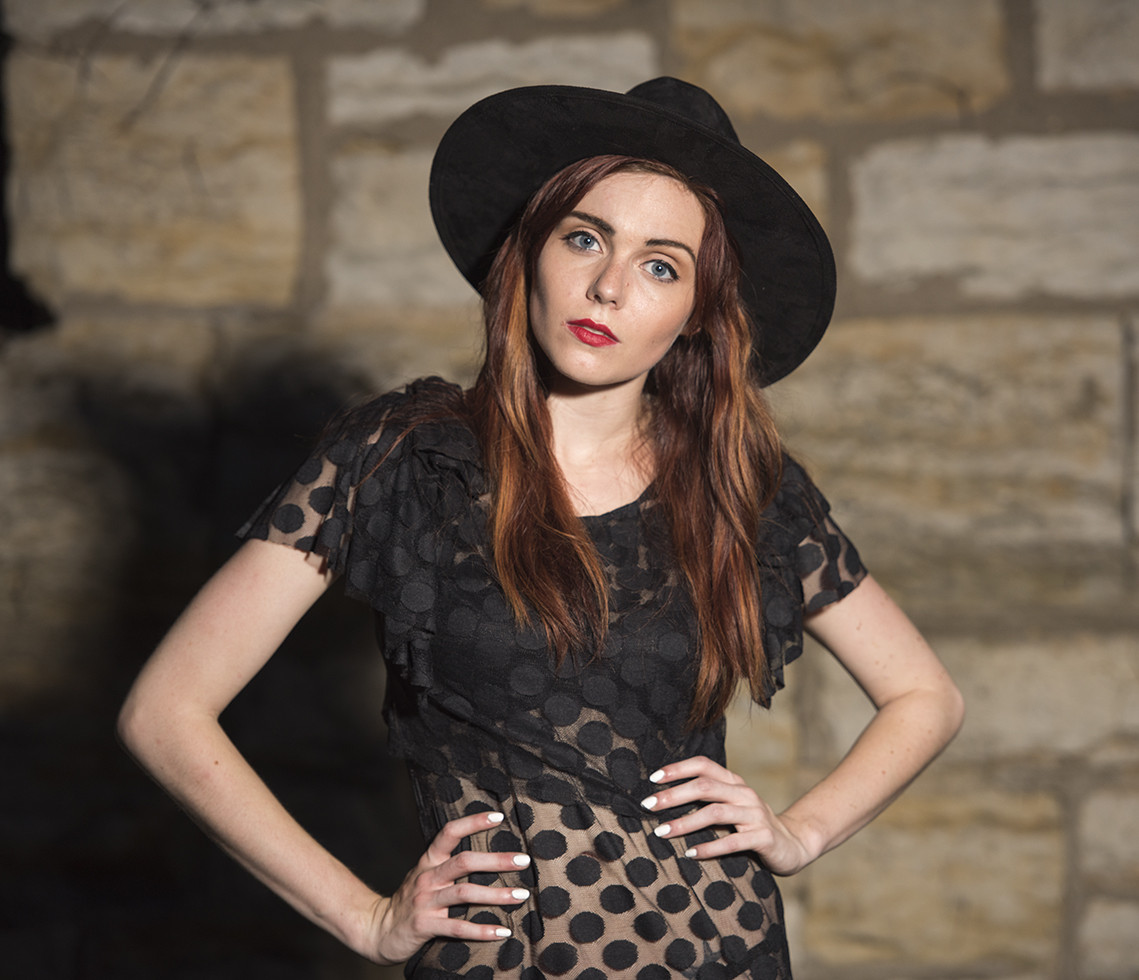
Despite the name of your modifier (Profoto White Softlight 20.5" Reflector), this is no soft light at all. The light source is far away and small enough to produce hard light on the subject. The most common property that makes light hard or soft is how smooth the shadows are. This can be seen from the shadow under the chin on the neck. The shadow has a sharp edge, where sharp means "the distance from full shadow to no shadow is very short". There's barely a gradient visible.
Just to be clear here, this is not to say this is good or bad. Just to give it a name so you know what I'm talking about.
The inherent property of soft light to make shadows transition more smoothly is caused by the angle of light. For soft light, the angle is very broad. For hard light it is narrow.
With a narrower angle, it takes a bigger distance1 for a shadow cast by hard light to become soft. That's why the shadow is still visible on the wall. If you used softer light, the shadow would be softened so much that it would be less visible.
This means that you have two options:
As Rafael pointed out in his answer, increase the distance from the model to the background. This gives enough room for the shadow to fall onto the ground where it is not part of the image any more. I want to add to this that if you are considering post processing anyway, you could consider using a white background. This has 2 advantages:
You can basically just overexpose it with another light source and not worry about any details in it that you want to keep because there are no details.
You can easily insert any background that you want in post processing via blend modes.
As the shadow edges become less visible and the overall shadow more blurry with softer light, you could use softer light. In order to do this, you'd either have to use a bigger modifier to increase the size of the light source or move the source in closer. There are two potential problems with this
The look will be significantly different, as the picture is now, the hard light is very punch, as in the middle of the day under harsh sun. With soft light, it will more look like an overcast day. Depending on how close you move in the light, it might only illuminate parts of the model and in turn look even more different.
The modifier/light source could reach into the frame. This is not a problem, because you can take an image of the background without the modifier/light source in it and remove the modifier/light source from the picture in post processing.
conclusion: If you want to keep the hard punchy lighting, but get rid of the shadow, increase the distance between background and model. If you want to get rid of the shadow only and don't mind a different look of the image, use softer lighting or possibly and another light in addition to that as suggested in other answers.
A little more creative thought (danger: opinion inside): So far 95% of the shot is the model and the pose. (dare I say 99%?) The lighting is not very interesting. A car produces that kind of light. (it'd have to be elevated to cast a shadow downwards, but still the same kind of light)
If that's the look you are trying to achieve, perfect.
Otherwise, embrace the shadow. You are using hard light and can get razor sharp shadow edges in your image, but so far the light is blowing out mostly all shadows on the model and the one on the background sure is annoying and not helping with anything at all. What if the shadow cast by the model becomes a part of the image instead of a bi-product of the lighting? Couldn't the rim of the hat throw an iconic shadow in the face? Contrary to what I suggested above: What if the model was leaning against the wall? If you move the light source closer to the wall, the shadows cast on the wall become longer and the shapes possibly more interesting. Can you make the the black of a shadow and the black of the dress merge into each other so the overall shape of the outline of the model becomes less obvious and thus more interesting?
Speaking of black, it is the only thing I'd be missing in the picture you are having right now. There's a black dress and black hat, but no true black in the image at all. There's so much light that even those blacks appear as dark grey in the image.
1distance from subject to the surface that the shadow is cast on


