3
\$\begingroup\$

I am very comfortable with using Adobe Bridge CC and Photoshop CC to organize, crop and straighten photos, but I am frustrated by what seem to be arbitrary limits on the two available tools for this in Lightroom: Crop & Straighten +/- 90 degrees and Lens Correction +/- 10 degrees. Oh, and the bubble level tool of course.

I am most assuredly missing some core concept here, so please indulge me in a Lightroom rookie question:

What if I want it rotated plus or minus 72 degrees? Assuming, say, a drunken smart phone photographer other than myself ; )

I am quite spoiled by Photoshop's (Command-T) for the Free Transform Tool used with a selected Layer.

Any advice humbly appreciated as I am quite sure there is some basic understanding I lack here.

\$\endgroup\$

2 Answers 2

2
\$\begingroup\$

On the Photo menu in Lightroom you can Rotate Left and Rotate Right (Command-[ and Command-] respectively), is this what you were looking for? this is only 90 degree increments. To get to eg +72 degrees, you could rotate clockwise by 90 degrees with this method, then adjust by -18 degree.

My best guess as to the reason for this is that the camera tends to know its approximate orientation, at least to the nearest 90 degrees.

Not sure about lens correction +/-10 degrees as I haven't particularly used this feature, but the bubble level, i'm thinking you mean where you can draw a line on your image, and it will use that as the horizontal or vertical. You can do this: in Develop mode at the top right, clicking on the crop/adjust tool palette (grid with handles below the historgram in the default Lightroom layout), you've got the Angle slider. To the left of that is the spirit level (bubble level) in a darker circle. If you click on this, you can draw the line along a vertical or horizontal object within your image.

\$\endgroup\$
2
\$\begingroup\$

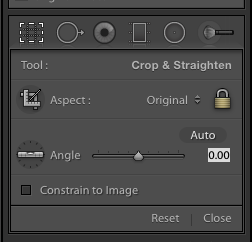
In the develop module, with the crop/straighten menu selection (looks like a dashed box) there's an "Angle" tool that looks like a ruler with a bubble. There's a few options to adjusting the angle there:

  1. Use the slider to drag left or right to change the angle, can be fussy, but gets you in the ballpark.

  2. Click on the angle number on the far right side and type in an exact angle with +/- numbers.

  3. Click the little ruler/bubble itself and it "detaches" from the menu and then you can draw the line on the image directly that corresponds with the line you want to straighten to.

enter image description here

\$\endgroup\$

Your Answer

By clicking “Post Your Answer”, you agree to our terms of service and acknowledge you have read our privacy policy.

Not the answer you're looking for? Browse other questions tagged or ask your own question.