3
\$\begingroup\$

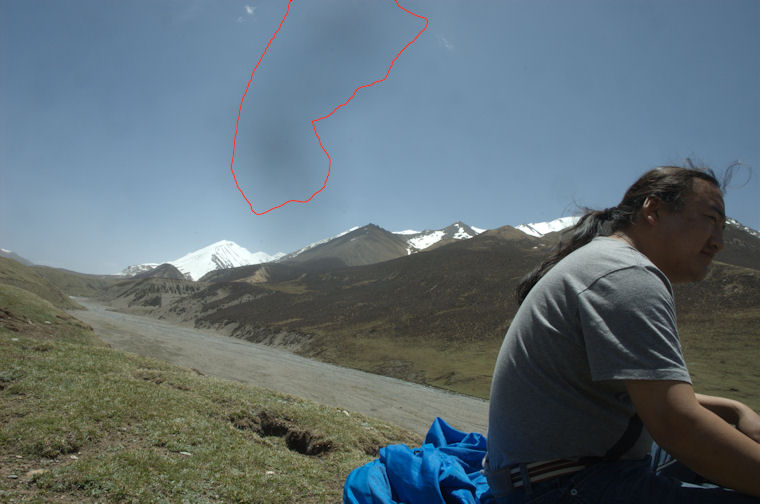
I have just returned from a trek that I cannot repeat. In archiving the photos I took on this trek, I realised that for one series of photographs I had something on the lens (probably yak shit). This has resulted in this series having the same flaw (it looks like smoke drifting upwards into the sky). Obviously the effect varies from frame to frame depending what lies within the spoilt area - a lot have sky in this area; another lot have mountains in this area (and so the effect is not so great). This flaw affects about 28 shots out of approx 230.

Does anybody know of an approach that will allow me to remove the effect of this flaw consistently across all the affected shots. I am not looking for detailed instructions applicable to a particular software package, but rather an approach to this type of problem and its correction using image manipulation software.

If it is relevant, the software I use normally is Corel Paintshop Photo Pro X3. The shots concerned were taken on a Nikon D70s, and are all in RAW format.

EDIT I was asked for a copy of an image so you could see what the flaw was. Attached is a small JPEG with the flaw roughly marked in.flaw I do appreciate that this particular image may be very simple to fix, as there is a plain sky I can use to clone. This is not the case with all of them. In addition, I asked originally for a solution to remove this flaw CONSISTENTLY across all the affected shots. A solution for one image only is less desirable.
\$\endgroup\$
1
  • 3
    \$\begingroup\$ Could you post one of the affected images here so we can see exactly what the flaw looks like? \$\endgroup\$ Commented Jun 7, 2012 at 8:02

4 Answers 4

4
\$\begingroup\$

If you use Lightroom, use the brush tool to heal or clone over the affected area. Then you can copy the adjustments for that image and "paste" them onto each of the others, saving you a lot of time :-)

\$\endgroup\$
4
  • \$\begingroup\$ I should note - I did see you're using Corel Paintshop Photo Pro X3, but download the trial of Lightroom -- it's free from Adobe -- you get 30 days to try it out. Should be long enough for you to do what you need ;-) \$\endgroup\$
    – Mike
    Commented Jun 8, 2012 at 12:30
  • \$\begingroup\$ Thanks for your comment. In fact I think the Corel product has a similar facility to copy the adjustments. This is the sort of solution I want, to apply to ALL the affected images. \$\endgroup\$ Commented Jun 8, 2012 at 13:29
  • 1
    \$\begingroup\$ If you use the clone tool on a patch of sky, then copy the adjustments to another image where the blemish is over a mountain, a person, or a darker patch of sky, what will the result be? \$\endgroup\$
    – MikeW
    Commented Jun 11, 2012 at 6:28
  • \$\begingroup\$ @MikeW: Not pretty. But if you have lots of dust specks to fix copying the adjustments and then removing/fixing the broken ones is much easier than doing all of them on every image individually. \$\endgroup\$
    – Joey
    Commented May 24, 2014 at 12:00
2
\$\begingroup\$

My sensor is prone to getting dust on it so I've run into this as well. Even if the obstruction is opaque, it's possible to lasso an area in Photoshop and use Content-Aware Fill to remove it. Using batch processing, you can easily apply this operation to a group of images with the same defect. However this is not foolproof, often requiring touchup afterwards, and if the defect falls on a dark area it may be less jarring to simply leave it in place than to remove it.

In the case of a translucent obstruction like in your example, it's possible to construct a layer that will carefully cancel out the spot in Photoshop (this is easiest to do if one of the images has the spot against a solid-coloured even surface like the sky or a sheet of paper). You can then select all and rapidly copy paste the layer into the other affected images. If you then copy the layer's style and paste it as well into the new layers, you can reproduce it in all the other images, which should precisely eliminate the defect. Note that noise in this area may be greater due to loss of light, so you may need to introduce a bit of blur in that region as well.

\$\endgroup\$
1
\$\begingroup\$

Apart from clone stamp, here are two ways you could try.

1) Select a clean area of sky/mountain near the affected area the same size or larger than the blemish. Duplicate that selection into a new layer. Move it over the blemish and hide it with a black layer mask. With a soft white brush, low opacity, brush over the mask to paint in the clean sky/mountain.

2) Use a curves adjustment layer. Pick a spot on the blemish and set a point on your curve (Ctrl-click in photoshop I think). Then move over to an area of the sky/mountain nearby and note what RGB values are in that clean area. Go back to your point, and set the output levels to those RGB values. You'll have to set the output level separately for each RGB channel. What you should now have is a curves layer that will adjust your grey yak poo blemish to blue sky or green mountain or whatever. Now hide the adjustment layer with a black mask and paint in the effect where you need it. This is a good way to fix skies that are uneven, so it may work for your problem.

My guess is that either of these may help reduce the issue, but you may need further work with clone stamp to blend in the changes so they are realistic.

\$\endgroup\$
-1
\$\begingroup\$

If you have photoshop the spot healing brush tool. I use that one most of the time and it does a pretty good job and its super easy.

\$\endgroup\$

Your Answer

By clicking “Post Your Answer”, you agree to our terms of service and acknowledge you have read our privacy policy.

Not the answer you're looking for? Browse other questions tagged or ask your own question.