37
\$\begingroup\$

I've heard that it's possible to create an HDR image from a single RAW file. (Obviously, it won't be as good as using multiple bracketed RAW files; I know that much.)

Every time I try — using Photomatix with the default settings -- the results are truly awful. I'm not even trying for something printable, I mean it's too noisy, blotchy and generally horrible even for viewing onscreen.

Does anyone have any tips — either about what kind of RAW files will work well, or about how to tweak the Photomatix settings for this case, or about other software which will do this better?

\$\endgroup\$
8
  • 2
    \$\begingroup\$ Keep in mind that many lowend DSLRs simply doesn't have enough dynamic range for a single frame HDR. My Nikon D60 didn't, but it works fine with Nikon D300. I assume the same is true for Canons comparable cameras as well. \$\endgroup\$
    – Emil H
    Commented Jul 16, 2010 at 21:07
  • \$\begingroup\$ What is the dynamic range of your camera's sensor (how many bits per pixel)? Can you adjust the pixel format of the raw file? \$\endgroup\$ Commented Jul 17, 2010 at 14:18
  • 11
    \$\begingroup\$ Here's the shocker: only a single exposure can be considered HDR, as your sensor has a higher dynamic range than the output (JPEG or print). Taking multiple exposures to achieve the same result is pseudo-HDR. \$\endgroup\$ Commented Jul 18, 2010 at 8:53
  • 1
    \$\begingroup\$ The sensor is 24-bit, I believe. I've stopped using the Photomatix pseudo-HDR-from-single-file thing, and instead started creating 3 distinct exposures as per Alan's answer, below - this has already improved the results. Basically, I was just being too lazy... \$\endgroup\$ Commented Jul 18, 2010 at 22:12
  • 1
    \$\begingroup\$ More recent sensors are 14-bit. Older sensors are 12-bit. I think it will be hard to find a DSLR with a 24-bit sensor. \$\endgroup\$ Commented Aug 5, 2010 at 18:16

13 Answers 13

17
\$\begingroup\$

Ideally you want to capture at least 3 distinct images, but the more properly exposed your single raw image is, the better the outcome.

By proper exposure (a subjective term), I mean to expose to the right. You want to capture as much detail in the shadow areas of your image, without blowing out the highlights. The way dSLR CMOS sensors work, they do a much better job capturing information in an image that is slightly overexposed, than with an image that is underexposed (shadow areas will have more noise).

When you have your single RAW file, you want to hopefully create at least three images with varying exposure levels. Depending on your base image, these exposures may be -2/0/+2 EV or -1/0/+1 EV (as Marc's answer (and image shows)), or some variation of three exposure values--one that is less than your base image, and one that is more than your base image. You will need to play with the EV values until you get the intuition on what EV values will work with your base image.

When using Photomatix, try playing with the settings, the default values were never good. IIRC, bumping up the strength to full, and then tweaking from there produced good results.

\$\endgroup\$
3
  • \$\begingroup\$ +1 Good answer but sometimes the 2EV difference might already be too much if the image is not well exposed. \$\endgroup\$
    – Marc
    Commented Jul 16, 2010 at 20:18
  • \$\begingroup\$ @Marc: Yeah I edited my answer to point that out, after I saw your answer :D \$\endgroup\$
    – Alan
    Commented Jul 16, 2010 at 20:22
  • \$\begingroup\$ Thanks for this; it was very helpful. Things are already looking better... \$\endgroup\$ Commented Jul 16, 2010 at 22:35
17
\$\begingroup\$

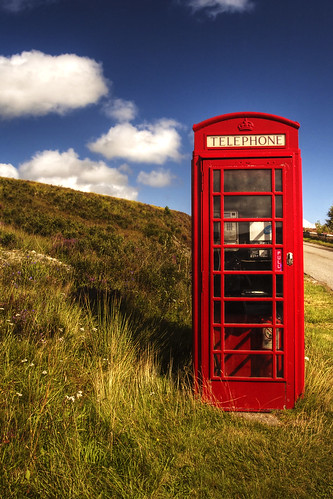
I usually export a single RAW three times by only changing the exposure (0, -1, +1).

You might be using too extreme exposure settings for your shots. Or the Photomatix settings are far from optimal. The Light Smooting setting should be quite high to achieve a realistic result.

This shot is a HDR from one RAW file, it worked fine for me so I'm sure you can do it too.

Scotland - RGB

\$\endgroup\$
4
  • 2
    \$\begingroup\$ @marc - nice shot! \$\endgroup\$
    – reuscam
    Commented Jul 16, 2010 at 20:16
  • \$\begingroup\$ +1, because I see two comments above that could be considered answers. 1) +1, 0, -1, and 2) extreme photomatix settings. \$\endgroup\$
    – reuscam
    Commented Jul 16, 2010 at 20:25
  • \$\begingroup\$ Great work: it doesn't look so obviously HDRed! Not a fan of the haloey, greyed out, flat, hyper-real look. \$\endgroup\$ Commented Jul 16, 2010 at 20:35
  • 8
    \$\begingroup\$ @Jared Updike: HDR is just a type image which allows a high dynamic range. It's the "Tone Mapping" that people abuse to create craptacular images that is destroying photography. Damn kids and their damn rap music. \$\endgroup\$
    – Alan
    Commented Jul 16, 2010 at 20:40
13
\$\begingroup\$

I use TuFuse to create good-looking HDR images. I shoot into RAW and check the histogram immediately to have no overexposures. Then I develop two pictures - one with nice bright parts and the second with nice dark parts:

http://2i.cz/2i/t/0b571c36e5 http://2i.cz/2i/t/1a460d27f4

Next, I run TuFuse with standard parameters:

tufuse.exe -o out.tif im1.tif im2.tif

It produces quite a nice image (using standard exposure weight curve):

http://2i.cz/2i/t/e5b9f2d80b http://2i.cz/2i/t/f4a8e3c91a

If I am not satisfied, I change the curve with some parameters:

tufuse.exe --cCo 0.6 --cBr 0.5 -o out1.tif im1.tif im2.tif

--cCo 0.6 narrows curve by 0.6, --cBr 0.5 moves it to the right by 0.5. The result image is brighter:

http://2i.cz/2i/t/d68ac1eb38 http://2i.cz/2i/t/c79bd0fa29

\$\endgroup\$
2
  • 2
    \$\begingroup\$ Wow this TuFuse is a very interesting thing. Is there a more user friendly and up to date alternative? \$\endgroup\$ Commented Mar 23, 2011 at 8:21
  • \$\begingroup\$ That would depend on the dynamic range of the image - if you try to photograph say the interior of a church you have a dynamic range that exceeds the dynamic range of the sensor and an HDR technique is a must. (I used around 40 exposures on one occasion, from 15s to 1/15s) \$\endgroup\$
    – DetlevCM
    Commented May 7, 2013 at 8:35
9
\$\begingroup\$

The short answer is no it's not possible to create an HDR image from a single raw file.

"HDR" is far and away the most misused term in photography. Dynamic range is the ratio between the darkest parts you can distinguish and the brightest parts.

A true multi-exposure high dynamic range image with linear tonecurve would actually look very flat and uncontrasty, due to the fact that computer monitors can only display a limited dynamic range so the differences between tones must be made as small as possible. For this reason mankind invented tonemapping. Effectively this boosts the local contrast so the dynamic range for one part of the image is displayed using the full range available to the monitor. This is what is responsible for the HDR "look".

So what you meant to ask was "how do you create a tonemapped image from a single raw", which is possible. I wont go into the how (see the many other answers to this question) but will point out that dynamic range and noise are inversely proportional. So the higher the dynamic range the lower the noise and the higher the noise the lower the dynamic range. The noise floor of an image effectively limits the ability to distinguish between shadow tones and thus affects the dynamic range, also if you have a limited number of bits per pixel the quantisation noise increases.

I mention this because you talked about noise. Unfortunately this is unavoidable. The relationship between noise and dynamic range means that if you apply tonemapping to a single raw image you will get more noise. This is because a single raw image has a limited dynamic range, no matter what you do with it!

I should also add that just because you can, doesn't mean you should! Some of the worst uses of tonemapping I have seen have been used to try and make a boring photo interesting, by going all out in the contrast stakes. I would think very carefully about whether you are using tonemapping because will work with am already strong image to improve the look, or just to make an otherwise dull image look a bit more interesting.

Good luck!

\$\endgroup\$
4
\$\begingroup\$

Here is how I achieve an HDR/tonemapped image using Lightroom and Photomatix:-

  • Choose your original image carefully, you want one where there's not too much in the way of highlights or shadows. ie. not over or underexposed.
  • Right click your original RAW file, and select Create Virtual Copy. Repeat once so that you have 3 copies of the image in your catalogue. (If you like, you can go to 5, 7, or 9, but thats stretching it from a single file).
  • On the first one of the three, select it, hit 'D' to go to Develop mode, then use the 'exposure' slider to underexpose the image by the amount desired. Usually this would be 1 1/3rd stops, or sometimes 2. (But again, 2 stops may be pushing it from a single RAW file).
  • On the third photo, drag the exposure slider to the right to over expose the image by the SAME AMOUNT as the under exposed image (ie, 1 1/3rd stops).
  • Press 'G' to go back to library mode.
  • Provided you installed the Photomatix lightroom plugin you can now select all three images and rightclick, and Export > Export to Photomatix Pro (or something similar to that).
  • When prompted uncheck the ghosting and align images options - as this is from a single file you wont need those! Also, set the option to reimport the result back into your LR catalogue.
  • It will load Photomatix and you then play with it in there as normal until you are happy.
  • When you complete the process and save and tonemap the image, it will go back into your Lightroom catalogue with the name you specified, and with a .TIF extension/file type.
  • You are done! You can now further manipulate it if you wish within Lightroom.

Hope that helps.

\$\endgroup\$
3
\$\begingroup\$

If you shoot Canon, and your camera is supported by current builds of Magic Lantern, use Magic Lantern's dual-iso mode.

Magic Lantern

Magic Lantern is a firmware add-on to Canon's DryOS. You load it onto the memory card in the camera, and it runs from there. It does not alter the firmware in your camera, but does require a specific version of firmware to run correctly, so only supported models with supported firmware versions will work. (See also: What are the risks of using Magic Lantern?).

Dual-ISO

The dual-ISO module is designed to do single-shot HDR or HDR video. The software samples the sensor at two different ISO settings by alternate pairs of lines. You get a striped output file. The lower ISO setting is typically the one you'd use normally, while the higher ISO setting is used for noise reduction in a manner similar to Guillermo Luijk's Zeronoise algorithm. Since noise is a limit on dynamic range, reducing the noise increases the dynamic range. You lose half the vertical resolution in the highlights and shadows (it's interpolated back on midtones) and there may be moire and aliasing in the deep shadows, but you gain roughly 3EV if you use a 4EV ISO interval.

When you use the dual-iso module, you can adjust the interval between the two ISO settings, but you are limited by what ISO levels your camera can do.

cr2hdr Processing

You shoot the image, and then download the RAW file. You then need to run the file through cr2hdr (see: the C source code), a utility that interpolates the lines of data back together to create your HDR image. If you aren't up to compiling cr2hdr :), there are binaries and GUIs, etc. available. I prefer the Lightroom plugin.

The DNG output from cr2hdr will look like the image is underexposed by your iso interval. However, pushing it (increasing the exposure) in post will show very little to no noise.

Because only a single shot is used, there is no chance of ghosts or clones, and this technique can also be used for video footage.

See:

\$\endgroup\$
2
\$\begingroup\$

I would thoroughly recommend a read of Trey Ratcliff's excellent HDR tutorial. The bit about post processing with layer masks as a step after all the Photomatix malarky was a real eye-opener for me, and has had a massive effect on my HDR efforts.

\$\endgroup\$
3
  • 5
    \$\begingroup\$ I stopped reading at step one when he says "Speaking of which, Macs are great, and my Mac’s CPU does not melt", completely not relevant to what he was trying to teach. I would never start a photography tutorial with "firstly you should be using a Nikon because Canon are rubbish..." \$\endgroup\$
    – Matt Grum
    Commented Sep 25, 2010 at 8:14
  • 5
    \$\begingroup\$ If that's all it took to stop reading (assuming your're not joking), then its really your loss. The guy imparts some good advice & tips. I can look beyond the Mac vs PC religious wars because, as you rightly say, it has no bearing at all on the tutorial. \$\endgroup\$ Commented Sep 26, 2010 at 23:02
  • \$\begingroup\$ I'm not a huge fan of HDR photography but I would agree that Trey Ratcliff's HDR Tutorial is about the best you are likely to find. All of the steps you need to get good results are covered in some detail. \$\endgroup\$
    – Mark J P
    Commented Jan 23, 2012 at 21:39
2
\$\begingroup\$

I didn't even use multiple exposures for this particular result, and it's not the best example because I didn't plan for it, but here it is.

Before & After

enter image description here

The only program I used was Lightroom 3 and I used the single CR2 file. Most of what I did was use the Fill Light and Exposure sliders to pull back the curves-crushed shadows and highlights. Some other tweaks brought the apparent contrast and colour vibrancy back into the image.

In the full resolution image, you can see cleaned up noise in the shadowy areas, but I was otherwise quite impressed with the range of values I pulled out of the single file. This was shot on a Canon EOS 60D (APS-C, 4.3µm pixels, 14-bit).

Actual JPEG

enter image description here

\$\endgroup\$
1
  • 3
    \$\begingroup\$ +1 for revealing the detail it alrady is in the single image. I was recently experimenting to rescue an image of a person under a tree's shadow with a bright sky behind her. I tried both, Photoshop's HDR, And curve editor in Canon Photo Pro. I like the Canon version much more than the HDR version because it had better saturation, more natural color and avoided the halos. \$\endgroup\$
    – Jahaziel
    Commented Sep 12, 2012 at 16:04
2
\$\begingroup\$

HDR imaging is not a certain look. High Dynamic Range, has a relative term "high" - high compared to what? Compared to the a printer's ability to print? The 8bit monitor? Or the 8bit jpegs? Or the 12-14bit cmos sensor?

If we choose the typical jpg/monitor, then the RAW file IS HDR - and it is a monochrome HDR image even. You don't "make a HDR from it". It already IS. And your RAW converter and the built-in camera software (when storing jpgs on the flashcard) turn this monochrome HDR image into low dynamic range (8bit per channel) through bayer interpolation and (linear and nonlinear dynamic range transformations known as) tonemapping (and other operations, e.g. neighbourhood operations also known as) sharpening, noise reduction, and highlight management. In good converter software, it lets you play around with which details to preserve, compared to the take-it-or-leave-it direct-to-jpeg-one-size-fits-all.

If you consider HDR to be "higher DR than the typical sensor" (which is how industry and researchers see HDR) then you also cannot turn a single RAW into a HDR image. you need the multiple exposures to see more dynamic range (saturation divided by noise floor), which you then combine into a floating point image - or perhaps at 16 bit image. which you cannot see on the monitor without the above mentioned transformations. However, since you have all the dynamic range in the image, you have more choices in the 16bit-2-8bit processing, where you squeeze and expand certain areas of the dynamic range.

If you want higher dynamic range you can also buy machine vision cameras with 100-120 DB (versus ~70 db) that has certain tricks to create 16bit images; multiple readouts, 2 sizes of pixel cells interleaved, one of the green pixels in the bayer pattern being twice as sensitive as the other, etc. They are very expensive though, and have no "photography" branding (features, lingo, only the most simple tonemapping - gain, wb and gamma). Pure dead honest raw imagery (which you then can tone-map as you please).

\$\endgroup\$
1
\$\begingroup\$

To get an HDR image from a single shot I recommend to use a camera that has a high dynamic range, so that you have room enough to extract all the information needed for the HDR techniques.

\$\endgroup\$
1
\$\begingroup\$

This is a very old question, however there are four things that I'd like to suggest that have surprisingly not been mentioned yet.

First of all, if you only have a single image, you are basically constrained to the maximum dynamic range your sensor can capture. However that dynamic range can be influenced by your ISO setting and it will typically be the highest at your base ISO and then reduce as you increase it, so if you already know you want maximum DR for a picture, pay attention to not only the exposure but also try to aim for a very low ISO: http://www.photonstophotos.net/Charts/DXOPDR.htm

Secondly, check if your camera has a setting like Sony's DRO. It will influence the exposure to achieve a maximum dynamic range and thus will also influence raw files.

Third, depending on the device you are using, it may be wise to just use its integrated HDR function. Especially android phones have "HDR+" and the likes which are extremely successful in creating artifical HDR images from a single picture with minimal effort.

The fourth hint is: just never shoot only a single picture. If your camera supports continuous bracketing and it's bright enough so you can use a low shutter speed and a low ISO, just always use that to capture 2-3 images always, even when handheld. Applications such as Photoshop are very effective at aligning and deghosting these pictures when stacking so that hand shake often poses no issue. A stabilized lens or sensor will help with that as well.

\$\endgroup\$
2
  • \$\begingroup\$ check if your camera has a setting like Sony's DRO. It will influence the exposure to achieve a maximum dynamic range and thus will also influence raw files. I'm not familiar with Sony's DRO. Are you sure that it will influence the RAW files (i.e., irreversibly modify the "RAW" content before being written to memory), or just that the information/settings are stored in the RAW file, and can be applied if using a Sony DRO-aware post-processing application. The distinction is subtle, but it's important to know if the choice to set DRO is permanent to the data. \$\endgroup\$
    – scottbb
    Commented Nov 18, 2017 at 17:10
  • 1
    \$\begingroup\$ I'm positive that it will influence the raw file before it's written, because it will change the way the exposure metering works (unless you are shooting raw + M exposure). Normally it will try to apply the metering setting as configured by the user, with DRO it will also give certain priority to maximizing dynamic range, but the inner workings are obscure. I have been able to somewhat test this with Sony A77, A7R and A7RII, the exposure sometimes is indeed different when comparing DRO vs normal on raw files. I know that other brands have similar options, but idk if they will also affect raws. \$\endgroup\$ Commented Nov 18, 2017 at 18:31
0
\$\begingroup\$

How can I get a good HDR image from a single RAW file?

You should use a camera with wide dynamic range. Here is a list.

Any camera from the upper part of the list will give you quite good material for tonal manipulation.

You should also try to expose as much as possible without blowing highlights.

P.S. Yes, those measurements are indeed reliable.

\$\endgroup\$
-1
\$\begingroup\$

I found a program called autoHDR (http://www.autohdr.co.uk/) which is freeware and does a good job even with JPEG images.

\$\endgroup\$
1
  • \$\begingroup\$ Can you please extend your answer, give some examples of usage \$\endgroup\$ Commented Mar 13, 2017 at 15:16

Your Answer

By clicking “Post Your Answer”, you agree to our terms of service and acknowledge you have read our privacy policy.

Not the answer you're looking for? Browse other questions tagged or ask your own question.