13
\$\begingroup\$

I've been trying to shoot some marble sculpture that are well lit on a studio wall. The photos are coming out well and perfectly useable.. but I'm striving for something better. My issue is with sharpness, I can't get everything perfectly sharp. Any tips on top of what I am doing:

  1. I'm using a tripod
  2. Canon 5d mark II with 24-105 as well as nifty fifty
  3. Aperture highest the lens offers
  4. ISO 400 or lower
  5. Image stabilisers off
  6. Long and short exposures 4 seconds - 1/500
  7. Focusing manually using liveCode zoomed in 10x
  8. 1.5 meters from the subject

I'm getting great shots.. but I want to capture all the fine details of the stone, the textures and veining etc.

I can sharpen and boost the contrast etc in post and get some pretty nice images.. but with the source images being a little off, you can never capture that perfect photo.

http://www.thisiscolossal.com/2014/03/airy-dresses-carved-from-marble-by-alasdair-thomson/

\$\endgroup\$
5
  • 3
    \$\begingroup\$ When you say 'aperture highest the lens offers' do you mean you're shooting wide open (ie a low f-number)? \$\endgroup\$ Commented Jul 17, 2014 at 14:19
  • \$\begingroup\$ @Benjamin: nice work! :-) \$\endgroup\$
    – TFuto
    Commented Jul 17, 2014 at 14:19
  • 1
    \$\begingroup\$ Use a perfect lens with a camera with infinite resolution. \$\endgroup\$
    – Michael C
    Commented Jul 17, 2014 at 23:02
  • 2
    \$\begingroup\$ adjustments to you list: try F 5.6-F8, and use mirror lockup, delayed shot (timed). since nothing is moving stick to iso 100. You are shooting raw right? Your images are kinda low contrast. increasing contrast also aids the perception of sharpness. \$\endgroup\$ Commented Jul 18, 2014 at 9:32
  • \$\begingroup\$ I'm noticing that the pieces do seem to have good sharpness in the colour image in the studio but lack contrast in the mono's (even those in the studio) which makes me wonder if the mono conversion process is killing quite a lot of contrast? What is your colour->mono process? \$\endgroup\$ Commented Jul 19, 2014 at 18:42

7 Answers 7

27
\$\begingroup\$

It sounds like you're doing almost everything right, but there's one detail that caught my attention: Aperture highest the lens offers. I'm assuming that this means that you are stopping the lens all the way down. You shouldn't do that, because the small aperture results in a less sharp image overall due to diffraction. See What is a "diffraction limit"? for more.

Take a look at How do you find out the "sweet spot" of a lens?, and experiment (two stops down from wide open is a general rule of thumb. With sculpture instead of a flat artwork, depth of field is of course an issue, but it appears that the works in question are relatively flat. (And when they aren't, having some distinguishable depth of field blur isn't necessarily a bad thing as you translate from one medium to another.)

You might also try techniques involving super-resolution — take multiple photographs and combine them.

I would also, just as an experiment, take a few shots with live view autofocus, and compare that to your manual-focus results. I don't think it will be better, but it'd be interesting to see.

And finally, you mention that they're well-lit, but it's never going to hurt to increase the light, if you can.

\$\endgroup\$
1
  • \$\begingroup\$ Good shout.. I would tend to shoot two stops up from most open when doing portrait / family shots. I didn't think to research the 'sweet spot' of my lenses. I'll give that and try and report back. Thanks for taking time to write back. \$\endgroup\$ Commented Jul 17, 2014 at 15:07
9
\$\begingroup\$

I agree with the comments about aperture, but also don't forget about mirror lockup and using a remote release (or the timer function) for the exposure.

\$\endgroup\$
7
\$\begingroup\$

Benjamin,

I want to encourage you to consider something different than pursuing only sharpness. That is continue with the different techniques already discussed, focus stacking, super resolution, etc. However, add to your tool belt two sets of other tools. I say this because of your statement "I'm getting great shots.. but I want to capture all the fine details of the stone, the textures and veining etc.", I want to encourage you to think about adding two new sets of approaches:

  1. Increasing micro-contrast, possibly micro-saturation and
  2. Lighting alternatives

In regard to micro contrast, I've had similar experiences with architechual images and originally I thought sharpness was the key, too. Eventually, after beating my head against a wall for a while, I learned that to make the details pop, I needed a way to bring out the micro-contrast of my low contrast scene.

It turns out that, there are a number of tools that work for this in Post Processing.

  • One way would be to use a high pass filter in Photoshop that's set for the details you want to bring out. Use it on a duplicate layer of the image, then set that layer to 'overlay'

  • Another example is leveraging your RAW converter, which may have settings for micro-contrast. I use DxO Pro's micro contrast setting sometimes.

  • I've used Contrast Master, a Photoshop plug-in, with good success because it provides some very granular control of the type of contrast.

  • I also frequently use a couple of Topaz Labs tools, 'Adjust' and 'Detail'. Both give some control in regard to selecting which details to adjust.

  • I've used Flaming Pear's tools, too - I've used Mr Contrast which is very flexible. Interestingly, I found their plug in, 'Organic Edges' bases its edge pattern on very subtle changes in contrast. Carefully applied, it can create a mask to help boost just those details.

Separate from post processing, is to consider different lighting techniques.

  • One that comes to mind is lighting from the side or top - called 'raking lighting' that helps reveal texture, cracks, etc. Think of a flashlight/torch laying on the floor illuminating all the Cheerios a toddler dropped.

  • Another technique that comes to mind is using a polarized filter AND a polarized light source. I haven't tried it on Marble, but I have on other materials and it's interesting what sort of details pop out. It may reveal some anisotropic variations of the marble. Note, those anisotropic variations are definitely there at a microscopic level, simply because of the variation of crystal alignment. However, it's possible there may be something at a macro level, too, due to some larger aspect of the marble - I can't say for sure, but it's an easy to experiment.

  • The third that comes to mind is using a different light source - for example UV or IR or polarized UV or IR may produce different optical responses - This may reveal inclusions (veins?) that fluoresce differently from the rest of the marble.

If these sculptures are in a museum, their conservation staff may have some of these light sources and/or be familiar with these techniques.

In the cases of alternative lighting, if you get successful results, I would use those results as layers on top of a regularly photographed layer in Photoshop. Which means multiple exposures from your tripod, just with different lighting conditions.

\$\endgroup\$
4
\$\begingroup\$

Use the delayed shutter release (or a remote) will reduce any shake from touching the camera (which can still affect a camera on a tripod) and the mirror lockup which moves the mirror out of the way early again reducing any vibrations caused by the internal mirror moving during the shot.

This may help along with the other advice about finding the sweet spot for your lens, for the 50mm http://www.dpreview.com/lensreviews/canon_50_1p4_c16/5 (f8 looks good). For most lenses just stay away from the extremes, both on aperture and on zoom lenses of the focal lengths as well.

I've added a custom setting to my 5DII with 2 second delay and mirror lockup specifically for tripod shots, just makes it easy to find when you need it.

\$\endgroup\$
3
  • \$\begingroup\$ Interesting.. can you tell me more about the custom setting? I normally use the 2 second timer when doing tripod shots.. but I've not used the mirror lockup setting? What does it do? \$\endgroup\$ Commented Jul 18, 2014 at 10:40
  • 2
    \$\begingroup\$ I'll need to check the manual for how I set it up, it's in the custom functions. What it does: When you look through the view finder you're looking down onto a mirror that sits in front of the shutter, when you take the picture the mirror flips up out of the way before the shutter opens, this can cause vibrations in the camera (although usually more noticeable in macro or telephoto shots). \$\endgroup\$
    – Tonkas
    Commented Jul 18, 2014 at 11:09
  • \$\begingroup\$ Ah, great.. that makes a lot of sense. I'll play about with the custom functions. Lets of things to try, very much looking forward to trying all this. PERFECT IMAGES HERE I COME! :) \$\endgroup\$ Commented Jul 18, 2014 at 11:43
3
\$\begingroup\$

About the digital processing part, you should avoid using the general purpose sharpening methods like unsharp mask, as these methods will only increase the local contrast — making details more visible but you won't get details back that have become invisible. It is better to use methods that are based on actually reversing the blurring due to imperfect focus, and for that you need to know the point spread function (so, in the part of the image that is not in focus, a single point will appear to be a small disk with some brightness profile, this is the so-called point spread function).

You can calculate the point spread function by zooming in to high contrast areas of the image. If you know that there is a sharp edge across which the brightness changes by some amount, you can easily calculate what the point spread function is that would yield the profile you see in the image.

A rough approximation is obtained by assuming that the point spread function is a uniform disk of radius R. If you zoom in to some sharp edge then the curvature will become very small in the magnified picture so you can assume that you have a straight line, on one side the brightness is v1 on the other side of the line it will be v2. The brightness a distance d from the line v(d) in the picture will be a smooth function due to the unsharpness that tends to v1 on one side and v2 on the other side. Near d = 0, the function g(d) = [v(d) - v1]/[2(v2 - v1)] behaves as follows:

g(d) = 1/4 - d/(pi R) + d^3/(6 pi R^3) +...

So, by making a linear fit of the function g(d) - 1/4 in terms of the x and y coordinates of the picture near the line, you will get a result of the form:

g(x,y) = A  + b x + c y

and then it follows that:

1/(pi R) = sqrt[b^2 + c^2]

So, the point spread function can be computed with some effort from the picture, if you are not too bad at math.

Then if you have computed the point spread function, then inverting the defocus blur is a piece of cake using algorithms such as Wiener deconvolution or Richardson–Lucy deconvolution. Such algorithms are usually included in image processing software, but you should run them by using the actual point spread function that applies to your image, not some standard Gaussian blur. E.g. this ImageJ plugin has various deconvolution algorithms that require you to specify the point spread function. And ImageJ can be obtained here.

I should add here that this should be done in a linear color space. So, you need to transform to linear RGB or to XYZ color space first, do the sharpening operation there and then transform back to sRGB.

\$\endgroup\$
2
\$\begingroup\$

I would use the 50mm, stop down the aperture to f/4 or 5.6, aim for iso 200 and under a second exposure. I would also underexpose by a stop or two. I would tweak the contrast and sharpness in post, but you could try doing a custom picture style by adjusting the picture style contrast and sharpness settings. If you have a flash maybe consider adding some side lighting to bring out the details....

\$\endgroup\$
8
  • 3
    \$\begingroup\$ I'm not sure what underexposing is going to do to help detail (if anything it's going to increase noise) unless you're getting problems with mirror slap at certain shutter speeds. \$\endgroup\$
    – Matt Grum
    Commented Jul 17, 2014 at 15:09
  • 3
    \$\begingroup\$ Likewise, why less than 1 second exposure and ISO200, can you provide any more details? \$\endgroup\$
    – Matt Grum
    Commented Jul 17, 2014 at 15:23
  • 1
    \$\begingroup\$ @user28116 Digital sensors are very linear with respect to incoming light vs. recorded value (unlike film) so provided you don't overexpose you'll capture the full range of details no matter where you place the exposure. Reducing the exposure, on the other hand, will absolutely increase noise in all circumstances. \$\endgroup\$
    – Matt Grum
    Commented Jul 18, 2014 at 12:14
  • 2
    \$\begingroup\$ @user28116 Firstly "don't overexpose" is shorthand for don't push the exposure so far you run into problems of clipping and nonlinearity (in any case avoiding nonlinearity in no way requires underexposure by 2 stops!). If you start with the camera's 18% metering reading and go down two stops from there you really are going to lose quality. Finally I will "ride" that answer until the laws of physics and mathematics change to render it incorrect :) \$\endgroup\$
    – Matt Grum
    Commented Jul 18, 2014 at 14:01
  • 1
    \$\begingroup\$ I said iso 200 because on my amateurish Rebel there is a noticeable difference between iso 200 and 400, so 95% of the time iso 200 seems like a sweet spot. I was thinking under a second exposure to cut down on noise. \$\endgroup\$ Commented Jul 18, 2014 at 19:47
2
\$\begingroup\$

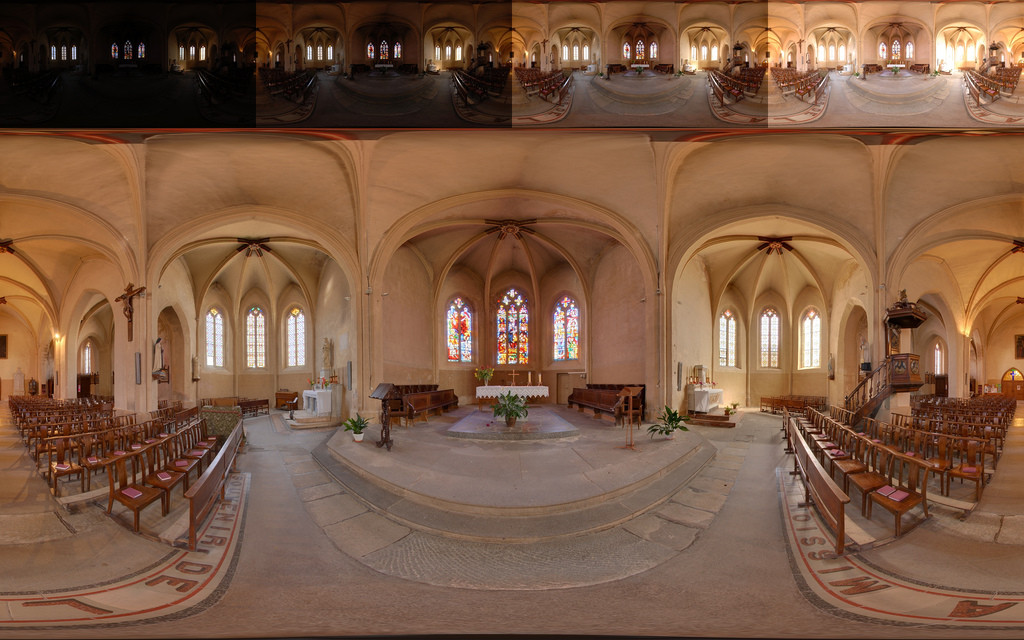
You could also consider trying using a wide aperture, (resulting in a narrow depth of field), and then focus stacking or several different exposures and exposure stacking possibly both - some software options can be found here.

While focus stacking is normally used for macro photography it is not restricted to such use and can be very rewarding and should allow the sort of detail capture that you are looking for.

Exposure stacked panorama made using hugin/enfuse free software. Enfuse Example

\$\endgroup\$

Your Answer

By clicking “Post Your Answer”, you agree to our terms of service and acknowledge you have read our privacy policy.

Not the answer you're looking for? Browse other questions tagged or ask your own question.