14
\$\begingroup\$

I've created a panormamic photograph from 4 separate shots using AutoStitch. The panorama came out fine, except that the left side of the image is brighter than the right side:

example pano

What's the best way to fix this using Photoshop CS4? Alternatively, is there a different stitching program I could use that would handle the brightness problem on its own?

\$\endgroup\$
5
  • 1
    \$\begingroup\$ Next time use AE-L or M mode to make sure your exposure stays the same between images. In case you have not done that, you should fix the focus (either manual or infinity/pan, depending on your camera) and white-balance (either using a preset or custom). If your camera has a Panorama mode it should do all this automatically. \$\endgroup\$
    – Itai
    Commented Nov 13, 2010 at 21:59
  • 1
    \$\begingroup\$ @Itai Locking the exposure is not a good idea in general as the exposure for your first frame won't necessarily be the right exposure for subsequent frames, especially if you go nearer or further from the sun. Any panorama tool worth its salt should be able to even out the exposures for you. \$\endgroup\$
    – Matt Grum
    Commented Nov 15, 2010 at 12:12
  • 1
    \$\begingroup\$ Have you tried Photoshop's inbuilt panorama stitching utility? I would give that a go before downloading anything else. It will even out the brightness for you... \$\endgroup\$
    – Matt Grum
    Commented Nov 15, 2010 at 12:14
  • 1
    \$\begingroup\$ @Matt - Sorry to disagree. You need to lock the exposure. Having software make decisions for you later is always a bad idea. Note that locking must be done at the desired exposure. Normally that means making sure those brightest area in a pano does not over-expose. \$\endgroup\$
    – Itai
    Commented Nov 15, 2010 at 15:54
  • 1
    \$\begingroup\$ @itai Disagreement is fine :) if you're using stitching software it's making hundreds of decisions for you. Evening out the brightness is a pretty non contravsial decision. Locking effectively limits the kind of panorama you can shoot, i.e. it stops you going close to the sun and retaining shadow detail. Not locking and/or setting the exposure yourself lets you extend the dynamic range of the capture. Ideally you'd bracket each image and do an HDR conversion but letting the exposure vary gets you close for no effort. \$\endgroup\$
    – Matt Grum
    Commented Nov 15, 2010 at 20:48

4 Answers 4

3
\$\begingroup\$

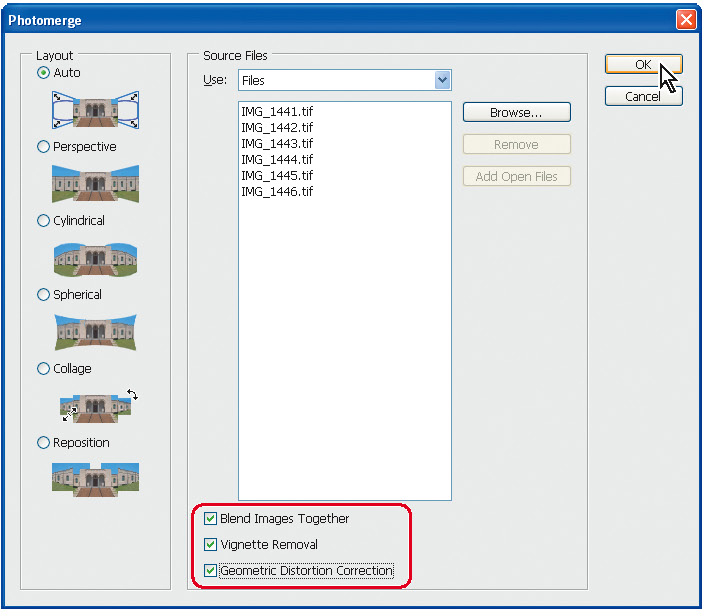
Photoshop CS4 has an inbuilt panorama stitching function. Go to File->Automate->Photomerge and follow the instructions - it's fairly easy to use. There is a check box labelled "[] Blend Images Together" which evens out the brightness and does a pretty good job with panoramas such as the one you posted in my experience.
Failing that, if you mask one half of the photo with a feathered selection you can usually even out the sky using a combination of the levels and hue/saturation/lightness tools (adjusting the brightness with levels tends to alter the saturation noticably, but that can be countered using hue and saturation). I wouldn't worry about this affecting the ground as slight changes of brightness are less apparent in areas with detail.

\$\endgroup\$
2
  • 2
    \$\begingroup\$ Downnvoted because...? The questioner already has CS4, and this will fix his problem \$\endgroup\$
    – Matt Grum
    Commented Nov 15, 2010 at 20:41
  • \$\begingroup\$ That worked perfectly! I've been using Photoshop for 15 years, and there are still so many features I've never encountered before. \$\endgroup\$
    – phenry
    Commented Nov 16, 2010 at 4:18
11
\$\begingroup\$

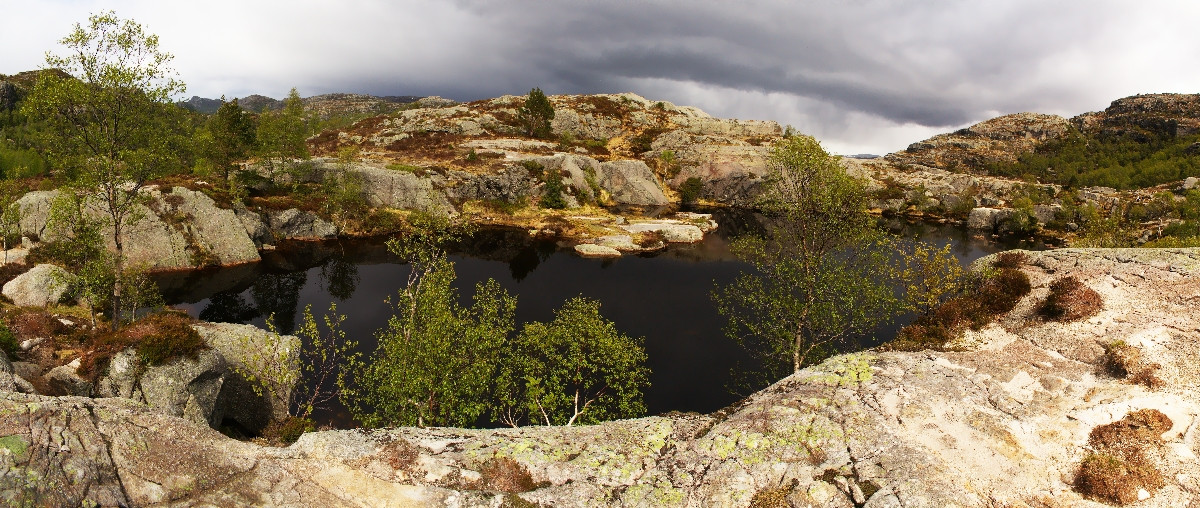
I used to use Hugin which is open source project. It is able to find correct exposure for most cases, even if You weren't exposing separate shots in the same way.

F.ex. here I have made some basic RAW->TIFF processing and put it into hugin: On the way to Preikestolen

\$\endgroup\$
1
  • 4
    \$\begingroup\$ Yes, I have found that Hugin does a good job of equalising exposure. \$\endgroup\$
    – labnut
    Commented Nov 14, 2010 at 7:52
2
\$\begingroup\$
  1. Luminance blending is much better done with the appropriate panorama stitching tools. They read exposure values from the picture's EXIF data and do corrections. The best ones even read lens data and correct vignetting at the corners. Either the software you have used is not one of those good tools or you have missed an option there (can't verify, I use a mac). Most panorama blending tools will end up with a perfectly evenly lit panorama with no such gradients.
  2. In case you have already end up with the image like this - you must use photoshop heavily to correct both luminance of the right part and then tune up the colors that would unevitably fall apart. Therefore see #1 and get back to better stitching.
\$\endgroup\$
1
  • \$\begingroup\$ The exposure adjustment is not (at least normally) based on the EXIF data. You normally use identical exposures for an entire panorama, but changes in brightness between one picture and the next can still be visible. Since you're aligning points in the photographs, the software can figure out that the same points should be the same brightness in both, and adjust accordingly. \$\endgroup\$ Commented Nov 15, 2010 at 16:07
-1
\$\begingroup\$

My suggested program is the fantastic PTGui Pro

\$\endgroup\$

Your Answer

By clicking “Post Your Answer”, you agree to our terms of service and acknowledge you have read our privacy policy.

Not the answer you're looking for? Browse other questions tagged or ask your own question.