2
\$\begingroup\$

I have a Plustek Opticfilm 8200i negative scanner that works well, but I believe its focus could be improved compared to my Opticfilm 8100, thus achieving a higher effective resolution. Since this is a fixed focus machine, I assume each unit is finely tuned during factory assembly. I suspect there might be an internal knob or screw for focus calibration, accessible once the casing is removed.

I am hesitant to void the warranty by opening the casing without confirmation. Does anyone know if such a focus adjustment mechanism exists, or can provide images or details of the scanner’s internals, particularly around the sensor area?

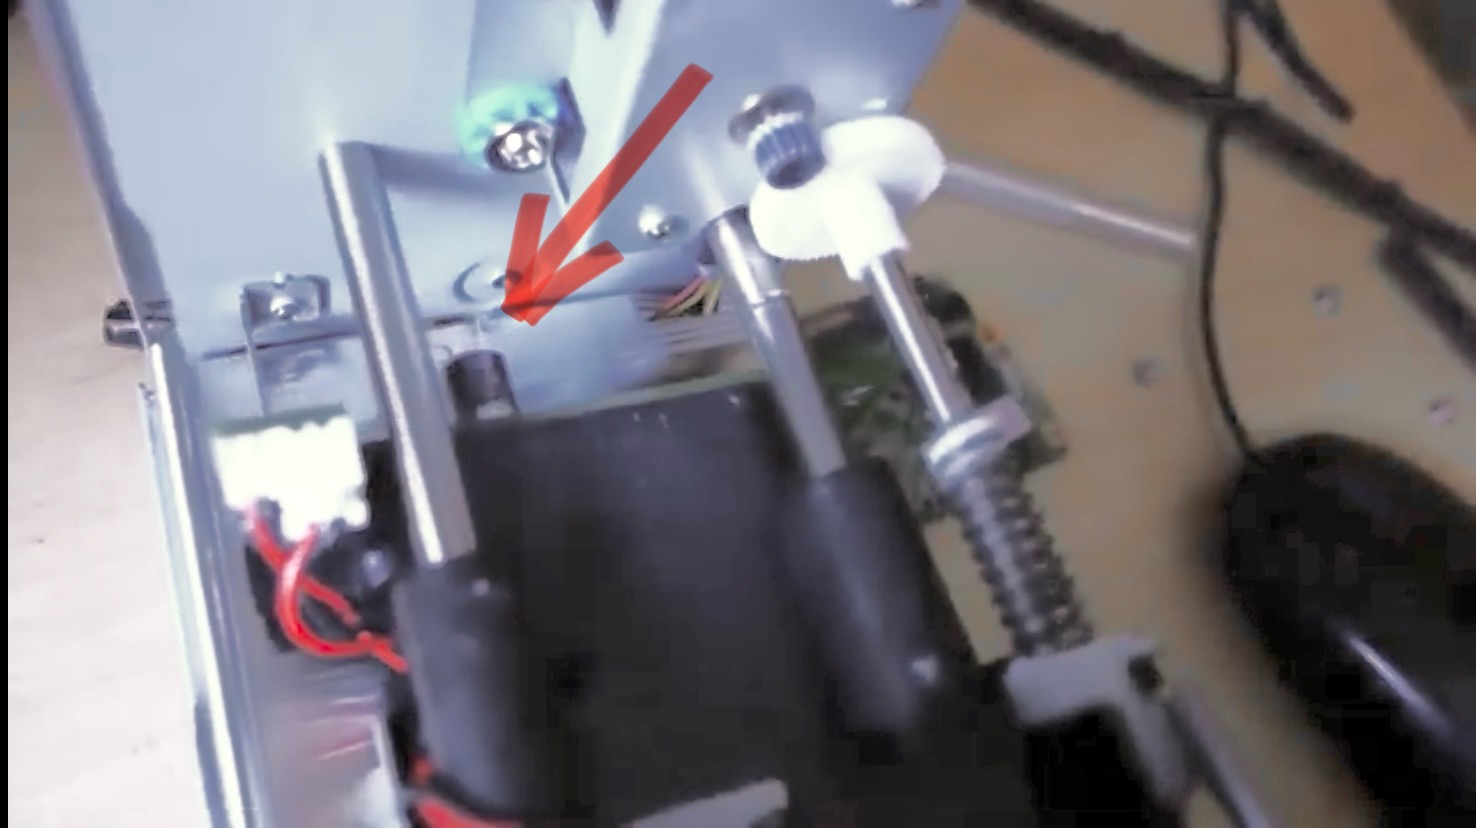
The only image I’ve found that might be relevant shows what seems to be a cylindrical knob near the sensor. Can anyone confirm this or provide a better picture?

Inside an Opticfilm model

\$\endgroup\$
1
  • \$\begingroup\$ Be sure emulsion-side is faced correctly. That throws off focus by thickness of film. \$\endgroup\$ Commented Aug 18 at 21:14

1 Answer 1

1
\$\begingroup\$

The Plustek scanners in the 7xxx and 8xxx range have a fixed focus. And that is true to my knowledge for all Plustek film scanners.

I'm unsure whether you can adjust the focus of a Plustek OpticFilm 7xxx/8xxx film scanner. When I looked inside my 7600i (different from you 8200i) I couldn'd find such knob at all. The only adjustment seems to be the orientation of the 45° mirror for which the screws have been covered with black sealant in factory to lock the adjustment in place.

Keep also in mind that the effective optical resolution of these scanners is closer to 2500-3200dpi than the maximum resolution mentioned in the product description (7200dpi).

To evaluate where the focal plane is, one could consider designing a 'wedged' negative holder containing a fine grid pattern. The place where the wedged pattern is sharpest indicates the focal plane.

Scanner disassembly instructions (at your own risk)

  1. To open your scanner, you have to remove 5 screws: one at the back (may be covered with a 'Warranty void when removed' sticker) and 2 at each side, hidden by the rubber bumpers. ⚠️ DO NOT attempt at removing the bumpers entirely from the top cover as you will end up tearing them right in the middle (leave the middle attached).
  2. Once those 5 screws have been removed, gently lift the top cover (in one piece) by taking care of the power button which protrudes a bit from the scanner chassis.
  3. You can move the sled with the scan unit by gently rotating the white cogwheel at the right close to the back of the scanner body. On your photo, it's the white cogwheel to the right of the red arrow).
  4. You can inspect the mirror and lens (but not the line sensor) by unscrewing the 2 screws that hold the LED light unit to the sled (closest to the back). ⚠️ Be careful with the power wires and with a coil spring holding the LED light unit to the scan tray (this coil spring probably compensates for having only 1 linear bearing installed with bushings, at least on my 7600i).
\$\endgroup\$
7
  • \$\begingroup\$ Can you add the following links to your answer concerning the wedged holder? photrio.com/forum/threads/… and strollswithmydog.com/the-slanted-edge-method and smallpond.ca/jim/misc/resolution/fft/index.html and smallpond.ca/jim/misc/v434b \$\endgroup\$
    – FarO
    Commented Oct 30 at 13:32
  • \$\begingroup\$ The references you mention are for a different, probably much more accurate approach than the one I suggested. In the naive approach I suggested, a film with a uniform grid pattern is positioned not parallel to the scanner but at a slight angle, in order to provide an indication of the focal plane by looking at the place where the grid pattern is at its sharpest. If this 'wedged film holder' is accurately made, you could even add graduations to the side to read the focal plane offset. \$\endgroup\$ Commented Oct 30 at 14:32
  • \$\begingroup\$ Another way of assessing the focus (or the position of the focal plane) is by using shims (e.g., post-it notes) to gradually raise the film in order to evaluate the height of the focal plane above the glass plate (flatbed scanner) or the film holder (film scanner). \$\endgroup\$ Commented Oct 30 at 14:34
  • \$\begingroup\$ @ShutterFreak I can assure you my 8100 achieves quite close to 7200 dpi, and most definitely well above 3600 dpi because I can see dust and tiny scratches that are mapped by one single pixel with only a tiny bit of leakage to the nearest neighbors. It seems then, it depends on how lucky you are with your particular machine, and with the 8200i I haven't been so lucky. I have managed to get the full resolution of it by means of a DIY cardboard holder that is quite unpractical. But, coming back to my question, when you disassembled your 7200i, what was really that "knob" you see in the post? \$\endgroup\$
    – Mephisto
    Commented Nov 4 at 12:28
  • \$\begingroup\$ @Mephisto There was no "knob" visible when disassembling the 7200i. \$\endgroup\$ Commented Nov 16 at 12:31

Your Answer

By clicking “Post Your Answer”, you agree to our terms of service and acknowledge you have read our privacy policy.

Not the answer you're looking for? Browse other questions tagged or ask your own question.