2
\$\begingroup\$

I have a Nikon D5600 with the Nikkor DX AF-P 70-300mm lens.

While taking practice shots of the sun to prepare for the April 8 2024 eclipse, I noticed that even while using a mylar solar filter, the sun is too bright. How do I lock the aperture at f/22, f/25, or any other very small setting, so I can focus properly?

Currently, I have to take an image then review it on the LCD to judge the focus. I understand I'll drain the battery a bit more to hold it in place, but that's a small price to pay. Can my gear do this?

\$\endgroup\$
4
  • \$\begingroup\$ I would think maybe you could do the focusing on a cloud.... that's sufficiently "infinity" that it should have reasonable results.... \$\endgroup\$
    – twalberg
    Commented Feb 28 at 19:57
  • 1
    \$\begingroup\$ @twalberg Not close enough for astronomical photography. Getting even the moon and the sun in equally sharp focus at the same focus setting (by focusing in between the two distances) means allowing both to be blurrier than if one or the other is optimally focused. \$\endgroup\$
    – Michael C
    Commented Feb 28 at 20:01
  • \$\begingroup\$ I'd caution you not to close down the aperture too much. At f/22-f/25 you're going to have significant blurriness from the effects of diffraction. \$\endgroup\$
    – Michael C
    Commented Feb 28 at 20:05
  • \$\begingroup\$ When I was preparing to shoot the 2017 eclipse, I focused on a mountain peak about ten miles away, and then used a strip of tape to hold the focus ring in place. \$\endgroup\$
    – Mark
    Commented Mar 7 at 4:46

5 Answers 5

3
\$\begingroup\$

You can't close the aperture to see the actual set value through the viewfinder. However, since you'll be shooting a nearly-static (slowly moving) sun, you can use Live View or Video mode to focus.

  1. Set the camera to manual mode
  2. Set the lens and body to manual focus
  3. Select your aperture, say, f/22.
  4. Enter either Live View, or start video recording. This will stop down the aperture, and show a live view on the display
  5. Assuming the sun isn't blown out (and of course, the presupposes your solar filter is on), set your focus. You can zoom in and shift the edge of the sun on your screen to help you nail focus.
  6. Tape the lens focus ring to the barrel to minimize focus shift if you accidentally brush against the lens later.

Note that if you change aperture setting during or after step 4., you'll need to leave Live View or video mode, and start over at step 3 again.

This is because once the D3x00 and D5x00 series bodies stop down the aperture, they can't mechanically open it back up until the shutter fires and the shutter curtain completes an entire cycle. Entering Live View or video mode stops down the aperture and opens the shutter curtain, but until the shutter curtain resets to trigger position, the aperture cannot mechanically open up. This is an inherited design from film SLRs. Before Live View and video, there was no need to allow the aperture to open during film plane exposure. It was originally a strictly mechanical interlinkage system, that Nikon continued to use in its bodies until mid- and higher-end DSLRs were designed with electronically-controlled aperture capability.

See Why is it not possible to change Aperture in Livewiev on a Nikon D5300 when using manual movie settings? for more.

\$\endgroup\$
2
\$\begingroup\$

According to this PCMag review, the D5600 does not have depth of field preview.

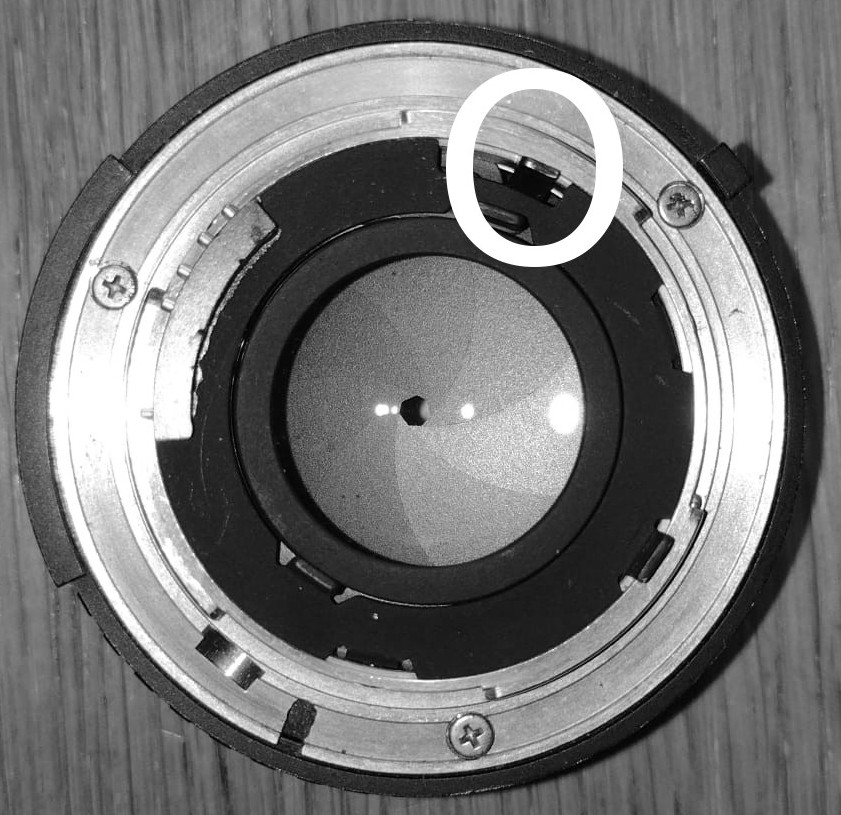
Even in manual mode, the aperture will be open right until you take the picture. It is held open by this lever:

Nikon F mount, Nikon Series E 50mm

The only way to close the aperture without help from the camera is to unlock the lens and rotate it slightly. Be careful though, it might fall off when you focus or move the camera!

Another way would be to use a non-Nikon lens and an adapter.

(Photo: Nikon Series E 50mm with Dandelion chip. Aperture control works still in the same way as with the old manual AI lenses.)

\$\endgroup\$
0
\$\begingroup\$

Yes, use the camera in manual mode. Then use zoomed in live view to set critical focus (focus on the sun spots).

You may need to disable manual movie settings to enable full manual control (slower SS's) for live view photography (shooting menu > movie settings > manual movie settings > off).

\$\endgroup\$
2
  • \$\begingroup\$ I'm familiar with neither Nikon cameras nor DSLRs in general, but in Manual mode, does the lens stop down before the actual moment of exposure? I would have expected not. I guess the OP wants the lens to stop down immediately, to reduce the amount of light entering through the lens into the viewing path...and I would guess that just whacking the camera into Manual mode is not going to have the desired effect here. \$\endgroup\$
    – osullic
    Commented Feb 28 at 10:11
  • \$\begingroup\$ @osullic, It will in live view; which is what I use for focusing on the sun... I guess I should have specified... \$\endgroup\$ Commented Feb 28 at 19:53
0
\$\begingroup\$

For this application -- makes no difference if the iris diaphragm is within or exterior to the lens elements. Remove the solar filter and cut a circular insert using aluminum foil, cut to fit inside the solar filter. Now using a sewing needle, make a pinhole in the center of this insert. Make a few trial exposures and adjust the size of the pinhole accordingly. This technique will work, give it a try.

\$\endgroup\$
2
  • \$\begingroup\$ "Remove the solar filter" NO, thats a bad idea \$\endgroup\$
    – Topcode
    Commented Mar 3 at 22:47
  • \$\begingroup\$ Sun filters are lens attachments that are affixed to the camera lens. I was trying to advise, detach the filter, apply opaque aluminum foil, cut to shape, to the lens side of the sun filter. With a sewing needle, make a pinhole aperture. Remount the filter with pinhole and make some test exposures. Enlarge the pinhole as needed. This is the technique I have been using for years (more than 70 years). \$\endgroup\$ Commented Mar 4 at 16:34
0
\$\begingroup\$

My experience taking pictures of the sun using a Baader solar filter film (not sure of the optical density since this was given to me):

  • Set camera to manual exposure.
  • Set ISO to 200 (you can use 100 if you wish). I used an ISO of 200 so I could get a faster shutter speed.
  • White balance: daylight
  • Use an aperture that will give you the best performance for your
    lens. For my 200-500 mm lens, I used f/8.0. On an APS-C sized sensor, don't shoot with an aperture smaller than f/13 or you will get a fuzzy image due to diffraction.
  • Choose a shutter speed that gives correct exposure. Use the camera's histogram function to set the exposure. I ended up using 1/640 seconds.
  • You can use auto-focus on the edge of the sun's disk. If you use manual focus, be sure to tape the focus ring in place after focusing.
  • If you use a zoom lens, tape the focal length ring in place so it won't change.
  • Set your tripod legs to the shortest length to minimize tripod vibration. I also brace the center column against the outer legs to dampen out vibrations faster.
  • Use a remote shutter release to reduce camera movement. If you don't have a remote shutter release, I would use Exposure Delay Mode (page 241 in your manual). This lets camera vibration, caused by you pressing the shutter release and mirror slap, die down.
  • Beware of heat waves. This will cause optical distortion. Shoot away from asphalt and concrete which are good sources of heat waves.

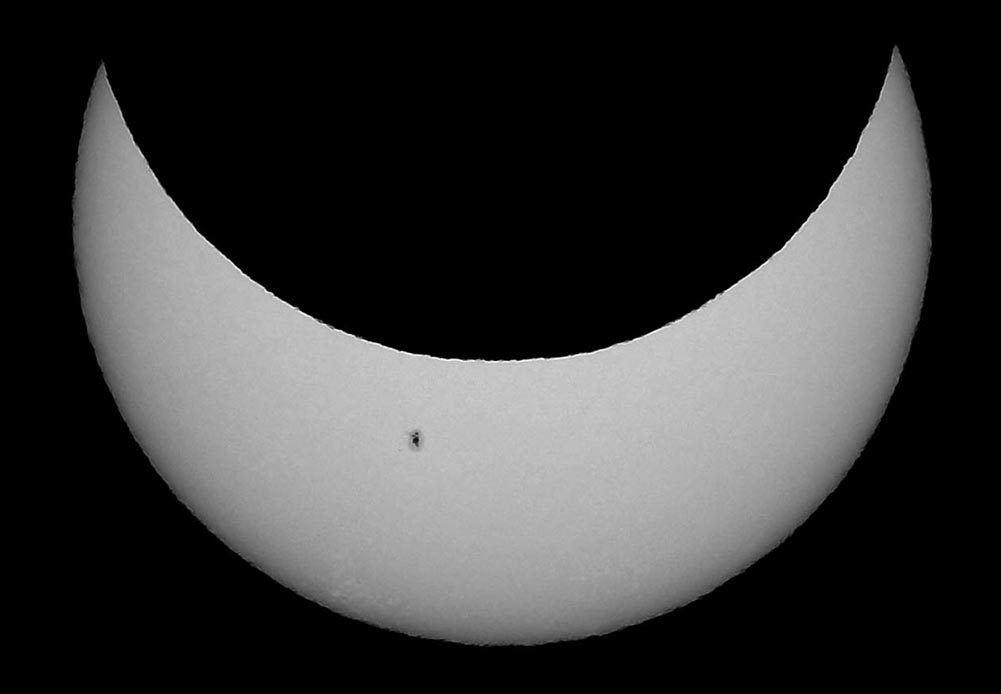
enter image description here 14 Oct 2023 solar eclipse. This shot was taken with an APS-C body, focal length 500mm, ISO = 200, aperture = f/8, shutter speed 1/640 seconds, solar filter film: Baader on a homemade fixture over the lens. Heat waves are evident along the periphery of the sun.

\$\endgroup\$

Your Answer

By clicking “Post Your Answer”, you agree to our terms of service and acknowledge you have read our privacy policy.

Not the answer you're looking for? Browse other questions tagged or ask your own question.