3
\$\begingroup\$

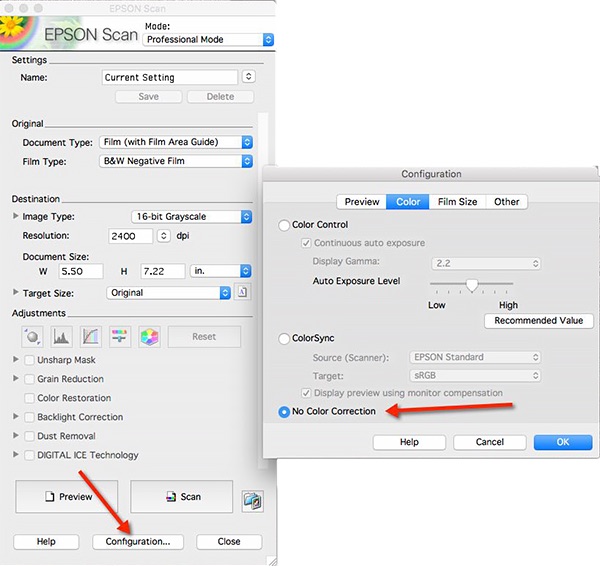
I am using Epson V600 as my scanner and with default Epson Scan app. What is the best setting to use for the app?

By "best" I mean, ideal for editing with Lightroom later.

enter image description here

For example, what's the good Image Type, Resolution? As well as, should I check the Unsharp Mask, Grain Reduction etc?

\$\endgroup\$
3
  • 1
    \$\begingroup\$ Can't give you a fully fledged answer now, but good starting points are scanning to a high bit TIFF file, without any sharpening or grain reduction done. You have no control over the latter to and are better off manually applying such settings in photo editing software such as Lightroom \$\endgroup\$
    – timvrhn
    Commented Aug 7, 2019 at 6:43
  • \$\begingroup\$ Best for what purpose? How do you plan to further process the results? The reason you have choices is because what is "best" depends on what you want to do with the results. \$\endgroup\$
    – Michael C
    Commented Aug 7, 2019 at 12:18
  • \$\begingroup\$ The best I mean for editing wit Lightroom \$\endgroup\$ Commented Aug 7, 2019 at 12:36

2 Answers 2

3
\$\begingroup\$

It sounds like you are new to scanning. Hope this helps.

1) With any high res scan, choose to save as Tiff in the maximum bit depth that your editing software will handle. Probably 32 or 48 bit. With black and white, 16 bit is sufficient.

2) You must decide what size scan you want to produce before you set your resolution and output size. I find that a high resolution setting (say 1200 dpi) works best if you keep the output size the same as the original. If you want to set the output size larger than the original (say 8x10) I find that a resoultion of 600 dpi works best. If you are making a 20x30 then 300 dpi works well. You must balance file size with your scanner's actual ability to scan high res. Most scanners don't scan at high res and enlarge well at the same time. Your setting is 5x7 output so I would use 900-1200 dpi. You can compare it to 2400. You may find that 2400 is not as sharp. Trust me on this.

3) Sharpening - Use unsharp mask. Don't oversharpen.

4) Digital Ice - Uncheck. Clean your neg with an Ilford antistatic cloth instead.
Dust removal - Uncheck. Grain reduction - Uncheck

5) If the neg is contrasty use the 16 bit black and white setting, but if the neg has a wide range of tones scan it in color mode. You will convert it to plain grayscale in your editor. Doing this gives you more detail and better tonality.

6) Adjustments - This is where you make it or break it. Your basic settings in Epson Twain are easy to use. Remember, you want to preserve your blacks and whites not just adjust for midtones. You will need to experiment because the scanner's ability to scan black is limited. The scanner will not give you deep blacks.

A suggestion: After you get comfortable with the basic twain interface consider upgrading to Silverfast for your scanner. Silverfast is better for negs and slides. It is also more complicated.

Things to remember: If you make a low contrast scan you won't have much to work with in lightroom. If you make a scan with too much contrast you will lose your shadows and highlights. Contrast is very important.

\$\endgroup\$
2
\$\begingroup\$

This is what I would start with. You'll likely have to tweak settings to fit your specific needs. The main setting to disable is Digital ICE. The silver in B&W film interferes with its function.

  • Original: Document Type and Film Type – These probably just set some reasonable defaults. What you've selected seems appropriate (Film, B&W Negative). Scan resolution is probably set implicitly by these settings, since there isn't anywhere else to configure it.

    Consider switching the film type to Color. The scanner sensor is color regardless, but when set to color you will get three copies of the image, one in each color channel. You can average them later to reduce noise.

  • Destination: Image Type, Resolution, Document Size, Target Size – These probably don't matter, since they are output image settings.

  • Adjustments:

    • Try to get the levels, curves, and color adjustments as close to perfect to maximize use of the available bit-depth in the final output. But do leave a bit of room in the histogram to make further adjustments later.

    • Unsharp Mask – Disable. You can do this later in a standard photo editor.

    • Grain Reduction - I would disable it. However, you might want to try it. If you like the results, you should go ahead and use it. It may use algorithms that are not normally available in standard photo editors.
    • Color Restoration – Disable for black and white. For color, test to see if you like the results.

    • Backlight Correction – Try it to see if you like the results.

    • Dust Removal – Try it to see if you like the results. Usually there is a trade-off in absolute image quality (sharpness) and effort you'll have to expend later removing dust.

    • Digital ICE Technology – Disable for Black and White. Enable for color. This setting uses an Infrared channel to detect and remove scratches and dust. The silver in B&W film interferes with this function.

  • Color Correction – None is probably fine. Consider making some test scans with it enabled. Even though you're working in black and white, it may apply some correction curves that could reduce effort later.

  • To save the file, I'd use 16-bit PNG. If that's not available, I'd use 16-bit TIF. File sizes will be quite large, but there aren't currently any viable 16-bit lossy image formats.

\$\endgroup\$
3
  • 1
    \$\begingroup\$ great answer. For LR editing, is PNG preferrable than TIFF? And how do you average the 3 color channels? \$\endgroup\$ Commented Aug 10, 2019 at 11:38
  • 1
    \$\begingroup\$ In most photo editors, there is a tool called channel mixer that you can use to control percentages from each channel to use when converting to grayscale. Standard conversion to gray is weighted toward containing more green. It's also possible to split channels into layers to use layer blending methods. Other averaging methods (median) can be done with ImageMagick, a command line tool. \$\endgroup\$
    – xiota
    Commented Aug 10, 2019 at 15:14
  • \$\begingroup\$ Scanning as color produces a large file that's about 3x what's necessary. I would go into an image editor to average the channels to reduce file size. PNG files tend to be a bit smaller, but slower to produce. There shouldn't be a difference as far as Lightroom is concerned. \$\endgroup\$
    – xiota
    Commented Aug 10, 2019 at 15:21

Your Answer

By clicking “Post Your Answer”, you agree to our terms of service and acknowledge you have read our privacy policy.

Not the answer you're looking for? Browse other questions tagged or ask your own question.