13
\$\begingroup\$

I've taken a picture with my Canon PowerShot SX210 IS and the following settings:

  • Aperture: F8 (Maximum I have)
  • Shutter speed: 1/400
  • ISO: 80
  • Focal length: 21.1 mm (118mm 35mm-e)

I did increase the contrast a bit through Gimp later on. What other camera settings and timings should I have considered to make this picture sharp?

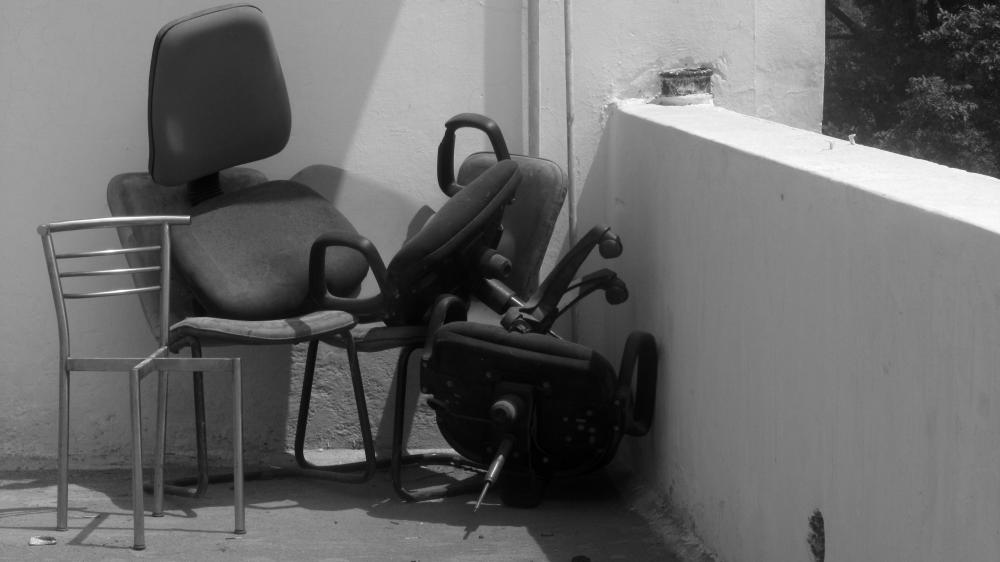
Please note: with this camera, I can't shoot in raw, and post-processing is the secondary concern for me. sample image

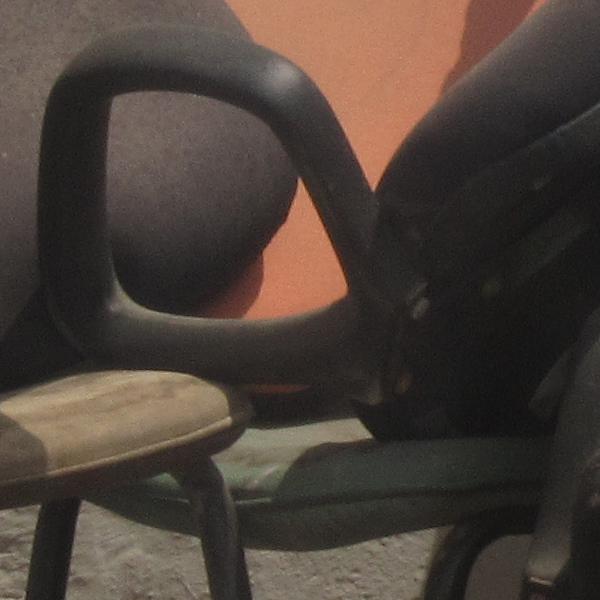
EDIT: I zoomed it to 100% and then cropped off 600x600.

And I didn't mention previously that I had used manual focus. And also, ALL the broken chairs together are the subject. enter image description here

\$\endgroup\$
5
  • \$\begingroup\$ Can you provide a section of the photo at 100% to show us how sharp the image is right now? \$\endgroup\$ Commented Aug 8, 2011 at 13:42
  • \$\begingroup\$ @Maynard What do you mean by 100%? \$\endgroup\$ Commented Aug 8, 2011 at 13:50
  • 1
    \$\begingroup\$ In your photo-editing software, zoom in to 100%, so that each pixel on the screen is a single pixel in the image. Then take a screenshot of a small section of the image (preferably the subject), showing how sharp it is. \$\endgroup\$ Commented Aug 8, 2011 at 13:53
  • 3
    \$\begingroup\$ Or just crop a 600×400 (or so — but no wider than 600) pixel section out of the middle of the image. No need to make a screenshot. 600 is the maximum width of images inline here, so it won't get scaled down further. \$\endgroup\$
    – mattdm
    Commented Aug 8, 2011 at 14:07
  • \$\begingroup\$ That image looks pretty sharp to me. \$\endgroup\$
    – dpollitt
    Commented Aug 9, 2011 at 2:45

10 Answers 10

20
\$\begingroup\$

f/8.0 is often the "sweet spot" for lenses on 35mm SLRs however on a small sensor camera like a Canon PowerShot that aperture is probably causing diffraction - there's a good reason the aperture doesn't go any smaller than that!

Light spreads out when passing through a small opening like the aperture on a camera and this results in loss of sharpness. The smaller the hole the more spreading you get, so there comes a point where stopping down a lens results in lower peak* sharpness. Due to compact lenses having (and requiring) shorter focal lengths, f/8 on a compact will result in a smaller opening than f/8 on an SLR, therefore you will get more diffraction.

*I said peak sharpness, as average sharpness can increase after the point where diffraction sets in due to increases in depth of field. However if you don't need the depth of field, try shooting at f/4 instead.

\$\endgroup\$
8
  • 2
    \$\begingroup\$ At f/8 on a compact, diffraction was my first thought as well. \$\endgroup\$
    – rfusca
    Commented Aug 8, 2011 at 16:32
  • \$\begingroup\$ Thanks Matt, Matt and @rfusca let me shoot this at f/4 and post the results here and what do you think shutter speed should be? \$\endgroup\$ Commented Aug 10, 2011 at 10:07
  • 1
    \$\begingroup\$ Well, I'd let your camera's meter determine it...but for the exact same scene it should be 1/1600... \$\endgroup\$
    – rfusca
    Commented Aug 10, 2011 at 15:43
  • 1
    \$\begingroup\$ @Anisha you shouldn't need to raise the ISO as opening up to f/4.0 lets in more light to counter the faster shutter speed. \$\endgroup\$
    – Matt Grum
    Commented Aug 10, 2011 at 16:23
  • 1
    \$\begingroup\$ @Anisha - it sounds like some exposure learning maybe should be in your future, check out this q - photo.stackexchange.com/questions/6598/… and the book Understanding Exposure is excellent \$\endgroup\$
    – rfusca
    Commented Aug 11, 2011 at 14:43
15
\$\begingroup\$

Sharpness is a result of eliminating various problems:

  1. Motion blur
  2. Focus blur
  3. Lens issues
  4. Camera issues

You can avoid motion blur by ensuring you use a tripod, set your camera to use mirror lock-up (if available) and using a remote trigger or timer. You also need to ensure your subject is still! Alternatively, use a flash to isolate any movement to a single instant.

You can avoid focus blur by using autofocus or by manually focussing. My camera allows me to zoom the image on the back screen of the camera to get really precise manual focus. You can also increase the depth of field to ensure more of the image is in focus.

You can avoid lens issues by using the sweet spot of your lens. This is generally in the middle of the aperture range, but you can test by taking a range of photos, one at each aperture setting provided by your camera, and then choosing the one that looks best. See this answer for more information and an example.

You can avoid camera issues by checking you are using the maximum available quality of image, by turning off noise reduction, and by checking any other settings that could affect sharpness.

Some lenses are sharper than others but you should be able to achieve good results if you use this technique.

\$\endgroup\$
2
  • \$\begingroup\$ You can also reduce motion blur by using faster shutter speed / more light. \$\endgroup\$
    – xpda
    Commented Aug 12, 2011 at 2:20
  • \$\begingroup\$ Also in-camera noise reduction \$\endgroup\$
    – Nzbuu
    Commented Aug 12, 2011 at 13:08
8
\$\begingroup\$

So, in contrast to the "let's look at it at 100%" response, which is perfectly natural, I'm going to encourage you to go the other direction — don't expect too much out of a $300 camera. If you look too closely hoping to see crisp detail, you'll be disappointed. You'll see fuzzy and noisy images, which are the norm for this camera and all similar cameras in its class even under idealized studio conditions. There's not much you can change in the settings — cameras like this generally don't offer much by way of control over JPEG processing, and some of it is just intrinsic to a small-format high-megapixel sensor. That doesn't mean it's a bad camera — it means that per-pixel sharpness is the wrong goal.

Instead, concentrate on results in your intended presentation medium. The unsatisfying artifacts you see while pixel-peeping won't be visible in 8×10" prints or at viewing size on a computer monitor. In fact, if you look at your scaled-down image as first posted, it does look pretty sharp. It might be worthwhile to experiment a little bit and find the limits to print and screen sizes where you're happy with the sharpness (applying unsharp mask in post-processing as appropriate to the output size), and then consider your camera as effectively producing output no bigger than that. Then, learn to work within that reasonable, real-world constraint — or, gear yourself up to spend some money on the next step up.

\$\endgroup\$
5
  • \$\begingroup\$ Indeed, encouraging pixel peeping on most P&S cameras will lead to disappointment. \$\endgroup\$
    – rfusca
    Commented Aug 8, 2011 at 18:57
  • \$\begingroup\$ Thanks, but the camera says that it is 14 mega pixel, I thought that would result in a crystal clear image? \$\endgroup\$ Commented Aug 10, 2011 at 10:09
  • 1
    \$\begingroup\$ @Anisha — more megapixels can increase detail, but won't necessarily give you a more crystal-clear image. I've made a new question on this: photo.stackexchange.com/questions/14773/… which hopefully will get some good responses. \$\endgroup\$
    – mattdm
    Commented Aug 10, 2011 at 14:29
  • 1
    \$\begingroup\$ @Anisha — The way I phrased that question led to rather technical answers, rather than a simple answer to "Shouldn't 14 megapixels result in a crystal-clear image?" Does what's there help, or would it be better asked in a different, more straightforward way? \$\endgroup\$
    – mattdm
    Commented Aug 10, 2011 at 22:29
  • \$\begingroup\$ Thanks for the concern Matt, just give me some time to read that thread fully and post here the new pictures, I'll pop in back soon. \$\endgroup\$ Commented Aug 12, 2011 at 4:11
4
\$\begingroup\$

I think than you cannot expect much from this sort of compact cameras. I tried many of them and I do not think, that you can crop to photos to 100% and still have it sharp.

See this image:

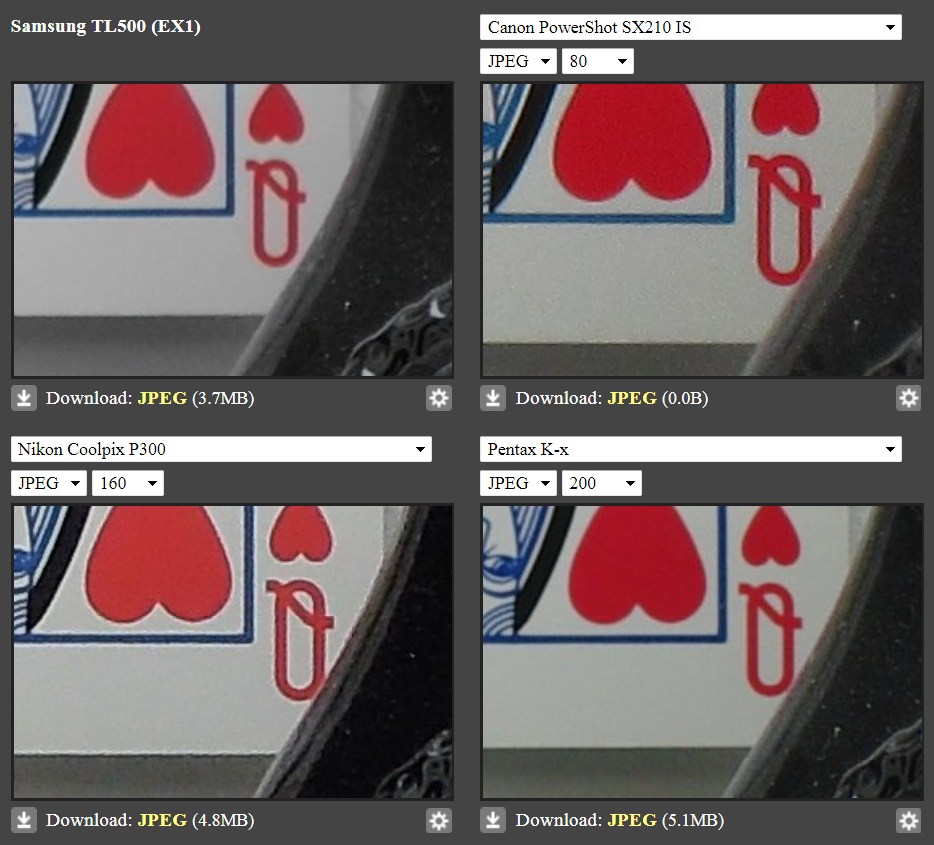
Dpreview screenshot

it is a screenshot of this comparison page on Dpreview.com - originally a Samsung EX-1 review, but can also be used this way.

There is an comparison image in some studio - I choosed some detail for this purpose. First camera - Samsung EX-1 is an expensive top compact camera, second is your Canon, third is another good compact camera - Nikon P300 with bright lens and CMOS chip and last one is my DSLR (entry level, but very good for me) - only chosen to show the difference. I tried to select almost the same and lowest ISO and you can also see the problem with noise.

So I think you have to buy a DSLR or just accept the fact, that you cannot have poster sized sharp photos from a cheap compact camera.

\$\endgroup\$
2
  • \$\begingroup\$ Thanks for the image, nikon coolpix seems sharpest among all :( \$\endgroup\$ Commented Aug 10, 2011 at 10:11
  • \$\begingroup\$ @Anisha: yes, but you can only directly compare it with the compact cameras which have very high DOF (as I know, this is caused by the small sensor) and is very hard to achieve bokeh on your photo. DSLR has much larger sensor and thus different parameters. Click other part of the image and you will see. :-) Nikon also uses different image processing etc. However, you are true that the pocket Nikon is really good - reason, why I am going to buy it as supplementary camera to my DSLR. \$\endgroup\$
    – Juhele
    Commented Aug 10, 2011 at 10:32
3
\$\begingroup\$

A primary consideration for what makes an image SHARP is your focal point. In your example photo, it is very difficult to assess sharpness because your subject is not readily apparent.

It is critical that your focus point when shooting is right over your intended focal point for the image. In portraits of people, this is most often the eyes, as that is where humans look first. If the eyes are not in focus, we often do not consider the image sharp, even though, say the hair is razor sharp. So Composition is critical to pre-determining sharpness. Following good practices in composition such as rule of thirds, golden rule etc, can be helpful to informing your audience the intended subject.

So, Photographer error/composition is quite frequently the issue with image sharpness. additional causes of lack of sharpness:

  • Backfocus
  • Frontfocus
  • Aperture

Often, lenses can be calibrated incorrectly, and tend to backfocus, meaning that even when the camera focus pt is on the object and indicates correct, the lens is actually focused on an object further back in the field of view. Front focus in the opposite. Many cameras have 'lens microadjustment' capabilities to correct this issue, or severe cases need to be sent to manufacturer for recalibration.

Finally, aperture can also cause an image to have lack of focus. When shooting with a large aperture (low f stop), your range of focus available can be extremely shallow. For example, a portrait may be taken of two subjects, one slightly behind the other. Proper focus on the front subject and wide aperture can cause the other subject to be very out of focus. Care must be taken in understanding the available depth of field under certain conditions so that this does not occur. (Google DOF Master).

\$\endgroup\$
1
  • \$\begingroup\$ The autofocus on the Canon PowerShot SX210 IS can't be microadjusted — and, since it's contrast-detect AF, it doesn't need to be. That part of this answer applies to dSLRs, not to the p&s camera in question. \$\endgroup\$
    – mattdm
    Commented Aug 8, 2011 at 18:51
3
\$\begingroup\$

I hate to tell you this but the point and shoot cameras are really not an ideal piece of equipment to take sharp photos. It is not the sharpness you are missing in this photo, but the detail. The strong noise reduction filter coupled with a strongly cooked photo in-camera post-processing gives you this sort of a plasticy washed out result. You need at least an entry level DSLR to get desirable amount of detail.

I hope I don't get buried for telling you this

\$\endgroup\$
3
  • \$\begingroup\$ what makes you think you'd get buried for your answer? \$\endgroup\$
    – rfusca
    Commented Aug 9, 2011 at 1:21
  • \$\begingroup\$ @rfusca The last statement in the above post is a pun. \$\endgroup\$ Commented Aug 9, 2011 at 1:24
  • \$\begingroup\$ @Anisha - It is...? I definitely don't understand the pun then... \$\endgroup\$
    – rfusca
    Commented Aug 9, 2011 at 1:27
2
\$\begingroup\$

Sorry for the silly question, but did you check that your lens is clean? I would say that the hazy transition between the white wall on the top right corner and the trees behind them is a bit too prominent. In your "100% zoom" sample the same hallo is also appreciable.

By the way, you also mentioned that you edited the photo with Gimp. The "100% zoom" has a lot of JPEG artifacts. Did they were there before editing the photo? (I assume you did shoot at maximum quality.)

\$\endgroup\$
2
  • 1
    \$\begingroup\$ imgur, the file hosting site used by Stack Exchange, heavily recompresses images, accounting for the JPEG artifacts in the sample. \$\endgroup\$
    – mattdm
    Commented Aug 12, 2011 at 1:44
  • \$\begingroup\$ My lens has some finger marks, do they effect too much? If yes, then how to get rid of them? \$\endgroup\$ Commented Aug 12, 2011 at 3:22
1
\$\begingroup\$

That image looks like it's had some heavy noise reduction applied, presumably in-camera. Unfortunately, there's probably nothing you can do about it.

\$\endgroup\$
1
\$\begingroup\$

If you are willing to make extra work, you can get more effective resolution by using panoramic composition, like this: http://www.flickr.com/photos/zds_/3014539488/

It's been shot with cheap point-and-shoot camera using 4*4 cells panoramic composition and shooting each cell at 9 different exposure times (exposure bracketing).

If you don't need the HDR, you can shoot just one frame per cell. Just remember to use tripod and manual settings, so that the exposure time, aperture and focus are identical from frame to frame.

A tutorial (written by me) explaining the steps in detail: http://zds.iki.fi/zds/projectlog/?page_id=200

Because you need around 55% overlap between cells to get well aligned panoramic composition, 4*4 cells gives you effective resolution of 250% on both X and Y axis compared to single shot.

Composed this way I can get enough resolution to print the image on A3+ size and the limiting factor on resolution is the printer, not the camera.

Also, as you are using Canon P&S camera, CHDK might be an option to you later on: http://chdk.wikia.com/wiki/SX210IS

It'd allow you to save in raw and do exposure bracketing up to 10 different exposures automatically.

In your 100% crop the main problems I see are noise and then JPEG artifacts resulting from the noise. Using a tripod so that you can use the lowest ISO available on your camera helps on that quite a lot. If you want more tools, you can shoot series of identical exposures from tripod and then combine them with software like Anti-Lamenessing Engine ALE. It takes bunch of exposures from same spot and then combines them, reducing per-exposure noise dramatically, if you just give it enough exposures to work with.

For example with my Samsung NX200 system camera I am able to match or beat ISO 1600 image quality by shooting 8 shots at ISO6400 and then combining them with ALE. This in turn means a single one second burst gives me ability to shoot in four times darker situations and still get a usable result.
\$\endgroup\$
-2
\$\begingroup\$

Are you sure you just haven't caught the manufacturer lying about megapixels? There's no way a cheap point-and-shoot camera's CCD is actually sampling 600x600 in that small region of the image. It's probably just upscaled from an actual resolution of less than half what it was advertised as having.

\$\endgroup\$
10
  • \$\begingroup\$ Thats a pretty bold claim. \$\endgroup\$
    – rfusca
    Commented Aug 9, 2011 at 1:29
  • \$\begingroup\$ And easily testable with some trivial frequency-domain analysis. It's well known and documented that manufacturers inflate the megapixels by counting what's effectively (modulo non-rectangular grid arrangement) a 1280x960 CCD as 3.6 megapixel (red, green, and blue! that makes 3 pixels, right? :) then upscaling to a resolution that gives the 3.6 million full pixels. \$\endgroup\$ Commented Aug 9, 2011 at 1:41
  • \$\begingroup\$ Due to the way the CCD grid works and the oversampling of green, there's a good argument that some such overrepresentation should occur in a rectangular-pixel-grid output, but it's unclear how much, and certainly not as much as manufacturers do. I'm looking for a link to a good blog article I had on it, but can't find it at the moment... \$\endgroup\$ Commented Aug 9, 2011 at 1:44
  • \$\begingroup\$ @R.. All manufacturers, from Hasselblad to Foveon to manufacturers of compacts, state the megapixel count as the number of photodiodes, even if each one is only sensitive to red, green, or blue. If there are 3.6 million photodiodes, then it's a 3.6 megapixel sensor, although some interpolation takes place to produce a colour image. It's not as bigger swindle as it seems given the colour channels are often highly correlated. \$\endgroup\$
    – Matt Grum
    Commented Aug 12, 2011 at 13:53
  • \$\begingroup\$ The "swindle" here is making the "X megapixel" setting on the camera save an image with a total of X million RGB triplets, which is severely "upscaled". It's a swindle in terms of storage space and confusing users and making them think they're getting more than they're actually getting. Of course for cheap cameras there's also the additional swindle that the optical quality is so poor that the individual sample points aren't remotely independent... \$\endgroup\$ Commented Aug 12, 2011 at 14:23

Your Answer

By clicking “Post Your Answer”, you agree to our terms of service and acknowledge you have read our privacy policy.

Not the answer you're looking for? Browse other questions tagged or ask your own question.