10
\$\begingroup\$

I'm a recent Lightroom convert, and I've come to appreciate its built-in workflow for library management and developing. I'm still stymied by printing, however, because I want to use an online lab for printing photos. The most obvious starting point is Lightroom's Print Module; however, that module seems geared exclusively for use with an attached local printer (as of LR3), which does me no good whatsoever.

The stuff I'm specifically interested in includes:

  • Use of ICC profiles.
  • Cropping to size. I'm somewhat familiar w/ the use of aspect in the Crop tool in the Develop module -- is there a better / easier way? I'd also like to be able to handle "add x inches" for canvas prints.
  • Resizing (up and/or down). What are the best practices here?
  • Final sharpening and/or any other "before you print" steps.

Searching online yielded a handful of interesting links, though none of these really cover all of my needs:

To be clear, I'm not looking for an Adorama-only solution -- they're just an example. I'd like to understand whether LR is really suitable for this part of my workflow, though, and if so, what should those last steps cover?

\$\endgroup\$
2
  • 1
    \$\begingroup\$ If you're going to do this, make sure your monitor is decent, or you'll be disappointed comparing your display's output to what you get from the printer. Anything that's an IPS display should do you fine. \$\endgroup\$ Commented Jun 20, 2011 at 17:05
  • \$\begingroup\$ Thanks, everyone, for some great answers. Will comment below re: accepted answer and bounty awarded. \$\endgroup\$
    – D. Lambert
    Commented Jul 5, 2011 at 12:22

4 Answers 4

4
\$\begingroup\$

I can't address the full scope of your question, but I can tell you that most labs don't want to know anything about your profiles The point of a profile is to generate a wonky set of differentials that allow imperfect physical displays and print outputs to display an adequate representation of the "true" image values in your image file. If your system is properly profiled, then the data in the file will be the ideal data, and the profile(s) are only used to let you see a best-case approximation of the ideal on your output device. So, if your equipment is properly profiled, the lab doesn't need any additional data beyond the file -- their own equipment will be profiled to render that file properly according to their own equipment's rendering quirks. And you shouldn't need to apply their profile for them (in most cases). The only thing you might have to worry about in colour terms is whether the lab prefers sRGB or Adobe for your application (and sRGB is not only standard but preferred for photographic/chemical printer/processors). Your lab will let you know what they want.

Much the same thing goes for sizing -- they (or their equipment) will know the optimum resolution for the substrate and printing technique, so any image size that's "adequate" will do (you wouldn't want to submit a VGA-sized image for a 30" x 40" print). Don't get hung up on PPI concerns at your end; that's the lab's job. You can certainly downsize an image to save upload time/bit count or upscale an image that's way too small for the desired print size (mostly to satisfy yourself that jaggies and other artifacts won't be introduced), but within reason you can trust the lab to do at least as good a job as you can (often invisibly in the printer system's RIP). Much the same can be said for pre-print sharpening; it's often done automatically for the output device in the RIP process.

The only time you'd want to get directly involved is when dealing with the canvas wrap issue, and I'm not familiar enough with Lightroom to tell you if or how you might be able to add a wrap border. It may be necessary to output to Photoshop.

\$\endgroup\$
2
  • \$\begingroup\$ So, if that's true, it's all about getting the crop ratio right? Like, maybe I'm making this more difficult than it needs to be? \$\endgroup\$
    – D. Lambert
    Commented Jun 21, 2011 at 12:34
  • \$\begingroup\$ Depends on the lab, of course (some printers want you to do all of the work, but they're mostly outside of the photocentric world), but that's been my experience for the most part. As long as your own house is in order, your file will be "pure" as far as they're concerned and they're better equipped to make the adjustments they require than you are. As I said, it mostly happens during the RIP process and it's all automated. \$\endgroup\$
    – user2719
    Commented Jun 21, 2011 at 20:35
2
\$\begingroup\$

Your questions are all valid, and really only are going to be answered by a professional lab. The studios I deal with require you to have a tax id here in the United States, so they require you to be a "professional". For example I typically use WHCC and they specifically give details around basically every one of your questions in the help/F.A.Q. documentation they provide. I could provide it here, but it is going to be specific for each printer that you choose so what I use is really not relevant.

You pointed out some details for Adorama, which is a good example of some of the details they have.

Lightroom in general should be able to achieve most if not all of the requirements of the high end studios. Any gaps the printer could probably even fill for you. I rarely use Photoshop because of a requirement from the printer, but it can be nice for soft proofing some fine art photography images if you are into that type of thing.

Re sizing up or down is a question you had, I've dealt with printers that will tell you to re size down, but let them do the upscale. I've also dealt with ones that told you do never do either. It really depends on the printer you choose.

Overall, you shouldn't have any problems using Lightroom to send images to a lab for processing, but if you want to get really detailed or perfect results, you might find more features in Photoshop for one off jobs.

\$\endgroup\$
2
+50
\$\begingroup\$

In Lightroom, you can use the Print module, but you need to Print to File with your Color Management ICC profile.

So, for Adorama, download the chosen ICC Profile for the paper you plan to have them print on, then put it in the profiles directory. (on Mac, this is ~/Library/ColorSync/Profiles).

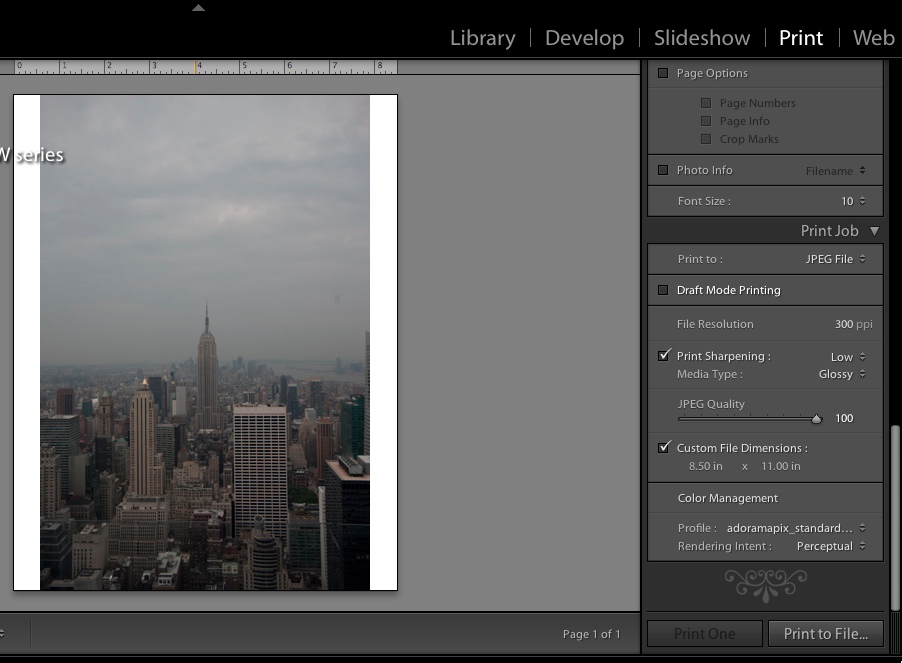
Then, open the print module with your selected images. Go down to the "Print Job" section:

  1. Choose 'JPEG File' in the "Print to" option
  2. Use "Custom File Dimensions" to set the print canvas size. I do not know how to set bleed as you asked, though most labs provide guidance on image size for special print items like canvas.
  3. Under "Color Management", in the "Profile" option, choose 'Other'. This will launch to the items in the profiles directory, where you can choose the vendor/paper profiles you have downloaded. Here, choose the appropriate Adorama profile.
  4. Click 'Print to File' button, and LR will create the JPEG file with your ICC Profile embedded.

For "Rendering Intent", you probably want 'Perceptual' which will render the color as described. The downside is that if you have lots of colors out of gamut, the printer will chose something it thinks is close. Unfortunately, since Lightroom doesn't offer soft-proof, there is really no way to check this first. Best bet is to try them both and see which print you prefer.

There are also options for Print Sharpening, but, as with Rendering Intent, I think you need to try a few options until you learn how your print house and their printers render under different options. Otherwise, I would choose Standard as a place to start.

Here is a screen shot that shows what is above:

LR print screenshot

\$\endgroup\$
1
  • 1
    \$\begingroup\$ Bounty awarded. There were some other really great answers here, but this was the one that made me say, "ah-ha!". I hadn't noticed the option to print to a JPG vs. a printing device, so that was really the key that made the Print module make sense for me. Thanks for the help! \$\endgroup\$
    – D. Lambert
    Commented Jul 5, 2011 at 12:25
1
\$\begingroup\$

I'll start out by saying, I'm not sure you will get the quality of results from Lightroom that you will from Photoshop. I say that primarily because Photoshop allows you to manipulate pixels and things like adding margin are so easily done using PS and so cumbersome using the margins in Lightroom's Print Module.

Photoshop's soft proof also gives you a pretty good idea what your print will look like if your monitor is calibrated and if your lab's profiles are good.

Finally, with respect to sizing, it does matter. Sizing and sharpening go hand in hand and the perceived sharpness of an image relates to the image resolution, its printed size, and how much artifact you apply to sharpen it. There's a reason every Photoshop tutorial says to sharpen as the last step in your workflow, and then only at the print size: That's the only way you can be sure you are sharpening the right thing. Over the years I've found most people undersharpen. That's because an image that looks right on a monitor will be displayed less precisely on reflective media because of diffraction. The result is the perception of less sharpness. Rather than use some arbitrary "sharpen until its way over the top" metric, I rely on the Nik Sharpener Pro plugin. But again, you can only sharpen when the actual size has been determined.

I too felt that I could probably get 99% of what I wanted to do accomplished in Lightroom, and I did. Revisiting those images, I now see that I bypassed some 2-3 minute adjustments in Photoshop just to keep the workflow contained completely in Lightroom. I would recommend selecting the best tool for the job and using that; in this case, I think it's Photoshop.

\$\endgroup\$
2
  • \$\begingroup\$ +1 - I've certainly seen this sentiment expressed elsewhere, and I believe it may be valid to some extent. If I'm feeling ambitious, I might ask about "Lightroom vs. Photoshop for print finishing" as another question (or experiment on my own) to understand what you're talking about a bit better. \$\endgroup\$
    – D. Lambert
    Commented Jul 5, 2011 at 12:31
  • \$\begingroup\$ I don't mean to promote someone's product, but Nik (niksoftware.com) seem to have figured out sharpening and a number of other aspects of image processing extremely well. Many pros use these plugins and they work with Lightroom as well as Photoshop. Their Sharpener Pro really does seem to figure out the right amount of sharpening for a designated output medium, so I'll make a "recommend" (if that's ok here), and suggest you look into getting a demo version. \$\endgroup\$
    – Steve Ross
    Commented Jul 5, 2011 at 15:53

Your Answer

By clicking “Post Your Answer”, you agree to our terms of service and acknowledge you have read our privacy policy.

Not the answer you're looking for? Browse other questions tagged or ask your own question.