13
\$\begingroup\$

I want to photograph my oil paintings to keep as a record and if possible, to print from. I want to know if its best to use a slide film. I want to use my Pentax ME Super 35mm SLR Film Camera.

I am looking to buy a new lens for the job so wondered which would be a good one to opt for.

My work is 30" x 30" or 39" x 39" or 10" x 12"

I am just a photography beginner but have been thrown in at the deep end with a high learning curve as I need to photograph my work soon.

I haven't had great results (resolution) with my digital SLR mainly because of my lack of experience and knowledge and the camera is just a basic model.

I am aiming for the best image quality and highest resolution so thought that slide film would be good? Any advice for a novice would be great. Thanks.

\$\endgroup\$
4
  • 1
    \$\begingroup\$ possible duplicate of What are the best practices for taking pictures of a canvas? \$\endgroup\$
    – mattdm
    Commented Oct 12, 2012 at 16:15
  • \$\begingroup\$ I marked an older question along the same lines (we have several), but the part about film makes this special. Maybe edit to emphasize that? \$\endgroup\$
    – mattdm
    Commented Oct 12, 2012 at 16:21
  • \$\begingroup\$ The Pentax 50mm f1.7 you mention in a comment below is an outstanding lens, by the way, and you won't find better without spending a ton of money, especially if you can stop down to f/8 or so. \$\endgroup\$
    – mattdm
    Commented Oct 14, 2012 at 5:04
  • 1
    \$\begingroup\$ I agree with the possible duplicate, but I'm not voting to close as this question is much better written than the previous one. I also agree the film angle makes it a slightly different question. \$\endgroup\$ Commented Oct 15, 2012 at 8:29

3 Answers 3

7
\$\begingroup\$

You camera isn't holding you back. I would think that slide film would be even harder for you to use since the time it takes to get feedback on your results will be measured, mostly likely, in days, not seconds.

I've photographed my gallery owner's (Katherine Baltivik) works for her to have printed so quality was of utmost importance. Here's what one looked like:
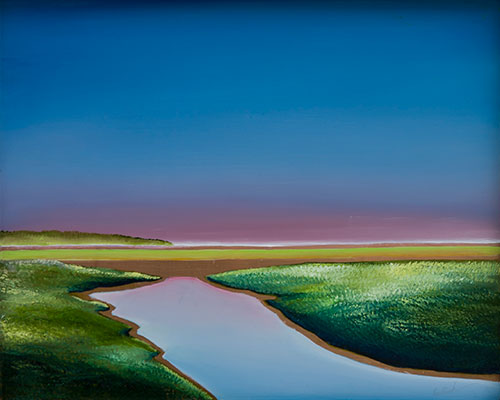
enter image description here

You'll need the following things:

  • A good source of light that does not have glare. She has a west facing exterior wall on the gallery with a nice nail in for hanging pieces. If I shoot in the morning the sun does not directly shine on the piece.
  • A tripod. Yes, this way you can set up the framing and then not worry about it. You can also shoot long exposures without worrying about shake.
  • A DSLR where you can manually focus with a decent lens. If you don't have a lens that manually focuses, don't worry about it, just let it auto focus.

Position the camera as perpendicular to the artwork. Turn off auto-focus and then do whatever your camera needs to manually focus. For any modern Canon you'll go into live view mode then press the + button once. Now you are looking at 5x mag and you can get a coarse focus. Then press the button again to get 10x mag and do your final focus. On a Canon you can move the "joystick" around to move the focus box so you can position on a spot with good detail.

Then take the shot. Use RAW mode if you are comfortable with RAW processing. (And you should learn it, I use Adobe Lightroom and I'm stunned at how awesome it is. You can download a 30 day free trial.)

Why RAW? This lets you have great control over the sharpness of the image. With JPG you only get what the camera is set to give you. (There are other reasons to use RAW but they probably don't apply here.)

Now bring the image into Photoshop and do a perspective correction. Drag the 4 corners to the 4 corners of your artwork. This corrects for any errors that crept in because the artwork wasn't vertical or when the camera wasn't perpindicular.

Save the image and you're done!

\$\endgroup\$
5
  • 1
    \$\begingroup\$ Can you elaborate on "If you don't have a lens, don't worry about it"? How is that gonna work? :) \$\endgroup\$
    – mattdm
    Commented Oct 12, 2012 at 16:16
  • \$\begingroup\$ oops! Will fix... \$\endgroup\$ Commented Oct 12, 2012 at 16:34
  • \$\begingroup\$ Ahhh that makes more sense. :) \$\endgroup\$
    – mattdm
    Commented Oct 12, 2012 at 16:56
  • \$\begingroup\$ Hi thanks for the replies.mattdm I have a pentax M 1:1.7 prime 50mm lens I will try to use both DSLR and the pentax to see how i get on with both. got a tripod and can photograph outside luckily as i prefer daylight (not enough knowledge to set up lights). great pic paul \$\endgroup\$
    – user12010
    Commented Oct 12, 2012 at 17:22
  • \$\begingroup\$ Thanks! I only put a low-res version up but you can see individual brush strokes in he high res one. \$\endgroup\$ Commented Oct 12, 2012 at 18:46
4
\$\begingroup\$

While @Paul Cezanne has pretty much covered what you need to do, I'll add a few notes:

  • Photographing the paintings outdoors has its own challenges: Movement due to breeze, and harsh shadows of brush-strokes, which will show up under close examination and create a false pattern. If you must, you can partly address both these concerns by fashioning a "soft light tent" of sorts, using thin white bed-sheets, completely encapsulating your easel, camera and yourself.
  • Use an aperture about midway in the range your lens allows. At widest aperture, any lens shows up the most distortion, and also depth of field gets very narrow so any warp of the painting, or the slightest lack of perpendicularity to the camera's focal plane will cause out of focus areas. At narrow apertures diffraction effects of the lens iris kick in, and you will lose some sharpness.
  • Use a plumb line (or a string with a small heavy object tied at one end) to try and suspend each painting perfectly vertical, both the plane of the image, and the edges. Though a tilt can be corrected in post-processing, that would inherently cause a marginal loss of detail.
  • Use the slowest available, fine grain film (pentax) or lowest ISO setting (dSLR), for minimizing grain / noise. There used to be special ultra-low-grain and even so-called "grainless" film for exactly this kind of use, but it probably isn't available any more.
  • While setting up initially, first set your tripod up close to the painting, then try and position your camera on it so that the center of the lens is almost precisely at the center of the painting - Two strings tied diagonally corner to corner of the painting would help locate the center. Then move the tripod back to shooting distance.
  • Your shooting distance should be at least twice the length of the diagonal of the paintings. Absolute minimum human viewing distance is recommended as the diagonal of any image, but that's too close for photography - sphericality related distortions would creep in, and also either your corners or center would be out of focus. If you can move even further away and use a longer lens, you might get better results - within reason. Long telephotos bring their own design and detail problems.
  • Try to frame the picture dead center of your viewfinder frame, and leave a bit of breathing room all around that you can crop later. Not too much, or you're sacrificing the detailing capability of your lens / medium.
  • If you are shooting film, keep in mind the color cast of daylight - though post-processing cures most ills these days.
  • Do not shoot during the early or late parts of the day, as the ambient light changes rapidly then.

If the paintings are of varied sizes, some of these steps will need to be re-done, so try and shoot all images of a given size in one lot.

I hope this helps.

\$\endgroup\$
2
\$\begingroup\$

Your camera is fine. Slide film will do fine as it kick out more dynamics for you. Use a low ISO (50-100). If you don't have good lighting go to a ISO 200. Higher ISO than that will start to give you noticeable grains.

The biggest "enemy" so-to-speak photographing oil/acrylic paintings, is reflection. I recommend you therefor to use a polarize filter on your lens if you have one. With this you can get rid of some of the reflections. A pro setup typically uses polarize filters on the lights as well.

Two lights is a must, setup from the sides at about 45 degrees angle as a start. If you get severe reflections experiment with different angles.

For lens, use one that matches the eye for this size f.ex. 50mm lens for 35mm film. If you don't have use one close or between 50-70mm (70mm works also better for the biggest paintings). If you have a fixed lens it will give you a little sharper picture and usually more light to work with.

\$\endgroup\$

Your Answer

By clicking “Post Your Answer”, you agree to our terms of service and acknowledge you have read our privacy policy.

Not the answer you're looking for? Browse other questions tagged or ask your own question.