37
\$\begingroup\$

I have a dSLR and I often find myself taking pictures of people in 'mixed lighting' environments (e.g. tungsten lighting and daylight, fluorescent and tungsten, or even the ‘nightmare lighting scenario’ of mixed fluorescent, tungsten and daylight). Since white balancing won't work (or at least it won't work completely) to remove the color cast from these sorts of mixed environments, what can I do to manage the multiple types of lighting in my environment?


Asked by Finer Recliner:

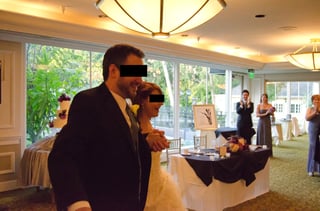
I was at a wedding recently, and the reception hall had these huge windows that let a lot of sunlight through. The overhead lamps used inside the reception hall had a strong yellow tint to them. Given the two different types of light sources, "white" seems to have a vastly different definition in different parts of the photo. I found that a lot of my photos were near impossible to correct the white balance in post production (I shot in RAW).

Here is an example from the set I shot at the wedding:

mixed lighting at wedding

If I set the white balance relative to something outdoors, everything inside looks too yellow (as seen). If I set the white balance relative to something indoors, everything that falls in the sunlight looks too blue. Neither looks particularly "good".

So, does anyone have tips for how to handle this sort of situation next time I take a shot? I'll also accept answers that offer post-processing advice.

// As an aside, I'm just an photography hobbyist...not a professional wedding photographer ;)

\$\endgroup\$

5 Answers 5

43
\$\begingroup\$

It is important to understand that different types of lighting will produce different ‘color casts’ to the light in a photograph. While the eye is great at correcting for color ‘on-the-fly,’ our cameras aren’t very good at the task of adjusting in mixed environments at all. This can result in severely yellow/orange pictures, or sickly green ones, depending on the lighting present at the location. Generally the approaches to correcting for mixed-environment lighting depend on how much control you will have over the environment. The solution isn't to do all of these things, but to know about each of them such that you can do one (or more) depending on the situations you encounter.


Complete control

(These solutions assume complete ability to control the ‘non-studio’ environment where the pictures will be taken. Because of the nature of completely controlling a location, to some extent it also assumes a large(ish) budget, and a good amount of time to engineer the environment.)

  • Turn off the ‘contrasting’ light source(s) - The first thing to look for is whether you can turn off one (or more) of the competing light sources. In terms of ‘easy solutions’ this is always what I look at first because if I am able to remove ‘offending’ light sources with the flip of a switch, I can often bring the color cast back to ‘normal’ (or close to normal anyway). On occasion I have even found myself turning off lamps and gaffers taping or clamping my own flashes inside of the lamp to provide the illumination of the subject from an ‘correct’ direction (such as when the lamp is in the frame so having it on would be expected).
  • Overpower the ambient lighting - If you aren’t in a position to turn off the contrasting light sources, the ‘next best thing’ might be to simply overpower the offending light with your own light sources. This works best if you’re able to throw enough light to completely light the scene yourself (e.g. if you only have enough power to light the subject OR the background, but not the subject AND the background) this will be tough to pull-off. I’ve included this one because I know photographers who do the kinds of shoots where they have the time to engineer solutions like this. For those of us who work more ‘on-the-fly,’ or are hobbyists, it probably isn’t practical to completely engineer the lighting in this manner.
  • Gel everything - This is the ‘Hollywood’ solution for using practical locations and if you look at many ‘behind the scenes’ extras on DVDs you can often see combinations of gels being used everywhere… CTO gels on all the tungsten, CTG on the fluorescent, ND or CTB gels on all the windows, etc. While it often isn’t practical to gel everything, doing so will essentially ensure a proper color balance. I’ve included this one in the interest of completeness, but for ‘most of us’ this will be an impractical option short of working on a large-scale paid shoot (where this sort of thing is done all the time)…

Partial control

(These solutions can often work in situations where complete control of the environment is not possible, but you do have some time to plan your photography at least a bit ahead of time or prepare the environment)

  • Gel something - If I’m in an environment that contains 3 different types of lighting I may not have the time, materials, or wherewithal to gel everything… But if given the choice I’ll often choose to gel something. Generally speaking the thing that I try to gel is the fluorescents if possible because a picture with an orange color cast is easier to manage and looks more ‘correct’ to the eye. A picture with a heavy green color cast on the other hand… That only looks good if you’re in the Matrix.
  • Control the angles - This will be situation dependent, but sometimes it’s possible to eliminate ‘offending’ light sources simply by not shooting in the direction of the light source. For example, I recently shot a wedding reception in a gym with lots of ugly fluorescent lighting up above, as well as one wall of the gym being all windows. The solution ended up being to balance for the fluorescents and simply not shooting anything with my camera pointing towards the windows (though admittedly not shooting towards the big bay windows was also because it was a daytime wedding and the daylight would have blown out all my pictures).
  • White balance for the main subject(s) - If ‘all else fails’ and you have no other options available, at least white balance for the subject. This will (more or less) get the color cast right for the skin tones, which are the most important element of most pictures. The rest of the colors in the photo may be off, but for some photos this will be forgivable, and in others you have a few options still available to you in post.

No control

(Though these can been solutions that are arrived at ahead of time, since they are post production solutions they can also be used ‘last ditch’ efforts, where either no color control was taken during the shoot, or the attempts at color control were not successful.)

  • Convert to B&W - If you weren’t able to do anything to control the mixed lighting and/or the lighting came out in an unattractive way despite attempts to control it, one answer may be to simply make the picture black and white in order to remove all color cast.
  • De-saturate in post - This is especially effective in situations where tungsten lighting has made pictures too orange. Often it can be an easy fix to simply ‘desaturate to taste’ and add a bit of blue (to tone down the pinks that invariably result from the desaturation).
  • Mask the area(s) with improper color cast and rebalance them - Time consuming, but certainly an option if you have pictures that you need to keep, but the color cast is wrong. It is possible to come up with something relatively good looking by correcting the photograph for skin tones, and then using masks to further correct any areas where the remaining color is off.

\$\endgroup\$
7
  • 6
    \$\begingroup\$ Oh, how fondly I remember using magenta filters on lenses, deep green filters on flashes, oddly-coloured tungsten replacement bulbs and taping large sheets of sickly, acid-green Rosco film over the windows... \$\endgroup\$
    – user2719
    Commented Feb 11, 2011 at 12:22
  • 16
    \$\begingroup\$ One thing I forgot -- I always used to keep a CD "coaster" (a bad burn -- they used to be the rule, not the exception -- or one of the twelve AOL disks I used to get every day) as a sort of poor man's spectroscope. Looking at the rainbow on the disk (caused by diffraction) I could see at a glance whether there was any chance of correcting the existing lighting -- some metal vapour lights are just impossible because they only emit a very few strong spectral lines, and you can see that right away. It saves a lot of time testing. \$\endgroup\$
    – user2719
    Commented Feb 11, 2011 at 19:40
  • 1
    \$\begingroup\$ @Stan: That is a great reminder! One of my mentors used to do the same thing, but I'd forgotten all about it. Nice! Gotta love those sodium vapor lights... :-/ \$\endgroup\$ Commented Feb 11, 2011 at 19:46
  • \$\begingroup\$ One comment on the "mask the area(s)" portion: one way to do this is with multiple raw conversions, stacked a la HDR, but varying whit-balance instead of exposure. In Photoshop, using Smart Objects (File->Place...) to open up an extra copy (or two) of your RAW file is a handy way to go (and you are shooting in RAW, right? Especially important for stuff like this.) \$\endgroup\$
    – lindes
    Commented Feb 18, 2011 at 21:55
  • \$\begingroup\$ @lindes: Good thought. Yep, I shoot RAW... \$\endgroup\$ Commented Feb 20, 2011 at 7:47
5
\$\begingroup\$

The one thing I always try to do is to note one thing in the main subject, or at least in the same light combination as the main subject, that is a "neutral" grey to almost white* according to my eye. It might be something small, like a button on a blouse or an iPod headphone cable. Then when I get home and have the image up in light room, I use the eyedropper to set the initial white balance from that. If that's not true to what my mind remembers, I'll adjust it from there, but usually it's just a matter of dialing down the shift amount (bring it closer to the middle) some, as this seems to result in too much shift on a regular basis.

As Jay Lance says, our eyes are really good at balancing out those color shifts, far better than our cameras, so no matter what you're going to get more pronounced differences in your images when there is mixed lighting. I've found that instead of desaturation, turning down the "vibrance" or "clarity" adjustments in LR can help filter out some of that and bring the image closer to what "the eye saw".

*I say "almost white" because if it is truely white it's risky that it will get blown out on one channel and the white balance adjustment will go totally wonky when I try to use it. At least that's been my experience.

\$\endgroup\$
7
  • 2
    \$\begingroup\$ @cabbey: Thanks for your answer. I'm curious... is this also your procedure when you're taking pictures in environments that have lights with different color balances? What happens (for example) if you've set a balance (whether in post or on location) for tungsten equivalent lighting, but there's ALSO florescent and/or daylight (or a flash) in the mix? Do you just 'live with' any strange color shifts that result from these sorts of complex lighting arrangements? \$\endgroup\$ Commented Feb 11, 2011 at 9:32
  • \$\begingroup\$ On this, I like to drag along a small grey card that I can toss in when the color balance start to look wonky. \$\endgroup\$
    – Pharaun
    Commented Feb 11, 2011 at 16:10
  • \$\begingroup\$ @pharaun, yeah, I carry a small black/grey/white focus target for the same purpose. I was mostly talking about "shots of opportunity" as that seems to be what the OP was asking about, not shots where you have a chance to pre-set with a target. \$\endgroup\$
    – cabbey
    Commented Feb 11, 2011 at 17:00
  • \$\begingroup\$ @cabbey, fair enough, I do have that problem too, but if I'm able to have a few second to a minute I can usually get the card out and quickly snap a shot, and then shoot the photo I wanted and fuzz with it latter :) \$\endgroup\$
    – Pharaun
    Commented Feb 11, 2011 at 17:13
  • \$\begingroup\$ @Jay Lance I'm a bit confused by your question... seems like the situation you asked about there, and the OP (just realized that was you too) asked about are the same thing. So uhm, yeah, this is also the procedure I use in that case since both are the same. Generally speaking, I try to avoid these cases personally, but if you're doing street photography, or other uncontrolled shooting that's hard. To be honest, I'm fine with different lights casting different colors, but that's because I spent several years working in theatre with stage lights and a wide selection of Rosco, Lee and Gam gell. \$\endgroup\$
    – cabbey
    Commented Feb 11, 2011 at 17:20
5
\$\begingroup\$

This is to add to Jay's very informative answer :

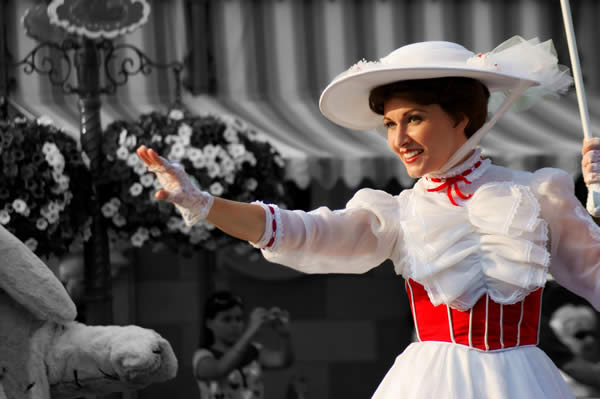
  • Convert to a partially coloured photo. You know, those B&W photo with ONLY the bride and groom in full colour. If you have decided for this type of post processing at the time of shooting, then it all becomes rather easy to just make sure ONE major light source is shinning on the bride and groom. You also have the easy option to overpower other lights with your flash.

Example (from google image search) :

enter image description here

This can sometimes produce some visually striking images. I also see this techniques used in many wedding photography studio's showcase photobook.

  • If you shoot RAW, its easy to adjust WB afterwards. Say you have two light sources, daylight and tungsten. You can output two JPEG of the same photo with two different WB settings. Then you can overlap them in Photoshop and selectively erase the area where the WB is wrong. You can also set a feather edge, and cross fade the areas where the change of colour temperature is gradual. Time consuming but it is a solution. Slightly decreasing the saturation should help, too.
\$\endgroup\$
1
  • \$\begingroup\$ Selective color is so late 2000's! Ugh. \$\endgroup\$
    – Michael C
    Commented Nov 25, 2021 at 23:18
0
\$\begingroup\$

In Lightroom, in the Develop module, at the bottom of the panel, there is a Camera Calibrations panel. Of the four options, the last is the blues slider; to correct the orange casts when you have competing window and electric light scenarios, slide the top blue slider to the right to about 20 and the lower blue slider to the left to about 40 - or values that eliminate or reduce the orange cast.

You may also want to slide the lower green/yellow slider left to reduce the yellow-green cast that may result, and you may also slide the lower orange/red slider left a bit as well.

If you have a series of images from the same event with this particular orange cast problem, you can create a pre-set: once you have a "recipe" you like, in the left hand panel in Presets, click the + sign to create this preset. Give it a name and located it in User Presets.

\$\endgroup\$
1
  • \$\begingroup\$ Can you explain what to do in the case of mixed lighting environment? What you are talking about here is pretty much color balance, which is not the question asked. \$\endgroup\$
    – Olivier
    Commented Feb 19, 2017 at 8:42
-6
\$\begingroup\$

I keep a setting of manual neutral (5000K) white balance for questionable lighting. This records what the camera "sees" without modifying the color. Then it's easy to adjust the white balance in the raw images. I realize this may not be conventional, but it works just fine.

\$\endgroup\$
6
  • 2
    \$\begingroup\$ It also doesn't really answer the question at all. Your solution won't work (at least without some of the color being off in a not-pleasant way) if you're shooting in a mixed-lighting environment. \$\endgroup\$ Commented Feb 18, 2011 at 20:13
  • \$\begingroup\$ I disagree. This way the camera saves everything that hits the sensor, and you can accomplish with software what is difficult in the photo setting (if you don't have a white or gray paper for white balance setting.) \$\endgroup\$
    – xpda
    Commented Feb 19, 2011 at 4:09
  • 2
    \$\begingroup\$ This might be useful to someone who's shooting JPEG. If you're shooting raw, the white balance is simply an EXIF attribute, so you get the same raw information either way. \$\endgroup\$
    – Evan Krall
    Commented Feb 19, 2011 at 7:09
  • \$\begingroup\$ You're right! I never realized that -- I just tried it. \$\endgroup\$
    – xpda
    Commented Feb 20, 2011 at 6:36
  • \$\begingroup\$ @Evan @xpda Can you explain what is _manual neutral (5000K) white balance _, as it is said that this might be helpful for jpeg, I would like to know. \$\endgroup\$ Commented Jun 21, 2011 at 16:30

Your Answer

By clicking “Post Your Answer”, you agree to our terms of service and acknowledge you have read our privacy policy.

Not the answer you're looking for? Browse other questions tagged or ask your own question.