Setting a lower color temperature (as in: less Kelvin) results in a blue picture, while setting a higher temperature enhances the amber-tones. Setting a negative tint will make the picture greenish, while a positive set tint will create a magenta-looking picture.
I can offer two examples to prove that: a look at Lightroom's White Balance sliders and a screencapture of a hands-on experiment.
Lightroom's sliders - as an example for almost all RAW editors I know of - show the estimated impact of their movement:
Take the Temp-slider to the left and it will get blueish, take the Tint-slider to the right and it will become magenta-ish, etc.p.p.. Note that the yellow tint is not that accurate: it actually should be coloured in amber.
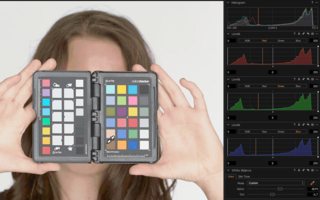
For visualisation of the effect, I made a screencapture while adjusting bith sliders in Capture One. Although the colours are quite blocky, thisthe GIF visualizes what's what.
The screencapture was taken from Capture One - itsOne's Kelvin-slider works the same way as Lightroom's Temp, and Tint...well, it is the same as in Lightroom. I also included an RGB histogram - and the levels for each channel.
TheFor everyone interested: The picture you see was taken in a studio with Hensel flashes (and softboxes), a white backdrop, and my 5D Mk III - the colorchecker was just lying around there, so why not use it? In this case, it even created some additional privacy for the model. ;-)
Click the image to see the full-version of GIF animation (13.2MB) or alternatively, link to the MP4 version
As you can see, setting a lower color temperature (as in: less Kelvin) results in a blue picture, while setting a higher temperature enhances the amber-tones. Setting a negative tint will make the picture greenish, while a positive set tint will create a magenta-looking picture.
Also note that Lightroom's sliders show the estimated impact of slider movements:
Take the Temp-slider to the left and it will get blueish, etc.p.p.


